RUBBER BAND RECIPES


CLASSIC CHRISTMAS PUDDING RECIPE | BBC GOOD FOOD
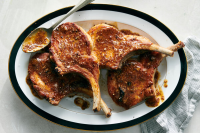
A homemade Christmas pudding is easy to make, then it just needs time in the steamer to turn it into a glorious, rich, fruity dessert. A festive classic
Provided by Orlando Murrin
Categories Dessert, Dinner
Total Time 8 hours
Prep Time 20 minutes
Cook Time 8 hours
Yield Makes two 1.2 litre puds (each serves 8)
Number Of Ingredients 16
Steps:
- Get everything for the pudding prepared. Chop the almonds coarsely. Peel, core and chop the cooking apples. Sharpen your knife and chop the candied peel. (You can chop the almonds and apples in a food processor, but the peel must be done by hand.) Grate three quarters of the nutmeg (sounds a lot but it's correct).
- Mix the almonds, apples, candied peel, nutmeg, raisins, flour, breadcrumbs, light muscovado sugar, eggs and 2 tbsp brandy or cognac in a large bowl.
- Holding the butter in its wrapper, grate a quarter of it into the bowl, then stir everything together. Repeat until all the butter is grated, then stir for 3-4 mins – the mixture is ready when it subsides slightly after each stir. Ask the family to stir too, and get everyone to make a wish.
- Generously butter two 1.2 litre bowls and put a circle of baking parchment in the bottom of each. Pack in the pudding mixture. Cover with a double layer of baking parchment, pleating it to allow for expansion, then tie with string (keep the paper in place with a rubber band while tying). Trim off any excess paper.
- Now stand each bowl on a large sheet of foil and bring the edges up over the top, then put another sheet of foil over the top and bring it down underneath to make a double package (this makes the puddings watertight). Tie with more string, and make a handle for easy lifting in and out of the pan. Watch our video to see how to tie up a pudding correctly.
- Boil or oven steam the puddings for 8 hrs, topping up with water as necessary. Remove from the pans and leave to cool overnight. When cold, discard the messy wrappings and re-wrap in new baking parchment, foil and string. Store in a cool, dry place until Christmas.
- To make the brandy butter, cream the butter with the orange zest and icing sugar. Gradually beat in the brandy or cognac and chopped stem ginger. Put in a small bowl, fork the top attractively and put in the fridge to set. The butter will keep for a week in the fridge, or it can be frozen for up to six weeks.
- On Christmas Day, boil or oven steam for 1 hr. Unwrap and turn out. To flame, warm 3-4 tbsp brandy in a small pan, pour it over the pudding and set light to it.
Nutrition Facts : Calories 550 calories, FatContent 25 grams fat, SaturatedFatContent 6 grams saturated fat, CarbohydrateContent 77 grams carbohydrates, SugarContent 16 grams sugar, FiberContent 2 grams fiber, ProteinContent 5 grams protein, SodiumContent 0.92 milligram of sodium
GIADA'S CARBONARA RECIPE | GIADA DE LAURENTIIS | FOOD NET…
Provided by Giada De Laurentiis
Categories main-dish
Total Time 20 minutes
Prep Time 5 minutes
Cook Time 15 minutes
Yield 4 to 6 servings
Number Of Ingredients 19
Steps:
- Bring a large pot of salted water to a boil over high heat. Add the asparagus and cook for 3 minutes. Transfer the asparagus to a bowl of ice water and let sit until cool, about 5 minutes. Remove from the water, remove the rubber band, and cut into 1-inch pieces.
- Meanwhile, add the pasta to the large pot of salted water used to cook the asparagus and cook until tender but still firm to the bite, stirring occasionally, about 8 to 10 minutes. Drain pasta into a large bowl. Add the Basil Aioli, cut asparagus, shaved cheese, salt, and pepper. Stir to combine and place on a long, rectangular serving dish.
- Place the butter in a medium skillet over medium-high heat. Add the eggs and sprinkle with salt and pepper. Fry the eggs to your liking. Place the eggs on top of the pasta and serve immediately.
- Combine the garlic, egg yolks, mustard, lemon juice, basil, salt, pepper, and cayenne in a food processor and run the machine to mix. With the machine running slowly drizzle in the vegetable and olive oil. Basil Aioli can be kept, covered, in the refrigerator for up to 3 days.
More about "rubber band recipes"
SOURDOUGH 101 - THE PIONEER WOMAN – RECIPES, COUNTRY ...
I first got into cooking with sourdough because I knew it was one of the healthiest ways to prepare grains.
From thepioneerwoman.com
Total Time P7D
Category baking, main dish
From thepioneerwoman.com
Total Time P7D
Category baking, main dish
- Making the starter:In a clean jar, weigh out 50 grams each of whole wheat flour and water. Mix well. Put a rubber band around the jar at the height of the starter to give a visual indication when the starter has risen. Cover the jar loosely with a glass or plastic lid, or a clean napkin secured with a rubber band.Set the jar aside in a warm spot out of direct sunlight for 24–48 hours.First feeding:Check the starter after 24 hours. If there is no change except for a bit of grayness on top, wait another 24 hours. Once you see any activity (bubbles and/or increase in volume), it's time to feed the starter!Mix together a 50/50 blend of whole wheat and organic all-purpose flour. This will be what you feed your starter with!Discard half of the starter. Add 50 grams each of the flour mix and water. Stir very well, cover loosely, adjust the rubber band if needed, and set aside as before.Second feeding:After 12–24 hours, you should see some activity in your starter (bubbles and increase in volume). Discard all but 50 grams of the starter. Add 50 grams each of the flour mix and water. Mix very well, cover loosely, adjust the rubber band if needed, and set aside as before.Subsequent feedings:Feed exactly the same way as the second feeding.Continue feeding your starter every 12–24 hours until it doubles in volume every 8–12 hours, has a pleasant, yeasty smell, and passes the float test (see note). Once it passes the float test, your starter is ready to be baked with!The whole process of getting your starter established can take anywhere from 5–10 days. Be patient and use your eyes, nose, and the float test to determine if it's ready.You can switch to feeding the starter organic unbleached all-purpose flour if you like. Continue feeding your starter once a day for a total of 2 weeks. Keeping your starter in the refrigerator:At this point you can start storing your starter in the refrigerator: Feed your starter one last time, let it sit at room temperature for about half an hour, then place it in the refrigerator. Feed your starter at least once a week: Take it out of the refrigerator and let it sit at room temperature for about an hour. Discard all but 50 grams of the starter, and feed with 50 grams each of flour and water (or however much you need for your recipe). You can either let the starter sit until it doubles and passes the float test (to use in a recipe), or just let it sit for half an hour and stick it back in the fridge.Keeping your starter at room temperature:You can store your starter at room temperature indefinitely if you make sure to feed it almost every day. A missed day here and there won't hurt an established starter, but if you starve it too long, it will die.Note: For the float test, drop a small amount of starter into a glass of room-temperature water. If it floats, the starter passed the test! If it sinks, you either need to let the starter sit longer to develop more bubbles, or feed it again and let it sit until it passes the float test (usually 6–12 hours).
See details
FIGGY PUDDING RECIPE | FOOD NETWORK
From foodnetwork.com
Total Time 2 hours 45 minutes
Category dessert
Total Time 2 hours 45 minutes
Category dessert
- Cool the pudding for 10 minutes, then invert the Bundt pan over a plate to unmold the pudding. Sprinkle the pudding with confectioners' sugar and cut into slices to serve.
See details
HOMEMADE RED WINE VINEGAR RECIPE - NYT COOKING
This simple recipe for homemade vinegar comes from Harry Rosenblum, a founder of the Brooklyn Kitchen and the author of “Vinegar Revival.” To make it, you’ll need a little raw, live, unpasteurized vinegar, or a vinegar mother (which you can buy online, or pick up from a vinegar-making friend). Be sure to aerate the wine before you start, which helps get it ready to ferment, and remember that the timeline in the recipe is a only a guide: The best way to get a sense what’s happening as your alcohol transforms into vinegar is to observe it and taste it frequently. Instead of red wine, you can also try the recipe with a rosé, sake, hard cider or your favorite beer. Just keep in mind that if the beverage has an alcohol content of 8 percent or lower, there’s no need to add water at the beginning.
From cooking.nytimes.com
Reviews 4
Total Time 10 minutes
Calories 82 per serving
From cooking.nytimes.com
Reviews 4
Total Time 10 minutes
Calories 82 per serving
- After about 2 months, when the alcohol has acidified, or when a taste of the vinegar makes your mouth pucker, it's ready to strain and bottle. (You can save the mother to begin a new batch.) The vinegar can be used as is, or aged in the bottle for up to a year to mellow its flavor.
See details
SOURDOUGH 101 - THE PIONEER WOMAN – RECIPES, COUNTRY ...
I first got into cooking with sourdough because I knew it was one of the healthiest ways to prepare grains.
From thepioneerwoman.com
Total Time P7D
Category baking, main dish
From thepioneerwoman.com
Total Time P7D
Category baking, main dish
- Making the starter:In a clean jar, weigh out 50 grams each of whole wheat flour and water. Mix well. Put a rubber band around the jar at the height of the starter to give a visual indication when the starter has risen. Cover the jar loosely with a glass or plastic lid, or a clean napkin secured with a rubber band.Set the jar aside in a warm spot out of direct sunlight for 24–48 hours.First feeding:Check the starter after 24 hours. If there is no change except for a bit of grayness on top, wait another 24 hours. Once you see any activity (bubbles and/or increase in volume), it's time to feed the starter!Mix together a 50/50 blend of whole wheat and organic all-purpose flour. This will be what you feed your starter with!Discard half of the starter. Add 50 grams each of the flour mix and water. Stir very well, cover loosely, adjust the rubber band if needed, and set aside as before.Second feeding:After 12–24 hours, you should see some activity in your starter (bubbles and increase in volume). Discard all but 50 grams of the starter. Add 50 grams each of the flour mix and water. Mix very well, cover loosely, adjust the rubber band if needed, and set aside as before.Subsequent feedings:Feed exactly the same way as the second feeding.Continue feeding your starter every 12–24 hours until it doubles in volume every 8–12 hours, has a pleasant, yeasty smell, and passes the float test (see note). Once it passes the float test, your starter is ready to be baked with!The whole process of getting your starter established can take anywhere from 5–10 days. Be patient and use your eyes, nose, and the float test to determine if it's ready.You can switch to feeding the starter organic unbleached all-purpose flour if you like. Continue feeding your starter once a day for a total of 2 weeks. Keeping your starter in the refrigerator:At this point you can start storing your starter in the refrigerator: Feed your starter one last time, let it sit at room temperature for about half an hour, then place it in the refrigerator. Feed your starter at least once a week: Take it out of the refrigerator and let it sit at room temperature for about an hour. Discard all but 50 grams of the starter, and feed with 50 grams each of flour and water (or however much you need for your recipe). You can either let the starter sit until it doubles and passes the float test (to use in a recipe), or just let it sit for half an hour and stick it back in the fridge.Keeping your starter at room temperature:You can store your starter at room temperature indefinitely if you make sure to feed it almost every day. A missed day here and there won't hurt an established starter, but if you starve it too long, it will die.Note: For the float test, drop a small amount of starter into a glass of room-temperature water. If it floats, the starter passed the test! If it sinks, you either need to let the starter sit longer to develop more bubbles, or feed it again and let it sit until it passes the float test (usually 6–12 hours).
See details
CRAFTING RECIPES - CUBIC CASTLES
Cubic Castles Item and Crafting Tables Blocks & Buildables. Dirt: Grass
From cubiccastles.com
From cubiccastles.com
See details
HOW TO CHOOSE THE RIGHT RESISTANCE BANDS FOR YOU
Jul 28, 2019 · Band jumping jacks: Hold the band in both hands over the head and pull the band down as you do jumping jacks.; Front and back double leg jumps: Put the resistance band on the floor in front of you in a straight line from right to left.Jump over the band …
From verywellfit.com
From verywellfit.com
See details
HOMEMADE SCOBY RECIPE | COOKING LIGHT
Pour kombucha into a 1-gallon-sized jar. Add room-temperature tea; do not add hot tea, as it will kill the good bacteria. Add cool water to fill jar to the top, just where the mouth starts to narrow. Cover jar with two coffee filters or a double layer of paper towels, and secure with a rubber band.
From cookinglight.com
From cookinglight.com
See details
KIRKLAND SIGNATURE RECIPES | COSTCO
Summertime Recipes Whether you're heading to a block party or hosting a barbecue, prepare with one of these party-ready recipes. Check out more recipes from The Costco Way Cookbook that you can make with high-quality ingredients from your local Costco …
From costco.com
From costco.com
See details
HOMEMADE WINE RECIPE | ALLRECIPES
This is an easy recipe for homemade wine. You can choose whatever flavor you like but my favorite is the red. You will need a sterile milk jug, a large latex balloon and a rubber band to …
From allrecipes.com
From allrecipes.com
See details
HOMEMADE GRAPE JUICE RECIPE - SIMPLY RECIPES
Mar 31, 2021 · Elise founded Simply Recipes in 2003 and led the site until 2019. She has an MA in Food Research from Stanford University. Learn about Simply Recipes' Editorial Process. Updated March 31, 2021. ... secure with a rubber band…
From simplyrecipes.com
From simplyrecipes.com
See details
TOP 15 NATURAL HOMEMADE LIP BALM RECIPES FOR ALL AGES
Cover the top of the jar with a few layers of cheesecloth. Secure it with the help of a rubber band. Place it in a cabinet and leave it on for 3- 4 weeks. Alternatively, set the jar into a saucepan packed with …
From healthyguide.com
From healthyguide.com
See details
ROAST DUCK AND BAKED QUINCE: NIGEL SLATER’S RECIPES FOR ...
Dec 13, 2021 · Nigel Slater recipes Christmas food and drink. Roast duck and baked quince: Nigel Slater’s recipes for festive gatherings. ... secure with string or a rubber band, then tin foil.
From theguardian.com
From theguardian.com
See details
HOW TO MAKE A RUBBER BAND CAR - LITTLE BINS FOR LITTLE HANDS
This rubber band powered car is an awesome engineering activity for your next STEM project time. There are lots of creative rubber band car ideas but you definitely need a rubber band and a way to wind it up! Are the gears whirring away inside your head yet? Make sure to check out our LEGO rubber band …
From littlebinsforlittlehands.com
From littlebinsforlittlehands.com
See details
SOURDOUGH STARTER MAINTENANCE ROUTINE | THE PERFECT LOAF
Nov 27, 2015 · I’ve placed the green rubber band at the beginning level of my starter so we have a good sense of how far it will rise throughout the day. 12:00 p.m. After only a couple of hours, you …
From theperfectloaf.com
From theperfectloaf.com
See details
HOW TO STORE COFFEE: WE SETTLE THE PANTRY VS. FREEZER ...
(If you don't have a canister, close the top of the bag with a rubber band, then put the bag in a resealable plastic bag.) When you freeze the coffee you use every day, the fluctuating temperatures create …
From realsimple.com
From realsimple.com
See details
CREME FRAICHE RECIPE | ALLRECIPES
Place a piece of cheese cloth over the top of the bowl and secure it with a rubber band or piece of string. When you are ready to use, add a half teaspoon of sugar and blend with a spoon until the …
From allrecipes.com
From allrecipes.com
See details
SOURDOUGH PIZZA DOUGH RECIPE - EASY — OONI USA
Pizza Dough Calculator, recipes and videos. Previous article Rosehill Sourdough’s Discard Buttermilk Biscuits Subscribe We'll send you epic recipes and exclusive offers. About About Ooni …
From ooni.com
From ooni.com
See details
4 PROCEDURES FOR HEMORRHOID REMOVAL PERFORMED BY A DOCTOR
Rubber-Band Ligation (Banding) Your doctor will take a tiny rubber band (only a few millimeters wide) and put it over the base of an internal hemorrhoid to cut off the flow of blood. The ...
From webmd.com
From webmd.com
See details
CRAFTING RECIPES - CUBIC CASTLES
Cubic Castles Item and Crafting Tables Blocks & Buildables. Dirt: Grass
From cubiccastles.com
From cubiccastles.com
See details
SOURDOUGH STARTER MAINTENANCE ROUTINE | THE PERFECT LOAF
Nov 27, 2015 · I’ve placed the green rubber band at the beginning level of my starter so we have a good sense of how far it will rise throughout the day. 12:00 p.m. After only a couple of hours, you …
From theperfectloaf.com
From theperfectloaf.com
See details
HOMEMADE SCOBY RECIPE | COOKING LIGHT
Pour kombucha into a 1-gallon-sized jar. Add room-temperature tea; do not add hot tea, as it will kill the good bacteria. Add cool water to fill jar to the top, just where the mouth starts to narrow. Cover jar with two coffee filters or a double layer of paper towels, and secure with a rubber band.
From cookinglight.com
From cookinglight.com
See details
HOW TO MAKE VENISON BOLOGNA - FOOD CHANNEL
Feb 20, 2017 · 10 Use rubber gloves. Keeps your hands clean 11 While adding the meat, squeeze out any air and pack down the meat to get the size of bologna you want 12 Once the casing is filled, twist to close and tie with twist band …
From foodchannel.com
From foodchannel.com
See details
BOSTON BROWN BREAD | KING ARTHUR BAKING
To steam the bread: Secure the foil cover with a rubber band. Place a steamer insert (or some crumpled aluminum foil) in the bottom of a deep kettle; you want to shield your Bundt or loaf pan from …
From kingarthurbaking.com
From kingarthurbaking.com
See details
COOKIE MIX IN A JAR I RECIPE | ALLRECIPES
Mix the salt and baking soda with the flour, then layer the ingredients into a 1 quart, wide mouth jar. Use scissors to cut a 9 inch-diameter circle from calico. Place over lid, and secure with rubber band. Tie on a raffia or ribbon bow to cover rubber band.
From allrecipes.com
From allrecipes.com
See details


