BOILING TEMPERATURE OF MILK RECIPES


HOMEMADE SOY MILK RECIPE RECIPE | EPICURIOUS

If you’ve never had super fresh soy milk, it’s easy to make at home and, frankly, tastes leagues better than the stuff sold in boxes and at dedicated tofu shops.
Provided by Andrea Nguyen
Yield Makes about 5 cups
Number Of Ingredients 2
Steps:
- Put the dried beans in a colander and rinse under tap water to remove any surface dirt. Transfer the beans to a bowl. Add water to cover by 2 to 3 inches, then set aside to soak at room temperature. The soaking time varies by season, and below is a rough estimate of the time required depending on the air temperature:
- 80°F: 8 hours 70°F: 10 hours 60°F: 13½ hours 50°F: 17½ hours
- Test the beans to determine their readiness. Squeeze one between your fingertips and it should split apart into two long halves. The beans are sufficiently soaked if the surfaces of the halves are flat with an even buttercup yellow color and if you can easily break one of the halves crosswise. If the surfaces are concave and/or darker in the middle than at the edge, and if halves bend in a rubbery manner, soak longer. Adequately soaked beans are easier to grind. Drain and rinse the soaked beans in a colander.
- Note: It is possible, but not easy, to oversoak the beans. If you see bubbles or foam on the surface, discard the water, then use the beans. Each 6 ounces of dried beans weighs about 14 ounces (and measures about 2¼ cups) after soaking.
- DO AHEAD: When soaking the beans in advance, transfer the drained beans to an airtight container and refrigerate for up to 5 days; discard or keep the soaking water refrigerated in a separate container, if you like. Refrigerating the beans in the soaking liquid is fine for 2 days; beyond that, the flavor may be compromised. If the beans look suspect, rinse them before using; throw out the soaking liquid if it smells funky. Regardless, return both beans and liquid to room temperature before proceeding. Soaked soybeans can be frozen but the soy milk and tofu produced from them are not as superlative as those produced from soaked, unfrozen beans.
- Set up your soy milk making equipment. For the straining station, put a 3- or 4-quart pot in the sink and place the colander (or mesh strainer) inside it. Put the soy milk pressing cloth (thin unbleached muslin works well) in the colander, letting its edges drape over the rim. Have your pressing tool (a potato masher is what I use) nearby. If you don’t have muslin, a nut milk bag could be substituted.
- Put a 5-quart pot (nonstick is great for easy cleanup!) on the stove. Kickstart the cooking process by heating 3 cups of water in the pot over high or medium-high heat. If the water comes to a boil before you’ve ground all the beans, lower the heat and cover the pot; raise the heat once you’ve added the ground beans.
- Meanwhile, use a blender to grind the soybeans with 2 cups of water. Run the blender on the highest speed for 1 to 2 minutes to yield a thick, smooth, ivory white puree — a beany milkshake. (If you scale up this recipe, grind in several batches. To rinse out the blender container, add ½ cup of water and run the blender for 10 to 15 seconds. Pour into the larger pot and scrape out any residual bits.
- Cook the soybean mixture, stirring the bottom frequently with a wooden spatula to avoid scorching, until frothy foam forms and begins to rise, 3 to 6 minutes. This can suddenly sneak up on you, so monitor the pot. Look for a very thick layer of foam that resembles softly whipped egg whites. When you see the foam rise like a beer head, turn off the heat and remove the pot from the heat to prevent boiling over. Stir the pot a few times and wait for the foam to deflate a bit.
- To strain out the milk, pour the hot mixture into the pressing cloth, pausing when the colander is full and waiting for the milk to pass through before adding more from the larger pot. Scrape out any soybeans remaining in the pot.
- Gather up the pressing cloth and twist it closed into a sack. It will be hot; it’s fine to wait a few minutes for the contents to cool slightly. Use your pressing tool to mash the sack against the colander and extract more soy milk.
- Extract additional milk via a second pressing. Open up the pressing cloth and spread the solids (lees) out. Add ½ cup of water to the lees; stir to combine into a polenta-like mixture. If the lees are still steaming hot, let them cool for 3 to 5 minutes. When you are able, twist the cloth closed and wring out more soy milk. Open up the pressing cloth, and transfer the soft white lees to a bowl. Let cool before using, refrigerating or discarding. Remove the colander and pressing cloth to reveal the soy milk in the smaller pot.
- Soybean protein needs to be cooked for a certain amount of time to ensure that it is fully digestible. Bring the smaller pot of soy milk to a gentle simmer over medium-high or high heat, stirring the bottom frequently with a wooden spatula. When bubbles percolate at the surface, lower the heat slightly to maintain that pace of gentle cooking for 5 minutes, minding the pot and stirring. If a light film forms at the top, remove it (eat it with a bit of soy sauce as a super delicate fresh tofu skin!). Should the milk scorch, your tofu will have a certain rustic smoky taste, as if it were made over a wood fire. After this second cooking, the soy milk is ready to be used for cooking or drinking. Enjoy warm or chilled.
- To quickly cool the soy milk, I move the pot to a cool burner, blast the exhaust and occasionally stir the pot for about 15 minutes to aerate and prevent a skin from forming; then I transfer the milk to Mason jars to store. You can leave the pot unattended to cool, but the hot milk will form a skin, which is delicious.
- NOTE: Don't discard the crumbly soft lees from the pressing cloth after you've wring out all the soy milk! What you may consider the dregs is a valuable food source. Called dou fu zha or xue hua cai, okara, and biji in Mandarin, Japanese, and Korean, respectively, the lees are loaded with dietary fiber and nutrients. The lees can be refrigerated for up to 1 week or frozen for several months; thaw it at room temperature or in the refrigerator before using. Add some to a Korean hot pot, and you'll thicken it into a creamy chowderlike consistency. Season and sauté them with vegetables for unohana, an old-fashioned Japanese favorite. Or bake cookies or make doughnuts with okara for a modern hybrid twist. Lees can also be used as a meat extender for dishes from many different cuisines.
HOMEMADE FRESH CHEESE RECIPE | ALLRECIPES
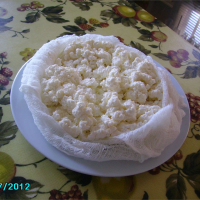
This is the simplest recipe that I use to make a version of Mexican 'Queso Fresco' and the same recipe for Homemade Ricotta Cheese.
Provided by SUNFLOWER71
Categories Everyday Cooking
Total Time 1 hours 45 minutes
Prep Time 45 minutes
Cook Time 1 hours 0 minutes
Yield 1 1/2 pounds of cheese
Number Of Ingredients 3
Steps:
- Pour the milk into a large pot, and heat until the temperature reaches 195 degrees F (90 degrees C), or almost boiling. Stir constantly to prevent scorching on the bottom of the pot. When the milk reaches the temperature, remove from the heat, and stir in the vinegar. Let stand for 10 minutes.
- Line a strainer with cheesecloth, and set over the sink or a large pot or bowl. The milk should separate into a white solid part, and a yellowish liquid (whey). Stir the salt into the milk, then pour through the cloth-lined strainer. Let the curds continue to drain in the strainer for 1 hour. Discard the whey.
- After the cheese has finished draining, pat into a ball, and remove from the cheese cloth. Wrap in plastic and store in the refrigerator until ready to use. Fresh cheese will usually last about a week.
Nutrition Facts : Calories 97.7 calories, CarbohydrateContent 7.4 g, CholesterolContent 16.3 mg, FatContent 5.3 g, ProteinContent 5.2 g, SaturatedFatContent 3 g, SodiumContent 65.1 mg, SugarContent 7.4 g
WHAT IS THE BOILING POINT OF MILK? - THOUGHTCO
From thoughtco.com
See details
HOW TO BOIL MILK: 6 EASY STEPS - HOW-TO-BOIL.COM
Mar 17, 2019 · Step 1: Put 1.5 Cups of Milk in a Boiling Pan. This amount measures up to around 0.75 litres of milk and is the amount that you need for this recipe. Taking more or less amounts of milk can mean that you will need to tweak the recipe somewhat. Step 2: Boil the Milk. Simply boil the milk on a stove. Make sure the milk has boiled.
From how-to-boil.com
From how-to-boil.com
See details
BOILED MILK: NUTRIENTS, BENEFITS, AND HOW TO MAKE IT
Dec 01, 2020 · This process heats milk past its boiling point to 275–302°F (135–150°C) ( 4, 5, 6 ). Boiling also alters milk proteins. The two primary proteins in milk are casein and whey. Casein comprises ...
From healthline.com
From healthline.com
See details
3 WAYS TO BOIL MILK - WIKIHOW
From wikihow.com
See details
HOW TO SCALD MILK | EASY BAKING TIPS AND RECIPES: COOKIES ...
Apr 07, 2021 · Heat the saucepan over medium heat, stirring frequently. 3. The milk is scalded with small bubbles appear around the outside of the saucepan, or the temperature registers 180 to 185 degrees F. 4 ...
From foodnetwork.com
From foodnetwork.com
See details
CAN YOU BOIL MILK - ALL INFORMATION ABOUT HEALTHY RECIPES ...
To boil milk, simply add boil 1.5 cups of milk. Take it off from the stove and stir it occasionally. Remove the foam and place it on the stove for boiling once again. Once it reaches a boil, let it boil for two minutes before taking it off the stove. Let the milk cool down and serve. Print Recipe Pin Recipe Cook Time 8 mins Total Time 8 mins
From therecipes.info
From therecipes.info
See details
BOILING MILK: WHAT THERE IS TO KNOW - WEBMD
Boiling milk is known to significantly lessen milk’s nutritional value. Studies have found that while boiling milk eliminated bacteria from raw milk, it also greatly reduced its whey protein ...
From webmd.com
From webmd.com
See details
DOES BOILING MILK MAKE IT LAST LONGER? - THE WHOLE PORTION
Jan 17, 2021 · Yes, boiling the raw milk does increase its shelf life and make the milk last longer. Milk is a nutritious food item that has high water content and provides a suitable environment for the bacteria to grow. Thus, raw milk, straight from the cattle (cow, goat, etc.) won’t last long as many bacteria have already found their way into it.
From thewholeportion.com
From thewholeportion.com
See details
5 WAYS TO MAKE CARAMEL FROM CONDENSED MILK (FROM QUICK TO ...
From foodhow.com
See details
HOW TO BOIL MILK: 6 EASY STEPS - HOW-TO-BOIL.COM
Jul 04, 2020 · Step 1: Put 1.5 Cups of Milk in a Boiling Pan. This amount measures up to around 0.75 litres of milk and is the amount that you need for this recipe. Taking more or less amounts of milk can mean that you will need to tweak the recipe somewhat. Step 2: Boil the Milk. Simply boil the milk on a stove. Make sure the milk has boiled.
From how-to-boil.com
From how-to-boil.com
See details
3 WAYS TO BOIL MILK - WIKIHOW
From wikihow.com
See details
MILK SIMMER TEMP - ALL INFORMATION ABOUT HEALTHY RECIPES ...
Milk boils at a temperature of 100.5 C/212.9 F, and it may vary a fraction of a degree if you're at higher altitudes, or have added salt or sugar. What happens when milk boils ? The fats in milk rise to the surface, along with some protein. In a slow heating process this produces cream, but in a boiling setting it will just spill over.
From therecipes.info
From therecipes.info
See details
RECIPES INVOLVING SCALDING | GREAT RECIPES | MORE GREAT ...
A: Scalding milk means to heat milk till just before it begins to boil, at about 185 degrees. Its usually done in a thick bottomed pan. Keep stirring to prevent a thin film from forming. Scalding is done to kill bacteria and also to destroy enzymes in the milk that prevent thickening in recipes.
From impulsesoft.com
From impulsesoft.com
See details
CAN YOU BOIL MILK - ALL INFORMATION ABOUT HEALTHY RECIPES ...
To boil milk, simply add boil 1.5 cups of milk. Take it off from the stove and stir it occasionally. Remove the foam and place it on the stove for boiling once again. Once it reaches a boil, let it boil for two minutes before taking it off the stove. Let the milk cool down and serve. Print Recipe Pin Recipe Cook Time 8 mins Total Time 8 mins
From therecipes.info
From therecipes.info
See details
AVOID CURDLED MILK WHEN COOKING - THE SPRUCE EATS
Dec 03, 2019 · Many sauce and soup recipes need to be reduced and thickened, which means gently simmering to achieve the desired consistency. With sauces and soups that contain milk, boiling or simmering can cause the milk to curdle. While curdled milk is safe to eat, it is not particularly appetizing.
From thespruceeats.com
From thespruceeats.com
See details
WHAT HAPPENS WHEN CURD IS ADDED TO BOILING MILK? - RECIPE
The time taken for the milk to get converted to curd largely depends on the temperature. In a warm, hot and humid climate, the time taken for the curd to set will be 4 to 7 hours. Whereas in a cool or cold climate, the time taken can be 8 to 12 hours. Can we make curd without boiling milk?
From gutomna.com
From gutomna.com
See details
THE PHYSICAL CHEMISTRY OF MAKING FUDGE | GEOPHYSICAL INSTITUTE
Dec 23, 2021 · There's a lot of physical chemistry involved in making old fashioned fudge. The recipe calls for combining and boiling milk, bitter chocolate or cocoa, and sugar together until the temperature of the syrup reaches 238 degrees F (114 o C), pouring the seething mixture into a bowl, cooling to 115 degrees F (46 degrees C), and then beating until the surface shine disappears.
From gi.alaska.edu
From gi.alaska.edu
See details
HOW TO HEAT MILK IN THE MICROWAVE? – LEARN HERE - KITCHEN ...
The simplest way to heat milk is in the microwave, but you must monitor it closely. 1 cup (250 mL) milk should reach room temperature in 45 seconds and reach a rolling boil in two and a half minutes. Every 15 seconds, stir it to prevent it from boiling over. 3.
From kitchengearoid.com
From kitchengearoid.com
See details
THE SCIENCE OF GREAT YOGURT | BROD & TAYLOR
Yogurt made from milk kept below 170 ºF / 77 ºC is thinner and tastes fresh, a little fruity and more tart, while yogurt made from milk held at 195 ºF / 90 ºC for 10 minutes is noticeably thicker and tastes less tart and somewhat creamy/nutty/eggy. Protein is Key to Thickening. The more protein in milk, the thicker the yogurt.
From brodandtaylor.com
From brodandtaylor.com
See details
MILK STEAK - IZZYCOOKING
Mar 25, 2021 · Bring the milk to a boil. Add rosemary and seasoned steak. Place the lid on and let the steaks boil for 6 minutes PER SIDE. (Add more time if your steaks are thicker than 1 inch.) Cook them until the internal temperature reaches about 135 F degree for medium-rare. Remove the steaks from the skillet.
From izzycooking.com
From izzycooking.com
See details
HERE'S EVERYTHING YOU NEED TO KNOW ABOUT MAKING YOGURT IN ...
Apr 29, 2020 · With this method, you heat milk on the Instant Pot’s boil setting to a temperature between 180 and 212 degrees F and then cool it down to 110 to 115 degrees F to add the culture to it.
From foodnetwork.com
From foodnetwork.com
See details


