DOUGH MIXER RECIPES


PERFECT HOMEMADE PASTA OR SPAGHETTI FOR KITCHENAID MIXERS ...
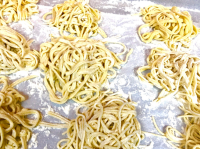
Per the internet site where the recipe was posted, this recipe is from Chef Andrea Apuzzo of Andrea's Restaurant in New Orleans. My sweet hubby gave me a Kitchenaid Mixer for Christmas, and I recently bought the Pasta Roller & Cutter attachments for it. I have tried many, MANY homemade pasta recipes and FINALLY found one that was PERFECT! I made it last night for the first time and it made 1.5 pounds of pasta (commercially packaged pasta is normally 1 pound). I cut it really thin for spaghetti, and I'm going to use it for everything now. Can't wait to try making homemade ravioli, using this recipe. Prep time includes "rest" period for dough & 10 minutes of drying time. Cooking time includes 10 minutes to bring water to a boil.
Total Time 2 hours 15 minutes
Prep Time 2 hours
Cook Time 15 minutes
Yield 1 1/2 pounds fresh pasta, 8 serving(s)
Number Of Ingredients 6
Steps:
- Combine the semolina flour, all purpose flour, and salt in a large bowl. Using a fork, mix these ingredients together, then using a sifter, sift into another bowl. Set aside.
- In a separate bowl, combine the eggs & beat well with a fork.
- Add extra-virgin olive oil to the eggs and mix with a fork.
- Add the cold water to the egg & olive oil mixture, and mix with a fork.
- Pour the liquid ingredients into your mixer bowl and attach the flat beater.
- Add half of the sifted flour mixture, turn to speed 2 and mix 20 seconds. Add the rest of the sifted flour mixture and mix an additional 20 seconds.
- Exchange flat beater for the dough hook. Turn to speed 2 and knead for 2 to 3 minutes, until a dough ball is formed.
- Remove dough from bowl and hand-knead for 2 to 3 minutes. NOTE: Good pasta dough should be elastic and pliable, but FIRM (not soft like bread dough). It should not stick to your fingers or fall apart. To test for the correct consistency, pinch a small amount of dough together after kneading for 2 to 3 minutes -- if the dough stays together without sticking to your fingers or falling apart, it should work well. If too soft, add more flour by dusting the top of the dough and knead some more, continuing to dust the dough with flour until achieving the right consistency. If too dry, wet your hands and knead some more, continuing to wet your hands a little at a time & knead until the right consistency. (Achieving the right consistency isn't hard at all -- I got it just right the very first time I tried this recipe).
- Wrap dough in plastic wrap and put in the refrigerator for a minimum of 1 hour (this step is important).
- Remove dough from refrigerator and let it rest for 15 minutes. Using your hands, roll dough into a log, about 12 inches long.
- Cut log into 8 slices, then flatten each piece slightly. Spread slices out so they aren't touching and cover with plastic wrap.
- Using the widest setting (1 on the Kitchenaid), turn mixer to speed 2 and taking one piece of the flattened dough, feed through rollers. Fold dough in half & roll again. Repeat 3 more times, lightly dusting the sheet of pasta in between each rolling if it feels the slightest bit sticky.
- Move adjustment knob to setting 2 and feed the dough sheet through the rollers once.
- Move adjustment knob to setting 3 and feed the dough sheet through the rollers once.
- Continue to increase roller setting until desired dough thickness is reached: 3 for Thick "kluski" type egg noodles; 4 for standard egg noodles; 4 or 5 for lasagna noodles, fettuccine, spaghetti, and ravioli; 6 or 7 for tortellini, thin fettuccine, and linguine fini; 7 or 8 for VERY thin "angel-hair" type pasta/capellini or VERY fine linguine.
- Separate sheets once desired thickness is achieved with a thin towel or piece of plastic wrap dusted with flour, so the dough doesn't dry out too much.
- To cut the noodles, exchange the Pasta Roller Sheet attachment for the cutter attachment of choice, either the fettucine cutter for wider noodles or the spaghetti cutter for spaghetti or linguine. Run each sheet through the cutter. NOTE: Each sheet can be cut in half or thirds before putting through the cutter to prevent "too long" of strips. I prefer to use the longer sheets, rather than cutting them in half or thirds, as this reduces the time it takes to cut each sheet & hang to dry.
- After cutting each sheet, hang to dry on a pasta rack. Dry for a minimum of 10 minutes. If you don't have a pasta rack, plastic hangers work great! IMPORTANT: Flour the pasta rack or the plastic hangers before placing pasta on them. ALSO, separate the strips of pasta as best you can, so they aren't touching. This way they won't dry sticking together. If you want to dry the pasta for later use, dry for several hours and then store in airtight plastic bags (i.e. Ziploc Freezer or Storage Bags).
- When ready to cook, boil your water and add salt. For the 1.5 pounds of pasta, I use 2 teaspoons of salt. Oil in the water is not necessary.
- Fresh pasta will cook faster than commercially bought pasta -- about 4 to 5 minutes in vigorously boiling water for el dente.
Nutrition Facts : Calories 296.8, FatContent 3.6, SaturatedFatContent 0.7, CholesterolContent 46.5, SodiumContent 165.1, CarbohydrateContent 54.3, FiberContent 2.5, SugarContent 0.1, ProteinContent 10.1
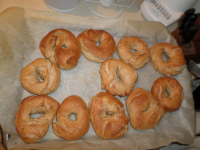
BAGELS 101 (USING A STAND MIXER) RECIPE - FOOD.COM
This is a great recipe for a 'bagel party' where everyone can choose and prep their bagel filling and topping choices. This recipe can easily be halved or doubled. We tweaked this very detailed recipe from the book 'The Best Bagels are Made at Home' by Dona Z. Meilach. We took the stand-mixer version and simplified the instructions as well as made some other adjustments as we went along to perfect it and keep it simple. Choices for different types of flavors are listed at the beginning. Selections for different types of toppings are listed at the bottom of the recipe. NOTE: It's recommended to print, read, and understand the instructions completely before beginning. Onion Bagels: Add 2 tablespoons of dehydrated minced onion, and replace salt with onion salt. Italian Herb Bagels: Add 2 teaspoons of Italian seasoning, and replace salt with onion salt.
Total Time 1 hours
Prep Time 30 minutes
Cook Time 30 minutes
Yield 8 serving(s)
Number Of Ingredients 5
Steps:
- CHOOSE YOUR FLAVOR (if other than plain). This is for the dough portion ONLY: WHOLE WHEAT BAGELS: Follow basic recipe, omitting sugar. Use 3 Tbsp honey instead. In place of flour, use 2 cups whole wheat flour, 1/2 cup wheat germ, and about 2 3/4 cup all purpose flour, blended together. Knead with white flour. PUMPERNICKEL BAGELS: Follow basic recipe, omitting sugar. Use 3 Tbsp dark molasses in place of sugar. In place of flour use 2 cups rye, 2 cups whole wheat, 1 3/4 cups all purpose flour blended together. Knead with white flour. ONION BAGELS: Add 1/2 cup dried onion or 1 pkg Lipton onion soup mix to the wet mixture before adding flour. (See 'THE BAKE' if you only want some of the bagels to be onion flavor).
- THE DOUGH: Using your KitchenAid with the dough hook attachement, combine the water (125F.), sugar, salt, and yeast. Add 3 cups of the flour and then the remaining flour 1/2 cup at a time until a ball forms. Knead (by hand or with the dough hook) for about 3 minutes, adding more flour a little at a time if necessary. When dough appears near desired consistency, knead in any additions for 1 minute or until incorporated. (NOTE: You can also knead till almost ready, remove the dough from your KitchenAid, and divide dough into individual (or a few each) bagels and add different ingredients to each bagel so you get a varied batch of bagels from one recipe). SUGGESTIONS: dried fruits (such as raisins, apples, cranberries), nuts, seeds, spices (such as dried minced onion or garlic), chocolate morsels or shavings, or any combination of flavorings. Knead in the ingredients until just combined, about 1 minute. Place into a lightly oiled bowl, cover with a towel and let rise (1st RISE) for 20 minutes.
- THE SHAPE: Punch down dough and place on a floured work surface. Use a food scale if you want consistency, and separate dough into balls; for 8 large, 12 regular, or 16 (mini bagels). Choose a shaping method and begin: 1) THE FINGER IN THE MIDDLE METHOD: Roll each piece of dough into a ball, poke a floured finger through the center to form the hole, and then shape top and smooth sides. With the bagel on the floured counter, place your finger in the hole with the tip of your index finger touching the counter, and make small fast circles with your finger to hula-hoop the bagel around it, to widen the hole. 2) THE ROPE METHOD: Roll each piece of dough into a rope by rolling it on the bread board or between your hands. Wrap the rope around four fingers, overlap and join the ends, and turn the circle inside out. Until you get this hand movement down pat, you may have to moisten the ends to hold them together. Initially the length may be lumpy and the joint will show. It takes practice. NOTE: Keep in mind that bagels do not rise very much, so you want them to be puffy when you shape them. Don't flatten them down.
- THE 2nd RISE: During the 2nd rising, the bagels will puff up slightly. Place on a baking sheet lined with parchment paper. Cover them with a plastic wrap that has been sprayed on one side with nonstick vegetable spray. Place them in a draft free location and let them rise at room temperature until puffy, about 20 minutes. NOTE: Bagels can be refrigerated at this point, should you decide to boil and bake them later, or the next morning. Leave them covered so they do not dry out. Remove from the refrigerator and allow to warm slightly while you boil water and preheat the oven.
- THE BOIL: Fill a 5 quart soup pot with water 4 inches deep (you can add 2 tablespoons honey or sugar for a sweeter bagel). Drop bagels one at a time into the boiling water. Boil about 3-4 at a time or only so many that they float freely, and are not crowded. Simmer for 30 seconds (15 seconds on each side), turning with a slotted spatula. NOTE: Put the top side of the bagel down into water first, and then turn over. When you remove them, the bagels will be top side up and slide off your spatula for draining and adding toppings. Remove and place them gently on a lightly greased cooling rack (that has been placed on top of a clean dish towel) for a few minutes to drain.
- THE GLAZE: Choose your glaze and brush tops before placing them in the oven: 1) WATER GLAZE: Spray bagels at the beginning of the baking (using a mist bottle makes this easy), again 5 minutes after placing them in the oven and again near the end of baking. A spray (or brushing) with room-temperature tap water will yield a subtle glaze. 2) NONSTICK COOKING SPRAY GLAZE: Spray before placing in the oven and again about 5 minutes before baking time is completed. Nonstick cooking spray goes on more evenly than using a brush and yields an even glaze. 3) EGG GLAZE: Mix together 1 egg with 1 tbs. water, milk, or cream. Brush it on the bagels before they are put into the oven. 4) CORNSTARCH GLAZE: Dissolve 2 tbs. cornstarch in 1/4 cup cold water. Bring 1 cup water to a boil and whisk the dissolved solution into the boiling water until it thickens. Brush it on the bagel tops at the beginning of the baking and again as soon as you remove the bagels from the oven for a very high shine.
- THE TOPPINGS: A variety of toppings can be added to the bagel before baking, either directly to the dough after settling, or after the bagel is glazed. Use as much or as little topping as you like. To brush the toppings on, use a ratio of 2-1 dry ingredients/1 water or oil. VARIATIONS: ONION- Use dehydrated onion flakes or packaged onion soup mix. 3) SEEDED- Sprinkle boiled bagels with sesame seed, poppy seed, or caraway seed (especially good on rye bagels) after using glaze and prior to baking. Poppy, caraway, sesame and celery seeds can be used directly from the jar. Just dip the bagels into a dish of seeds or sprinkle seeds on top. 4) TOASTED NUTS: Using them on (and in) bagels enhances their flavor. Walnuts, almonds, pecans or hazelnuts can be used on bagels as toppings and also added to the dough at the beginning or before they are shaped and rise the second time. 5) OATS/GRAINS: Sprinkle with rolled oats or multigrain cereal, which will brown while baking.
- THE BAKE: Preheat the oven to 400°F Choose your baking surface then continue on to the steaming. 1) BAKING SHEET: Line a baking sheet with parchment paper (as it eliminates the use of oil and cornmeal and cleaning pans). Place bagels on the shelf just below the middle in the oven. 2) BAKING STONE: Place the stone on the lowest rack in your oven while preheating the oven (with stone inside). Sprinkle cornmeal on the stone. Transfer un-baked bagels to the hot surface using a wooden peel (a long-handled wooden paddle used in baking), or any flat instrument with a long handle so you don't burn yourself; wear heavy padded gloves (NOTE: you can also place parchment paper on your peel and slide it off onto the stone with the bagels right onto the peel). NOW FOR STEAMING (Optional): Place a heavy pan in the very bottom of your oven (under the bottom rack) while it is preheating. Place the bagels in the oven and then pour cold water or half a dozen ice cubes into the pan and spray the sides of the (preheated) oven with water from a spray mist bottle when you place the bagels inside (This gives the bagel tops a crisp crust and extra shine by creating steam during the first few seconds of the baking). Bake for 20-40 minutes (depending on their size) until the tops are a light golden brown.
- STORING BAGELS: Bagels are best when they're eaten fresh from the oven while still warm. Once cooled, keep them in a brown paper bag for up to 12 hours. Any longer, and freezing is recommended. Slice them horizontally before freezing. Place the halves in a ziploc freezer bag and place in freezer. Thaw bagels on the kitchen counter in a plastic bag for about 15 minutes or toast directly from the freezer. What if a few bagels get stale? Put them into your blender or food processor and grind them into bread crumbs. None of the tasty bread need ever go to waste!
Nutrition Facts : Calories 336.9, FatContent 1, SaturatedFatContent 0.1, CholesterolContent 0, SodiumContent 876.5, CarbohydrateContent 71, FiberContent 2.8, SugarContent 5, ProteinContent 9.6
100 RECIPES TO MAKE IN YOUR STAND MIXER | EPICURIOUS ...
From epicurious.com
See details
20 BEST KITCHENAID MIXER RECIPES - INSANELY GOOD
From insanelygoodrecipes.com
See details
HOW TO MAKE BREAD DOUGH WITH A MIXER (RECIPE INCLUDED)
1. Mix the salt, sugar, milk and butter in a saucepan. 2. Heat over a low heat on a stove-top while stirring until all the butter has melted and the sugar and salt dissolve. 3. Cool it until it becomes slightly warmer than body temperature. 4. Snap out the mixing bowl and wash it with hot water to warm it up. 5.
From kitchenmakerhq.com
From kitchenmakerhq.com
See details
KITCHENAID MIXER RECIPES PASTA DOUGH - JUST EASY RECIPE
Oct 10, 2021 · Fresh pasta dough using stand mixer recipe by silvia. Place 4 eggs, flour and salt in the mixer bowl. Turn mixer to speed 2 and mix until mixture is well combined.
From justeasyrecipe.com
From justeasyrecipe.com
See details
BASIC STAND MIXER BREAD DOUGH RECIPE
In a large bowl, add the flour and salt. Make a well in the middle and add water containing the yeast. Using your hands, mix flour and water adding warm water a little at a time until mixture foams a stiff dough. If dough is too soft, add flour or water as needed. Step 6. Knead dough in the bowl or on a floured surface about 10 minutes. Step 7
From italianmeddiet.com
From italianmeddiet.com
See details
16 KITCHENAID MIXER RECIPES YOU MAY NEVER HAVE THOUGHT TO MAKE
From tasteofhome.com
See details
HOW TO USE A FAMAG DOUGH MIXER | THE PERFECT LOAF
Dec 06, 2020 · While I mostly mix the recipes here at The Perfect Loaf by hand, I sometimes use my KitchenAid stand mixer for enriched doughs or a Famag spiral mixer to mix larger bread dough batches. I feel like the Famag IM-8S is one of the best small spiral mixers with a breaker bar (I'll go into what this is later in this guide).
From theperfectloaf.com
From theperfectloaf.com
See details
KITCHENAID MIXER RECIPES PASTA DOUGH - JUST EASY RECIPE
Oct 10, 2021 · Kitchenaid mixer recipes pasta dough. Meanwhile lay clean tea towels over the bench or lightly dust with. Meanwhile lay clean tea towels over the bench or lightly dust with. When making pasta dough, the flat beater should be used to mix the eggs, flour, salt, and water for about 30 seconds on speed 2.
From justeasyrecipe.com
From justeasyrecipe.com
See details
EASY STAND MIXER PIZZA DOUGH - MY ECLECTIC BITES
Jul 12, 2021 · The original recipe was published on November 28, 2018, and updated on July 12, 2021. Pizza is a popular menu in my household since it’s something my husband and I can both enjoy. I have a pizza dough recipe that does NOT require a stand mixer (pizza dough recipe by hand). But if you rather spend your energy eating the pizza rather than ...
From myeclecticbites.com
From myeclecticbites.com
See details
16 KITCHENAID MIXER RECIPES YOU MAY NEVER HAVE THOUGHT TO MAKE
Aug 05, 2020 · Make guacamole in a stand mixer by placing halved avocados, lime juice and your favorite seasonings in the mixing bowl. Use the paddle attachment on a medium speed to combine. Then, stir in diced tomatoes, onions, jalapeños and any other add-ins you’d like. Get Our Recipe for Catherine's Guacamole. 4 / 16.
From tasteofhome.com
From tasteofhome.com
See details
KITCHENAID STAND MIXER BREAD RECIPES
2013-02-05 · Stop, remove the flat beater, and place the dough hook onto your stand mixer. Set to speed 1 or 2 and let the mixer run, kneading the dough, for 6 to 8 minutes. After kneading, stop, remove the dough hook and let the dough rest in the Kitchenaid mixer bowl for 10 minutes. Grease 2 bread loaf pans.
From tfrecipes.com
From tfrecipes.com
See details
PERFECT PIZZA DOUGH RECIPE | ALTON BROWN
Procedure. Place the sugar, salt, olive oil, water, 1 cup of flour, yeast, and remaining cup of flour into the work bowl of a stand mixer fitted with the paddle attachment. Start the mixer on low and mix until the dough just comes together, forming a ball. Coat the hook attachment with cooking spray.
From altonbrown.com
From altonbrown.com
See details
THE BEST PASTA DOUGH FOR KITCHENAID MIXER - CILANTRO PARSLEY
Nov 02, 2020 · How to make The Best Pasta Dough for Kitchenaid Mixer. Add the eggs in the bowl. Using the flat beater, beat the eggs. Switch to the dough hook and throw in the flour, olive oil and salt. Beat for about 3-4 minutes, or until the dough indents when you touch it. If the dough feels too sticky, add flour.
From cilantroparsley.com
From cilantroparsley.com
See details
SOURDOUGH BREAD STAND-MIXER RECIPE | THE EASY WAY - FOODGEEK
Mix the dough. To the bowl of your stand mixer add: 576g bread flour, 144g rye flour, and 14g fine salt. Mix with the paddle attachment until all everything has been mixed together. Then add 144g sourdough starter that has grown to its peak. Then add 482g room temperature water for 70% hydration.
From foodgeek.dk
From foodgeek.dk
See details
HAND-CRANKED DOUGH MIXER | THE FRESH LOAF
Nov 21, 2013 · I've just learned that a USA manufacturer makes and markets an updated version of a hand-cranked dough mixer: EZ DOH. It claims to meet all Health Canada and USFDA recommendations for food-safe containers.It's available through Lee Valley (www.leevalley.com) a Canadian catalogue sales company I've been buying hand tools, woodworking fixtures, and kitchen gadgets from for at
From thefreshloaf.com
From thefreshloaf.com
See details
EXPERT TESTED: THE 8 BEST STAND MIXERS FOR BREAD IN 2021
Aug 11, 2021 · Hamilton Beach 6-Speed Stand Mixer Review. For the price, the 300-watt Hamilton Beach 6-Speed Stand Mixer does a decent job at mixing most bread dough and batters for quick breads. “The Hamilton is great for smaller batches and for softer doughs,” says Weber. “For the price point, this mixer will be a great addition for a novice baker.”.
From thespruceeats.com
From thespruceeats.com
See details
ELECTRIC MIXER PIE CRUST - ALL INFORMATION ABOUT HEALTHY ...
Electric Mixer Pastry | Better Homes & Gardens hot www.bhg.com. Beat at low speed with electric mixer until pieces are the size of small peas. Add water; beat at low speed just until a dough begins to form (about 15 to 20 seconds). Form dough into a ball with hands. Divide into 2 balls. Roll out and finish as for a single- or double-crust pastry.
From therecipes.info
From therecipes.info
See details
MAKING BREAD IN A KITCHENAID STAND MIXER - PRODUCT HELP ...
Adapt your Recipes/Kneading Times. Making bread in a Kitchenaid ® stand mixer is very efficient. You may have to adapt your favorite recipes and cut the kneading time significantly. Many people are amazed to learn that: Kneading for 2 minutes in your mixer is equivalent to kneading 10-12 minutes by hand. If you knead too long, the dough will ...
From producthelp.kitchenaid.com
From producthelp.kitchenaid.com
See details
dough in same manner. Adjust knob to thickness setting 2. Feed dough through rollers to further flatten. Change to setting 3 and feed dough through rollers again. Change to setting 4; feed dough through rollers twice. Repeat with remaining dough. Turn off mixer. Remove Pasta Roller and attach Spaghetti Cutter attachment. Turn mixer to Speed 4.
From kitchenaid.com
From kitchenaid.com
See details


