CLEVER KNIFE RECIPES


HOW TO COOK SPAGHETTI SQUASH IN THE MICROWAVE | KITCHN
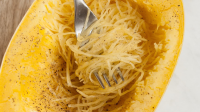
The best and easiest way to cook spaghetti squash in the microwave, with a bonus tip for much easier cutting and cleaning too!
Provided by Emma Christensen
Total Time 0S
Number Of Ingredients 4
Steps:
- Lightly score the squash where you will cut it in half: Use a paring knife and cut into the squash 1/8- to 1/4-inch deep from stem to bottom on both sides. This is the line where you will be cutting the squash in half.
- Poke the squash in a few places with either your paring knife or a dinner fork: This creates vents to allow steam to escape during the initial cooking of the squash.
- Microwave the squash for 5 minutes: Place the squash in the baking dish and microwave for 5 minutes on high. This cooks the squash a little bit and makes it easier to cut in half. Do not microwave the whole squash for longer than 5 minutes since this can cause steam to build up inside the squash and create a dangerous situation (even with vent holes poked through the shell).
- Cut the squash in half: Use oven mitts to remove the baking dish with the squash from the microwave. Place the squash on the cutting board and use a chef's knife to cut all the way through to the middle of the squash — start to one side of the stem, cut through the bottom, and then cut the other side of the squash up to the stem. Use your hands to pull the two halves apart and break the squash at the stem (don't try to cut through the stem). The squash will still be hard when you cut it and you'll need to use force, but less than if the squash was raw.
- Scoop out the seeds: Save the seeds for roasting, if you like!
- Season the squash halves (optional): If you like, rub a teaspoon of olive oil into the squash, then sprinkle with salt and pepper. This is just for flavor if you're serving the squash on its own; you can skip if it if you're planning to use the squash in a recipe or want to season it after cooking.
- Flip the squash halves upside down in the baking dish: You can cook each squash half separately if your baking dish is too small to fit both, or cook both at once. You can also save one half in the fridge to cook later.
- Fill the dish with about 1 inch of water: The exact amount isn't important; you just want the squashes to be partially submerged and to have enough water to create steam in the microwave.
- Microwave on high for 5 minutes.
- Check the squash: When done, a fork poked through the skin should slide easily into the squash. Continue microwaving on high for another 2 to 5 minutes as needed.
- Scrape the squash strands from the inside: Remove the baking dish using oven mitts and transfer the squash halves to a cutting board. Use a fork to scrape the strands of squash from the inside. You should get 6 to 8 cups of "noodles" from a 3- to 4-pound squash.
Nutrition Facts : SaturatedFatContent 1.1 g, UnsaturatedFatContent 0.0 g, CarbohydrateContent 20.8 g, SugarContent 8.5 g, ServingSize Serves 4, ProteinContent 2.1 g, FatContent 7.4 g, Calories 144 cal, SodiumContent 1004.0 mg, FiberContent 4.7 g, CholesterolContent 0 mg
QUICK ROTISSERIE CHICKEN POT PIES RECIPE | RACHAEL RAY ...
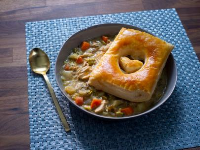
Why fuss with making a traditional pot pie? You can finish this easy stove-top version in half the time. Topping the finished filling with golden, buttery pieces of puff pastry is a delicious, fast and pretty finish to this bowl of comfort.
Provided by Rachael Ray : Food Network
Total Time 30 minutes
Cook Time 30 minutes
Yield 4 servings
Number Of Ingredients 19
Steps:
- Preheat oven to 375 degrees F. Have rack 1 rung up from center in oven.
- Gather your ingredients.
- Lightly flour work surface and roll out dough a bit; cut into 4 to 6 portions (I cut rectangles to keep it easy and based on how many people I'm feeding). Cut a small hole in center of each piece of dough with a 1-inch round or heart shaped cookie cutter, or freehand cut some slits or designs with tip of sharp small knife. Using a fork, beat an egg in a small dish with a splash of water. Line a baking sheet with a sheet of parchment and arrange dough pieces. Brush dough with egg wash and bake until puffed and golden, 20 to 22 minutes.
- Peel and chop the onion and potato. Halve the celery and carrot lengthwise and chop. Halve the leek, trim top tough greens and roots and run under cold water while fanning the leek to release grit. Shake the leek of excess water and thinly slice. Peel and slice planks off the apple around the core, then stack and dice 1/4 inch.
- Heat a Dutch oven or large deep skillet over medium to medium-high heat. Melt butter and when it foams add the onion, potato, celery, leek, apple, bay and herb bundle and season with salt, pepper and nutmeg. Cook to soften, 8 to 10 minutes, partially covered and stirring occasionally. Add flour and stir a minute. Add stock and whisk in to thicken a bit.
- Separate the chicken from the bones and skin and pull meat. Add to sauce to reheat. Remove bay and herbs. Remove chicken from heat and stir in Dijon mustard, cream and lemon juice.
- Serve the chicken and vegetables in bowls and top with pastry.
More about "clever knife recipes"
MAKE-AHEAD EGGS BENEDICT CASSEROLE RECIPE - BETTYCROCK…
This clever egg bake takes its flavor and ingredient cues from classic Eggs Benedict—think English muffins, Canadian bacon, eggs, herbs and hollandaise. We simply cut out the fuss of making individual servings in favor of a crowd-friendly casserole format. It might just be the most impressive breakfast casserole ever—and it can even be made ahead!
From bettycrocker.com
Reviews 4
Total Time 3 hours 0 minutes
Calories 320 per serving
From bettycrocker.com
Reviews 4
Total Time 3 hours 0 minutes
Calories 320 per serving
- Meanwhile, make hollandaise sauce as directed on package. Pour over top of casserole. Sprinkle with chives.
See details
ROAST TURKEY | JAMIE OLIVER TURKEY RECIPES
From jamieoliver.com
Total Time 2 hours 25 minutes
Calories 249 calories per serving
Total Time 2 hours 25 minutes
Calories 249 calories per serving
- GET AHEAD 1. Check the main turkey cavity for the bag of giblets; if they’re in there, remove and tip them into your roasting tray, discarding the bag. The added flavour they’ll give your gravy will be incredible – trust me. 2. Peel the onions, wash the carrots and roughly chop with the celery or the leek tops, then add to the tray with the unpeeled garlic cloves. 3. Place your stuffing in the neck cavity, then pull the skin back over it and tuck it under the bird. You’ll get a good contrast between the soft, juicy stuffing here inside the turkey, and the crispier stuff you can bake separately in a dish. 4. Place the softened butter on a board and press down with your hands. Pick over 3 sprigs of thyme, finely zest ½ a clementine and season with sea salt and freshly ground black pepper, and scrunch all together to make your flavoured butter. 5. Halve the clementines and place in the main turkey cavity with the remaining thyme – not filling it too full allows hot air to circulate, cooking the bird from the inside out and from the outside in. 6. Get your turkey and use a spatula to work your way between the skin and the meat. Start at the side of the cavity just above the leg and work gently up towards the breastbone and towards the back so you create a large cavity. Pick up your butter and push it into the cavity you’ve created. Use your hands to push it through the skin right to the back so it coats the breast meat as evenly as possible. Do the same on the other side. 7. Drizzle the turkey all over with 1 tablespoon of olive oil and generously sprinkle from all sides with salt and pepper. 8. Cover the turkey snugly with tin foil and place it on top of the trivet in the tray. ON THE DAY 1. Take your turkey out of the fridge 1 hour before it’s due to go in the oven. 2. Preheat the oven to 180°C/350°F/gas 4. 3. You want to cook a higher-welfare bird for 25 to 30 minutes per kg and a standard bird is 35 to 40 minutes per kg. For a 4kg bird, pop it in the oven for 1 hour 40 minutes, basting several times with all the lovely juices in the tray and covering with foil when beautifully golden brown. 4. The simplest way to check it’s cooked is to stick a knife into the thickest part of the thigh – if the juices run clear, it’s done. 5. Use heavy-duty tongs to lift up your bird so all the juices run from the cavity into the tray, then transfer the turkey to a platter and leave to rest for up to 2 hours while you crack on. You can cover it with a double layer of tin foil and a clean tea towel to keep warm, if you like. 6. Skim away the fat from the turkey tray, save it in a jar, and leave to cool. When cold, transfer to the fridge for cooking with at a later date. CARVING THE TURKEY 1. Once the turkey has rested, it’s time to carve. There are two ways you can do this. - The first method is to remove the wings, slice the skin beside the legs, then pull out and chop the legs off. You can either slice or pull this brown meat – it’s so tasty. Keep it warm while you move on to the breast meat. Use the full length of the knife in a nice smooth action to slice through the breast meat, transferring it to a platter as you go. - Alternatively, remove the leg as above, then feel where the backbone is and cut with the length of your knife all the way down beside it until you hit the carcass. You can then lift the whole breast off the bone. Remove to a board and slice.
See details
BEST HEALTHY JUICER RECIPES - COLD PRESSED JUICE RECIPES ...
Immunity Support juice recipes are packed with iron, vitamin C, E, and B6 to strengthen the immune system. Drink these recipes frequently to ensure a balanced and healthy immune system. Our Immunity Support juice recipes …
From hurom.com
From hurom.com
See details
14 CREATIVE KETO ZUCCHINI RECIPES - THE SPRUCE EATS
Feb 18, 2021 · Whether you're new to the keto diet or an experienced low-carb eater, it can be a challenge to keep things tasty. We've got you covered with these creative keto recipes that make the most of bountiful summer zucchini.You'll find genius recipes …
From thespruceeats.com
From thespruceeats.com
See details
I TRIED FOUR POPULAR BISCUIT RECIPES — HERE'S THE BEST ...
Sep 30, 2020 · For this showdown, I chose four buttermilk biscuit recipes that each had a unique point of view. Southern Living has been churning out biscuit recipes since their inception in 1966, …
From thekitchn.com
From thekitchn.com
See details
RECIPES | KITCHN
Find any recipe you need at the Kitchn, whether it’s lunch, dinner, or a special occasion. Here are our favorite recipes, how to’s, and video tutorials for easy meal ideas to cook at home.
From thekitchn.com
From thekitchn.com
See details
50+ EASY KETO RECIPES - KETO RECIPE FOR BEGINNERS | KITCHN
Jan 04, 2021 · For many, a new year means trying a new diet. While the ketogenic diet isn’t new (it’s been trending for the past few years), if you’re trying it for the first time, figuring out what to eat isn’t always easy. Generally your choices are low-carb, as the goal is …
From thekitchn.com
From thekitchn.com
See details
RECIPES | KITCHN
Find any recipe you need at the Kitchn, whether it’s lunch, dinner, or a special occasion. Here are our favorite recipes, how to’s, and video tutorials for easy meal ideas to cook at home.
From thekitchn.com
From thekitchn.com
See details
50+ EASY KETO RECIPES - KETO RECIPE FOR BEGINNERS | KITCHN
Jan 04, 2021 · For many, a new year means trying a new diet. While the ketogenic diet isn’t new (it’s been trending for the past few years), if you’re trying it for the first time, figuring out …
From thekitchn.com
From thekitchn.com
See details


