BAKING BREAD IN CAST IRON LOAF PAN RECIPES


RUSTIC CAST IRON SKILLET BREAD – 1840 FARM
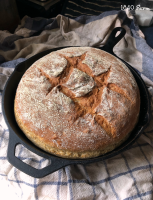
This loaf can be baked in a 10.25” or 12” cast iron skillet. I do not recommend using enamel coated cast iron for this recipe if you are baking it on the grill. If you don’t have wheat flour on hand or prefer the flavor of white flour, you can make this loaf using all bread flour. Simply use 4 cups of bread flour and omit the wheat flour from your dough. I like to use my Baking Pan Release Spread when baking this recipe. If you don’t have it in your pantry, you can use a light coating of your favorite baking pan spray or neutral-flavored cooking oil.
Provided by Jennifer from 1840 Farm
Number Of Ingredients 6
Steps:
- In a large bowl, combine the warm water and honey. Sprinkle the yeast on top and allow it to proof for a few minutes as you measure the remaining ingredients. Add the flour and salt to the bowl and stir until it is fully incorporated.
- Cover the bowl with a lid, clean kitchen towel, or piece of plastic wrap. Set the bowl in the refrigerator and allow it to rest for 2-4 hours. A longer proof in the refrigerator leads to a better tasting loaf. Two hours should be sufficient if the water was warm to the touch and the yeast was allowed to proof before adding the dry ingredients. You will know that the dough is ready to shape when it has risen slightly and has visible bubbles on the surface.
- Brush the bottom surface and sides of your cast iron skillet with Baking Pan Release Spread or add a light coating of cooking spray or neutral tasting oil.
- Remove the dough from the refrigerator. Sprinkle flour on a clean work surface. Remove the dough to the floured surface. The dough will be very sticky at first. Knead and turn the dough, shaping it into a ball as you go. Turn the dough a quarter turn with each kneading motion. Add more flour if necessary. The dough will quickly take shape and begin to lose its sticky texture. I usually knead it about 30 turns.
- Place the ball of dough in the middle of the prepared skillet. You can use a sharp knife to score the top of the loaf if you wish. Scoring the loaf will create a beautiful pattern on the baked loaf, but it isn't necessary to bake a delicious and beautiful loaf. Allow the dough to rest for around 30 minutes
- While the bread is resting, prepare your oven or grill for baking by preheating to 420-425 degrees Fahrenheit.
- When the 30 minutes have elapsed and your oven or grill is holding temperature, transfer the skillet to the preheated oven/grill. Set a timer for 30 minutes.
- Unlike an oven, grills can vary in heat during the cooking period. So, when I am baking these loaves on the grill, I usually check the temperature by glancing at our grill’s thermometer every ten minutes or so. If your grill runs a bit hotter than you would like, open the lid, adjust the heat down slightly, and consider baking your loaf for a few minutes less if necessary. It will all come out delicious in the end, I promise.
- When 30 minutes have passed, the loaf should be brown and the top surface should be crisp. Carefully remove the hot skillet from the oven or grill and transfer to a safe place to cool for 5-10 minutes.
- Transfer the loaf from the skillet to a serving board or platter. Serve and enjoy every last bite with plenty of butter!
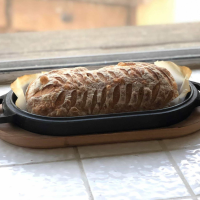
CAST IRON-BAKED BREAD LOAF RECIPE — OONI USA
Steps:
- You’ve mastered making pizza in your Ooni Pro, now it’s time to nail baking bread! Bona fide baker and one of our Pizza Taste Testers, Mike Vaona, created this recipe for a Cast Iron-Baked Bread Loaf. Use Ooni’s Casserole Dish and Sizzler Pan combo to cook your favorite bread recipe. Here, Mike gives you the option to cook your loaf using a method for sourdough or a dough made with dried yeast.IngredientsFor a sourdough loaf3.9oz (110g) water 0.25oz (7g) salt1oz (28g) sourdough culture10oz (285g) bread flourFor a loaf using dried yeast4.4oz (125g) water0.25oz (7g) salt1 tsp active dried yeastPinch of sugar10.6oz (300g) bread flourMethodTo make a sourdough loaf:Day 1Start 3 days before the day you’d like to bake bread, during the evening (at around 9pm).Mix together 0.35oz (10g) of the sourdough starter, 0.7oz (20g) of the water, and 0.7oz (20g) of the flour in a jar to feed your starter overnight. This will become an active sourdough starter, and is ready to use once it has doubled in size, which usually takes around 8-10 hours after mixing. Only 1oz (28g) of this active sourdough starter will be required for the bread recipe the following day, but this will give you extra to work with.Day 2In the morning, mix together the sourdough starter with the remaining water, plus the salt and the flour until well incorporated. Place the dough ball into a bowl, cover with a cloth and rest for 30 minutes.Stretch and fold the dough 6 times. Be sure not to overwork the dough or it will tighten and become difficult to work with. Return the dough to the bowl, cover with a cloth and rest for a further 30 minutes.Stretch and fold the dough another 6 times. Rest again for another 30 minutes, covered with the cloth.On a floured work surface, turn the dough ball out of the bowl and shape it into a smooth, round ball – hold the dough ball with both hands, and tuck the bottom edges of the dough ball inwards on itself (similar to how you would shape a ball of pizza dough before proving).Place the dough ball back into the bowl, and cover with a wet kitchen towel. Leave to rest for 1.5 hours.Place the dough in the fridge and allow to rest overnight, covered again with the wet kitchen towel.Note that the process followed on Day 2 is based on working with dough that is around 70ºF (20ºC). If the dough is cooler because of your surroundings, lengthening the final rest time might be needed – in that case, add on another hour or two to the final rest after shaping. Likewise, if you’re in a warm environment the dough may be ready sooner. The dough is ready to be placed in the fridge when it feels airy and is not cool to the touch.Day 3In the morning, remove the dough ball from the fridge.Shape the dough ball again following the same technique as on Day 2.On a tray covered with a sheet of parchment paper (greaseproof paper), place the dough ball on top and cover with an upturned bowl. Allow to rest at room temperature for 3 hours.Place the dough ball back into the fridge, still covered with the bowl.Day 4Fire up your Ooni pizza oven. Aim for 900°F (482°C) on the stone baking board inside. You can check the temperature inside your oven quickly and easily using the Ooni’s Infrared Thermometer. If using a wood-burning fire, refrain from adding wood as the temperature begins to drop, and allow the oven temperature to reduce to 600°F (315°C). Fit your Casserole Dish with the Sizzler Pan as a lid, and place inside your oven to warm up. Keep it toward the very front of the oven.When you notice the oven temperature dropping to under 450°F (232°C), add wood into the burner tray as needed (we recommend 2 small pieces at around 15-20 minute intervals) in order to maintain a rough temperature of 450°F (232°C).Remove the dough ball from the fridge, keeping the parchment paper underneath. Flour and score the top of the dough with the design of your choice.Remove the hot Casserole Dish and Sizzler Pan from your oven. Flip the Sizzler Pan over (so it’s sitting flat like a tray) and flip upside down so the Sizzler is now on the bottom. Place the dough ball, still with the parchment paper underneath, onto the Sizzler Pan.Flip the Casserole Dish upside down and place on top of the Sizzler Pan, so that the Casserole Dish is now the lid to the Sizzler Pan.Open the chimney vents on the oven.Bake the loaf in your Pro for 30 minutes, keeping the pan as close to the front of the oven as possible and with the oven door on. Remove from the oven and take the Casserole Dish off of the Sizzler Pan. Place the Sizzler Pan with the bread loaf back in the oven and bake uncovered for 15 minutes until golden brown, rotating after about 7 minutes to ensure it bakes evenly. To make a loaf using dried yeast:Over a stovetop (hob) in a pan, warm the water to around 90°F (32°C). Add the active dried yeast and the sugar. Whisk well until they have dissolved into the liquid. Allow the mixture to rest for 5-10 minutes.Add the salt and mix until dissolved. Transfer the water mixture to a large bowl and add the flour. Mix by hand until well incorporated – be careful not to over mix.Cover with a kitchen towel and leave to rest for 30 minutes.Next, follow the same method as making the sourdough loaf, starting from the stretch & fold step on Day 2.
TIPS FOR MAKING BREAD IN CAST IRON | LODGE CAST IRON
Jan 16, 2019 · On Using Cast Iron Our experts shared several reasons why they love baking in cast iron. From crust to steam they think nothing does it quite as well as a cast iron vessel. According to bread maker and scoring expert, Erin Slonakar, cast iron takes a lot of the guesswork out of baking sourdough bread. There’s no fussing with trays of boiling ...
From lodgecastiron.com
From lodgecastiron.com
See details
THE 15 BEST BREAD RECIPES YOU CAN BAKE IN YOUR CAST IRON ...
Mar 26, 2021 · Put the rolled-out dough (that's in the cast iron pan) in the warm oven and immediately turn the oven off. This will be a nice warm place for your dough to rise quickly! This crispy golden brown bread is made for dipping in olive oil or marinara sauce. 2. Whole Wheat No-Knead Skillet Bread
From wideopeneats.com
From wideopeneats.com
See details
BREAD RECIPES FOR CAST IRON - ALL INFORMATION ABOUT ...
18 Best Cast Iron Skillet Bread Recipes - Homestead & Survival trend homestead-and-survival.com. There are a variety of cast iron skillet bread recipes that you can make at home. These are great as a snack or to have with a meal. 1. Make a batch of this tasty skillet biscuit bread. photo by thisweekfordinner.com 2.
From therecipes.info
From therecipes.info
See details
HOW TO MAKE HOMEMADE WHITE BREAD IN ... - CAST IRON RECIPES
Oct 12, 2019 · Mixing. In a small saucepan, scald the milk. Add the sugar, salt, and butter to the warm milk and keep stirring until combined. Then remove from heat. While milk is coming to temperature, add yeast to warm water and stir to activate. In a large bowl or stand mixer combine half the flour, eggs, yeast ...
From castironrecipes.com
From castironrecipes.com
See details
CAST IRON LOAF PANS FROM BREAKFAST TO DESSERT - BACKWOODS ...
In a large bowl or a mixer, blend meat, eggs, oats, and onion, adding salt and pepper to taste. Line bottom of loaf pan with half of the bacon. Fill loaf pan with meat mixture, then add remaining strips of bacon on top. Bake one hour at 375° F. Remove from oven, let sit 10 minutes for flavor to absorb.
From backwoodshome.com
From backwoodshome.com
See details
CAST IRON LOAF PAN FOR BAKING BREAD, ANYONE?
Do not over beat. Lightly butter an 8 x 12 inch shallow baking pan and pour in the batter. Bake in the center of the oven for about 30 minutes, or until the bread comes slightly away from the edge of the pan and is golden brown. If you wish you make bake the cornbread in a 9 x 5 x 3 inch loaf pan or in muffin tins.
From gardenweb.com
From gardenweb.com
See details
BREAD RECIPES FOR CAST IRON - ALL INFORMATION ABOUT ...
18 Best Cast Iron Skillet Bread Recipes - Homestead & Survival trend homestead-and-survival.com. There are a variety of cast iron skillet bread recipes that you can make at home. These are great as a snack or to have with a meal. 1. Make a batch of this tasty skillet biscuit bread. photo by thisweekfordinner.com 2.
From therecipes.info
From therecipes.info
See details
HOW TO MAKE A NO KNEAD CAST-IRON LOAF | BREAD RECIPES ...
From m.youtube.com
See details
HOW TO MAKE BREAD IN A CAST IRON DUTCH OVEN | 3 SIMPLE STEPS
Jul 28, 2021 · Baking bread in a cast-iron Dutch oven is relatively simple, once you have a recipe and can prepare the dough. The major point to keep in mind is to preheat the pot properly, so it is ready to work the moisture in the dough into the all-important steam necessary for the final result.
From ovenspot.com
From ovenspot.com
See details
CAST IRON LOAF PAN FOR BAKING BREAD, ANYONE?
Bake in the center of the oven for about 30 minutes, or until the bread comes slightly away from the edge of the pan and is golden brown. If you wish you make bake the cornbread in a 9 x 5 x 3 inch loaf pan or in muffin tins. Increase the baking time to 45 minutes if using a loaf pan. Also great baked in a cast iron skillet.
From gardenweb.com
From gardenweb.com
See details
LODGE CAST IRON LOAF PAN RECIPES
2020-04-02 · Now through April 6, Lodge is offering 15 percent off bread-baking products, like the Cast Iron Loaf Pan (now $14) and 5-Quart Double Dutch Oven (now $47). The beautiful and highly reviewed enamel-coated dutch ovens are also on sale right now, as part of the bread-baking discount.
From tfrecipes.com
From tfrecipes.com
See details
QUESTION: BAKING BREAD IN A CAST IRON LOAF PAN | THE FRESH ...
Mar 06, 2014 · I like baking bread in cast iron dutch oven but lately I've been baking sandwich bread in a loaf pan. I just purchased a cast iron loaf pan and my question is, do I let the dough proof in the cast iron before baking in a hot oven? Won't the pan take long to heat up? I use the normal aluminum pans and they heat fast to bake the bread. Thanks in advance.
From thefreshloaf.com
From thefreshloaf.com
See details
PUMPKIN BREAD | OLD TIME CAST IRON
May 13, 2020 · The flavors of fall. Pumpkin bread baked in cast iron loaf pans. I found this recipe several years ago on Allrecipes.com while searching for a pumpkin bread recipe. This recipe was created by Laurie Bennett. I tweaked a few things with this recipe and want to share this delicious mouth-watering serving of autumn with you.
From oldtimecastiron.com
From oldtimecastiron.com
See details
HOW DO I KEEP BREAD FROM STICKING TO MY CAST IRON? – 5 ...
If you want to keep your bread from sticking, try using parchment paper. Creating a barrier between the bread dough and the cast iron will prevent it from sticking to the pan. There are other things you can try too. For example, oiling and preheating the pan or letting the bread cool for 15 minutes after baking all help reduce sticking.
From trycookingwithcastiron.com
From trycookingwithcastiron.com
See details
CAST IRON PAN BREAD RECIPE - EASY SKILLET DEEP DISH PIZZA ...
Jan 14, 2022 · Here are a number of highest rated Cast Iron Pan Bread Recipe pictures upon internet. We identified it from trustworthy source. Its submitted by management in the best field. We assume this kind of Cast Iron Pan Bread Recipe graphic could possibly be the most trending subject when we allowance it in google benefit or facebook.
From cdn.mind.org.uk
From cdn.mind.org.uk
See details
SKILLET BREAD - I HEART EATING - I HEART RECIPES
Apr 21, 2020 · In the bowl of a stand mixer fitted with the dough hook, stir the water, honey, and yeast together. Let mixture sit for 5-10 minutes, or until foamy. Add 2 ½ cups of flour, olive oil, and salt. Knead on low, continuing to add flour ¼ cup at a time until it forms a soft, smooth dough that clears the sides of the bowl.
From ihearteating.com
From ihearteating.com
See details
CAST IRON BANANA BREAD FOOD - ALLFOODSRECIPES.COM
Stir in 1/2 cup chocolate chips., Transfer to a greased 10-in. cast-iron or other ovenproof skillet; sprinkle with remaining 1/2 cup chocolate chips. If desired, top with dried banana chips. Bake until a toothpick inserted in center comes out clean, 25-30 minutes. Cool in pan on a wire rack.
From allfoodsrecipes.com
From allfoodsrecipes.com
See details
CAST IRON SKILLET BANANA BREAD {DELICIOUS & PERFECTLY BAKED}
Jul 02, 2020 · In a large mixing bowl, add the dry ingredients. Next, add in the bananas and eggs. Add the oil, vanilla and milk and then mix well with a hand mixer for about three minutes. Pour into a well greased cast iron skillet. Bake for 30 to 35 minutes or until a toothpick comes out clean from the center. I hope you enjoyed this banana bread recipe.
From twopinkpeonies.com
From twopinkpeonies.com
See details
THE 10 BEST LOAF PANS OF 2021, TESTED BY ALLRECIPES ...
Jul 13, 2021 · "The cast iron loaf pan created crispy edges that none of the other loaf pans could emulate," says Samantha. The release was a bit more difficult and there was a slight amount of sticking to the edges that was harder to clean off. As with all cast iron it's not dishwasher-friendly and you have to be careful with water.
From allrecipes.com
From allrecipes.com
See details


