WIRE BRUSH RECIPES


CHOCOLATE BABKA RUGELACH RECIPE - NYT COOKING

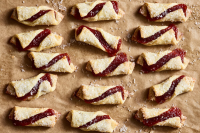
These festive, fudgy confections are a mash-up of two traditional Jewish favorites: rugelach and chocolate babka. They have a tender, flaky pastry wrapped around a bittersweet truffle-like filling that’s sprinkled with chopped nuts or cocoa nibs for a contrasting crunch. A topping of Demerara sugar adds texture, and a little flaky sea salt cuts the sweetness perfectly. These are best served within five days of baking (store them in an airtight container at room temperature). They also freeze well for up to one month, with parchment or waxed paper between layers.
Provided by Melissa Clark
Total Time 1 hours 30 minutes
Yield 4 dozen rugelach
Number Of Ingredients 21
Steps:
- Make the dough: Using a stand mixer fitted with the paddle attachment or a hand-held electric mixer, beat cream cheese and butter on medium speed until smooth and well blended. Beat in sugar and vanilla extract. Reduce speed to low, and gradually add flour and salt until just incorporated.
- Scrape dough onto plastic wrap. Divide dough into 4 portions, form each into a disk and wrap each in plastic wrap. Refrigerate for 2 hours or up to 5 days.
- Prepare the fudge: In a medium saucepan over medium heat, combine sugar, cream, and salt. Simmer, stirring occasionally, until sugar dissolves completely, about 5 minutes. Scrape mixture into a bowl. Add chocolate, butter and vanilla, and let sit for 5 minutes to soften the chocolate, then mix until melted and smooth. (Fudge can be made up to 2 weeks ahead and stored, covered, in the refrigerator. Let come to room temperature before using; it’s too firm to spread when cold.)
- Make the crumb filling: In a small bowl, stir together flour, sugar, cocoa powder and salt. Stir in melted butter until it is evenly distributed and the mixture forms large, moist crumbs. Set aside.
- Line 4 baking sheets with parchment paper or nonstick liners, or lightly butter the pans, if you like. Working with 1 piece of dough at a time, remove it from refrigerator and allow it to sit at room temperature for about 5 minutes, or until malleable enough to roll out.
- On a clean, lightly floured work surface, roll out dough into a 9-inch circle, about 1/8-inch thick. Rotate dough while rolling to ensure it does not stick to the work surface.
- Using the back of a spoon, evenly spread 2 tablespoons of fudge onto the rolled-out dough. Sprinkle about 1/2 cup of sugar cocoa crumbs over fudge. Sprinkle 2 tablespoons of chopped nuts over the crumbs, and, using your hands, press the filling firmly and evenly into the dough.
- Using a sharp knife, cut the dough circle into 12 triangles, like pieces of a pie. With an offset spatula or thin knife, loosen the triangles from the work surface. Starting at the wide end of the triangle and working to the narrow tip, roll up each piece and bend the ends around to form a slight crescent shape.
- Place rugelach, narrow tip tucked beneath, on a prepared baking sheet, leaving about 1 1/2 inches between each. Refrigerate, lightly covered with plastic wrap, for at least 30 minutes (and up to 24 hours) to help them keep their shape in the oven. Repeat with the remaining dough, fudge and filling. (Clean your work surface before rolling out the next batch of dough.)
- When ready to bake, heat oven to 350 degrees. In a small bowl, stir together Demerara sugar and a large pinch of flaky salt. Brush rugelach with milk and sprinkle sugar-salt mix on top.
- Bake, 2 sheets at a time, until lightly browned, 17 to 25 minutes. Rotate cookie sheets halfway through for even baking. Transfer sheets to a wire rack to cool completely.
GUAVA AND CREAM CHEESE TWISTS RECIPE - NYT COOKING
In Puerto Rico and other parts of the Caribbean, pastelillos (also known as pastelitos) are flaky pastry turnovers that taste like bliss when eaten fresh from the bakery, their jammy guava centers fused with creamy cheese. These cookies capture a bit of that magic in packable, sturdy sweets that can be kept for days and easily shared or shipped. Instead of being filled with perishable cream cheese, these have it blended into their buttery dough to incorporate that tangy richness. Guava paste seals into the pastry while baking, delivering a chewy fruitiness with each bite.
Provided by Genevieve Ko
Total Time 2 hours
Yield About 50 cookies
Number Of Ingredients 8
Steps:
- Using an electric mixer on medium-high speed or a large bowl and wooden spoon, beat butter and cream cheese until creamy and smooth. With the machine running, add sugar and salt, and continue beating until a little fluffy. Add egg yolk and beat until incorporated. (Reserve egg white.) Add flour all at once and mix just until incorporated. Halve the dough, and place each half on plastic wrap. Using the plastic wrap, press each half into a 1-inch-thick rectangle. Wrap tightly and refrigerate until firm, about 2 hours.
- When ready to bake, cut guava paste into 50 1/4-inch-thick rectangles (2 inches long, ½-inch wide). Line 2 baking sheets with parchment paper. Heat oven to 350 degrees.
- On a generously floured surface, using a well-floured rolling pin, roll out 1 dough rectangle until roughly 15 1/2 inches long, 6 1/2 inches wide and 1/8-inch thick. Trim the edges, then cut into 24 (2 1/2-by-1 1/2-inch) rectangles. (You will have 48 rectangles from the initial rolling; the final two rectangles will come from rolled-out scraps.) Transfer to a prepared sheet, spacing 1 inch apart. If the dough has gotten too soft to handle, refrigerate until firmer but still very pliable.
- Place a guava paste rectangle in the center of each piece of dough on a diagonal. (It should not extend past the dough.) Take the dough corner opposite the top of a guava rectangle and wrap it over the guava paste so that the point meets the opposite edge; press the dough corner gently to secure. Take the corner diagonally opposite to the folded one and fold over the other end of the guava paste, pressing the corner gently against the other edge. Repeat with the remaining dough and guava paste. Chill and reroll dough scraps. If the assembled dough is soft, and you’d like to decorate the tops, chill or freeze again.
- For a sparkly, crunchy and sweet top, lightly brush the top of the dough with the reserved egg white and sprinkle with sparkling sugar. (These taste just as good without any topping.) Bake, 1 sheet at a time, until golden brown around the edges, 13 to 15 minutes. (The paste may ooze out.) Cool completely on the sheets on wire racks. The cookies are best the day they’re made, but will keep in an airtight container for up to 5 days.
DANGERS OF WIRE GRILL BRUSHES - GRILL CLEANING SAFETY
May 30, 2015 · Doctors warn that using wire bristle brushes could be hazardous to your health. The risk: The brush's wire bristles can break off, remain on the grill grate and end up in the food you're cooking ...
From goodhousekeeping.com
From goodhousekeeping.com
See details
SUMMER DANGER: BBQ GRILL BRUSH WIRES CAUSING BIG HEALTH ...
Jul 02, 2015 · BBQ Grill Brush Wires Causing Big Health Woes. If ingested, stray wire bristles can pierce throat, intestines, public health experts warn. THURSDAY, July 2, 2015 (HealthDay News) -- Before you ...
From webmd.com
From webmd.com
See details
WHAT IS HYPERTUFA: INFORMATION FOR USING AND COMPLETING ...
Jul 23, 2021 · Moisten the peat moss with water and then thoroughly mix the three ingredients using a spade or trowel. There should be no lumps. Gradually add water, working the mix after each addition. When ready, the hypertufa should have the consistency of cookie dough and hold its shape when you squeeze it.
From gardeningknowhow.com
From gardeningknowhow.com
See details
HOW TO CLEAN A GRILL WITHOUT A WIRE BRUSH | TASTE OF HOME
Jun 06, 2018 · Mix Vinegar & Ammonia. For the most stubborn, baked-on gunk, put your grill grates into a trash bag with 3 cups ammonia, 3 cups white vinegar and 1 cup baking soda. It will deliver a deep clean with ingredients you probably already have.
From tasteofhome.com
From tasteofhome.com
See details
UPDATED WITH RECIPE! - SIMPLY CLEAN LIVING
Dec 30, 2011 · Basically you will need a spray bottle, liquid fabric softener, water, and a wire brush or wide tooth comb. Fill a spray bottle with 2 tablespoons liquid fabric softener, and then fill the rest with water. Shake to mix well.
From simplycleanliving.blogspot.com
From simplycleanliving.blogspot.com
See details
HOW TO TAN HIDES USING TRADITIONAL METHODS PART 1 • NEW ...
Jan 31, 2018 · Wire brush or scraper; Neat’s foot oil or Mink oil; Nails and a hammer; Directions. 1. Soak the hide in clean warm water for several hours to make sure it is flexible. 2. Boil the three gallons of the water you have set aside. 3. Pour the boiling water over the bran flakes. 4. Allow the mixture to settle for approximately 60 minutes. 5.
From newlifeonahomestead.com
From newlifeonahomestead.com
See details
5 GRILL BRUSHES ON AMAZON WITHOUT METAL BRISTLES | EPICURIOUS
From epicurious.com
See details
FLY TYING MATERIALS | FLY TYING RECIPES | FLY TYING ...
These dubbing brushes are made from Crystal Web (one of the best fly tying tinsel and wing materials on the market). Brush is 4" wide Crystal Web with 6" long Northern Lights as an accent and a touch of StarBurst fiber. 12" long brush in 10 colors. (Made when ordered). Price: $5.00 per brush
From flytyersdungeon.com
From flytyersdungeon.com
See details
UPDATED WITH RECIPE! - SIMPLY CLEAN LIVING
Dec 30, 2011 · Basically you will need a spray bottle, liquid fabric softener, water, and a wire brush or wide tooth comb. Fill a spray bottle with 2 tablespoons liquid fabric softener, and then fill the rest with water. Shake to mix well. The first time I worked on the doll, I used a wire brush, but later for the Barbies I just used a wide-tooth comb and it ...
From simplycleanliving.blogspot.com
From simplycleanliving.blogspot.com
See details
JUST A CAUTIONARY RE: GRILLING WITH A WIRE BRUSH - BLOGS ...
Aug 21, 2019 · I just wanted to give a fyi that if or when barbequing on the grill, utilizing a wire grill brush may result in the wire getting caught in the food of which you're grilling. There was a program on tv ("Monsters Inside of Me") about a woman who was at a bbq and felt a sharp pain in her throat. She'...
From community.qvc.com
From community.qvc.com
See details
ANJA DUNK’S CHRISTMAS CAKES, BAKES AND CHOCOLATE RECIPES ...
Dec 01, 2021 · Transfer to a wire rack and brush with the melted butter repeatedly until all the butter is used up. Sprinkle with the vanilla sugar, then sift over the icing sugar. This is best eaten within a ...
From theguardian.com
From theguardian.com
See details
HOW TO CLEAN A GRILL WITHOUT A WIRE BRUSH | TASTE OF HOME
Jun 06, 2018 · Using a grill brush isn’t the only option when it comes to getting your grill clean between barbecue sessions. These unexpected ideas for how to clean a grill will all get the job done effectively, no brush required. You won’t feel guilty about firing up the grill to cook extra-saucy BBQ recipes this summer, because any leftover marinade will come off in minutes.
From tasteofhome.com
From tasteofhome.com
See details
12 SURPRISING WAYS TO USE A STEAM CLEANER IN YOUR KITCHEN
Jul 15, 2020 · 35 Party Appetizer Recipes Your Guests Will Love Whether you're looking for classic bite-sized party appetizers like bruschetta, deviled eggs, and cocktail meatballs to gather with family and friends, or need ideas for festive finger food or holiday platters that you can make ahead of time, we've got all the inspiration you'll need in this special collection of our best party appetizer recipes.
From allrecipes.com
From allrecipes.com
See details
SANDING CAST IRON POTS | RESTORING CAST IRON | WHAT'S ...
Using a wire wheel brush on a drill to clean cast iron pans from Wes Chitwood of Atlanta, GA. Just a quick note about cleaning cast iron frying pans. Using a wire wheel brush on a drill or other tool will clean rust and other “nastys” of the skillet very well. I use a bronze wire wheel, but brass works just as well.
From whatscookingamerica.net
From whatscookingamerica.net
BEST BEEF TENDERLOIN ROAST RECIPE (WITH CHERMOULA SAUCE)
Dec 08, 2021 · Slow-roast the tenderloin. Place the sheet pan with the rack and seasoned tenderloin on top on the center rack of the heated oven. Roast for 2 to 3 hours at 225 degrees F or until the tenderloin is cooked to an internal temperature between 120 and 125 degrees F for medium-rare. Remove the meat from the oven for now.
From themediterraneandish.com
From themediterraneandish.com
See details
5 GRILL BRUSHES ON AMAZON WITHOUT METAL BRISTLES | EPICURIOUS
Jun 07, 2018 · The best way to clean the grates of your grill is with a grill brush—but wire grill brushes have recently been getting some pretty scary press.Apparently the small wires from metal grill brushes ...
From epicurious.com
From epicurious.com
See details
BBQ CLEANING TOOL | UNITED STATES | GREAT SCRAPE
The Great Scrape is an all-natural BBQ cleaning tool and wood grill scraper. It is an alternative to the old metal wire brush. It custom grooves to uniquely fit your barbecue grill without having to worry about metal bristles or harming your grill grates. It is made of solid premium hardwood and is designed for years of grilling pleasure.
From thegreatscrape.com
From thegreatscrape.com
See details
BEST GRILLING TOOLS & EQUIPMENT | AMERICA'S TEST KITCHEN
Barbecue Basting Brushes: Long-handled barbecue basting brushes allow you to safely apply oil or sauce to food on the grill without burning your fingers. Our favorite is the Elizabeth Karmel Super Silicone Angled BBQ Brush. It’s come out on top of our last two barbecue basting brushes reviews thanks to its 12-inch handle, long bristles, and a ...
From americastestkitchen.com
From americastestkitchen.com
See details
10 BEST DIY HOMEMADE GROUT CLEANERS - HOME REMEDIES
Don’t use wire brush as they can damage the grout and tile. To protect your skin from the harmful chemicals, wear gloves while cleaning the grout lines. Before using any recipe, test them on a smaller area to know its outcome. Whenever any stain occurs, clear it immediately. Do not try to clean the cracked grouts.
From homeremedyshop.com
From homeremedyshop.com
See details
RECIPES-FOR-BARS-BROWNIES-BLONDIES.DOCX - MATERIALS NEEDED ...
Materials needed in any of these recipes: 1. Parchment paper 2. Pastry brush (optional) 3. Wire whisk 4. Heat-proof rubber spatula 5. Measuring cups and spoons 6. Mixing bowls 7. Strainer or sifter 8. Digital weighing scale (optional) 9. Electric hand mixer (for efficient creaming and mixing) For the bain marie method: 1. Casserole 2. Bowl (Heatproof glass or thick metal bowl or any heatproof ...
From coursehero.com
From coursehero.com
See details


