PLASTIC SPATULA MELTED IN FOOD RECIPES


EASY CHOCOLATE-DIPPED APRICOTS (APRICOT ... - FOOD.COM
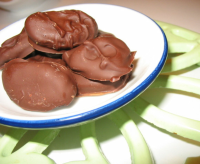
This is a quick homemade candy delicacy that can also be used as a tastier take on Chanukah gelt, inspired by a recipe in Martha Stewart Living. I used Ghirardelli bitterwsweet baking chocolate bars. After you make the chocolate-dipped apricots, read up on how to play dreidel and use the candies in place of coins. These morsels make a great gift for any occasion.
Total Time 35 minutes
Prep Time 30 minutes
Cook Time 5 minutes
Yield 48 pieces
Number Of Ingredients 3
Steps:
- Line two baking sheets with parchment paper.
- Heat chocolate over a double-boiler. Allow the water in the boiler to get hot but not fully boil. Use a plastic spatula to scrape chocolate away from the sides. Remove from heat as soon as the chocolate is melted. If you prefer to use a microwave, melt the chocolate in a glass bowl in short intervals, stirring well with spatula.
- Immediately add all the apricots to the pot melted chocolate, and stir gently until they are all coated fully. Carefully lift each piece out of the pot with a fork, allowing some of the excess chocolate to drip off. For a more sophisticated look, you can also try holding each apricot by one end with your fingers and dipping only half of it into the chocolate.
- Place carefully on parchment-lined baking sheet. Refrigerate until the chocolate has become firm (20-30 minutes). Optionally, you can wrap individually in foil wrappers to give as gifts. Store in the refrigerator - If refrigerated, they can last up to a week (though they are best if eaten within 3 days).
Nutrition Facts : Calories 22.8, FatContent 0.1, SaturatedFatContent 0, CholesterolContent 0, SodiumContent 0.9, CarbohydrateContent 5.9, FiberContent 0.7, SugarContent 5.1, ProteinContent 0.3
CANDY MAKING : HOW TO MELT CHOCOLATE | JUST A PINCH RECIPES

There are some tricks to successfully melting chocolate. Whether you are working with dark, semisweet, milk, or white chocolate, here are some tips to follow. These tips are from : By Linda Larsen, About.com Guide
Provided by Karla Everett @Karla59
Categories Candies
Number Of Ingredients 1
Steps:
- Melting chocolate is not the same as tempering chocolate, although melting is a necessary step in the tempering process. Melting chocolate can be accomplished in a microwave or over a hot-water bath. There are a few fundamental guidelines to successfully melting chocolate: Make sure the chocolate is chopped into uniform pieces to ensure even melting. Never try to melt large bars or blocks of chocolate that have not been chopped.
- When melting chocolate on a double boiler, be sure to use a thermometer.
- Avoid all contact with water! Chocolate will seize and become unworkable if it comes into contact with even a few droplets of water. Make sure your bowls, workstation, and spatulas are completely dry. Melt the chocolate slowly over low heat. Chocolate is very delicate and can become lumpy or grainy if overheated. Stir the chocolate frequently with a rubber spatula, once the outer edges start to melt. Chocolate retains its shape when melted, so the only way to know if it is truly melted is to stir it. Do not rely on appearances alone.
- Melting Chocolate in the Microwave The microwave is a great tool for melting chocolate. If used properly, it can melt chocolate more quickly than a double boiler with minimal effort and mess. The most critical part of melting chocolate in the microwave is choosing an appropriate container. Ideally, you want to melt your chocolate in a microwave-safe bowl that remains cool or only slightly warm after several minutes of near-continuous microwaving. If the bowl is too hot for you to handle after it has been microwaved, it is too hot for your chocolate. If you have overheated your chocolate, immediately pour it into a cool bowl add chunks of unmelted chocolate, and stir continuously.
- It is preferable to melt your chocolate on a low (50%) power setting, to avoid scorching or burning it. If your microwave does not have this option, heat the chocolate in shorter intervals and stir between each bout of heat. Additionally, if your microwave does not have a turntable that rotates the bowl of chocolate, manually turn the bowl each time you stop and stir the chocolate. White chocolate or vanilla milk chips are the most difficult to melt. Too much heat will make this type of chocolate seize.
- It is very difficult to determine exact microwaving times, as it can vary depending on microwave wattage, quantity of chocolate, and even the cocoa butter content of the chocolate. However, as a rough guide, estimate about 1 minute for 1 ounce of chocolate, 3 minutes for 8 ounces of chocolate, 3.5 minutes for 1 pound of chocolate, and 4 minutes for 2 pounds. Run the microwave in 30 second-1 minute increments, stirring in between and rotating the bowl if necessary. Finish heating when most, but not all, of the chocolate is melted. Stir the chocolate continuously until it is smooth, shiny, and completely melted.
- Melting Chocolate With a Double Boiler The traditional method of melting chocolate is to use a double boiler. A double boiler is a specialized set of pans consisting of a saucepan that holds hot water, and a bowl that fits securely over the saucepan. Chocolate is placed in the top bowl and allowed to melt over gentle, indirect heat. If you don’t own a double boiler, any metal or glass bowl that fits snugly over the top of a saucepan can be used.
- Begin by filling the saucepan with hot water from the tap. You want enough water to provide heat, but not so much that the bottom of the chocolate bowl touches the water. Heat the saucepan over low heat until it just begins to simmer, then turn off the stove and place the chocolate bowl over the water. If you are melting large amounts of chocolate, begin with 1/3 of your final quantity and melt in batches, waiting until the chocolate in the bowl is melted before adding more unmelted chunks. Let the chocolate begin to melt, and then stir it gently with a plastic spatula. When almost all of the chocolate is melted, life the top bowl from the saucepan and set it on the counter. Stir continuously until it is shiny, smooth, and completely melted.
- Melting Chocolate With Liquids Many recipes call for melting chocolate along with liquids like milk, cream, water, or liqueurs. Melting chocolate with liquids is often faster and more convenient, since it often speeds melting times and prevents common chocolate problems like overheating. However, there are a few things to keep in mind when melting chocolate with other substances. Chocolate should never be melted with very small amounts of liquid. Always use at least 1 tablespoon of liquid for every 2 ounces of chocolate. This prevents the dry particles (cocoa and sugar) in the chocolate from binding together and becoming lumpy. Very dark chocolates may require more than this guideline, so be prepared to add another spoonful or two of liquid if necessary. When adding large quantities of liquid, add it all at once, rather than in small amounts, to prevent the chocolate from thickening.
- Cold liquids should never be added to melted chocolate, as it can cause the chocolate to seize. Instead, ensure that your liquids are warm (but not boiling) when you add them to chocolate. Additionally, many recipes, like ganache, call for hot liquids to be poured over chopped chocolate. The heat from the liquid melts the chocolate, while the room temperature chocolate cools down the liquid. If you are following this method, allow the hot liquid and chocolate mixture to sit for a few minutes, then gently whisk them together until completely incorporated. Another useful tool for combining chocolate and hot liquids is an immersion blender. This handheld gadget does an excellent job of creating a smooth emulsion without incorporating air bubbles. Food processors, blenders, and electric mixers can also be used at low speeds.
82 THE MELTED SPATULA: RECIPES IDEAS | RECIPES, FOOD, FOOD ...
Mar 28, 2012 - Recipes from my food blog, www.themeltedspatula.com & www.facebook.com/TheMeltedSpatula. See more ideas about recipes, food, food blog.
From pinterest.com
From pinterest.com
See details
MELTED A BIT OF MY PLASTIC SPATULA ON MY PAN WHILE COOKING ...
Melted a bit of my plastic spatula on my pan while cooking I'd like to preface this that, in spite of me being a dumbass, I'm fairly new to cooking. So, with that said, I was making some eggs and accidentaly left my plastic spatula in the pan.
From reddit.com
From reddit.com
See details
MELTED PLASTIC IN THE OVEN, CAN I STILL EAT FOOD? - THE ...
Jan 05, 2021 · With the help of a spatula with a razor blade, clear out the brittle plastic. Be very careful because you don’t want to damage the oven interior. Self-cleaning oven. Some ovens have this feature that allows them to clean the insides of the oven. Do the important settings to turn this feature on and then using a spatula, scrape off the melted plastic.
From thewholeportion.com
From thewholeportion.com
See details
MELTED PART OF A PLASTIC SPATULA ON THE RIM OF A FRYING ...
Melted part of a plastic spatula on the rim of a frying pan. Is the pan still ok to use? Accidentally left a plastic spatula propped up on top of the rim of a nonstick frying pan while heating, and part of the spatula has melted on top of it.
From reddit.com
From reddit.com
See details
WILL I GET SICK IF I EAT FOOD THAT A PLASTIC SPOON MELTED ...
It turns out the plastic spatula you’ve been using to flip your food, could be damaging your liver and thyroid. Plastic utensils produce harmful toxic byproducts that can contaminate food when heated. The toxic byproducts, known as oligomers, are formed during plastic production and may be poisonous to humans. Do plastic forks melt? 2 Answers.
From seniorcare2share.com
From seniorcare2share.com
See details
WILL I GET SICK IF I EAT FOOD THAT A PLASTIC SPOON MELTED ...
Answer (1 of 6): Did the plastic actually melt into the food or did the spoon simply heat up and get disfigured? There is a difference because you won’t ingest any plastic from the spoon if it is still in one piece and if it is a new plastic spoon it won’t have any materials that would be harmful...
From quora.com
From quora.com
See details
IS IT SAFE TO USE PLASTIC SPATULA? | - FROM HUNGER TO HOPE
Nov 05, 2021 · Plastic spatulas are safe to use as long as they follow the appropriate cleaning instructions. If you follow the instructions provided by the product manufacturer, plastic spatulas are safe to use. However, if not, you can cause serious harmful effects to yourself and others. Cutting with plastic spatulas is a common kitchen task.
From fromhungertohope.com
From fromhungertohope.com
See details
FOUND A PIECE OF MELTED PLASTIC FROM A SPATULA IN MY FOOD ...
Mar 03, 2019 · Found a piece of melted plastic from a spatula in my food. induced vomiting and am freaking out whether i ate some small pieces and how toxic it is! 1 doctor answer • 3 doctors weighed in. Share. Dr. Jeffrey Juchau answered. Family Medicine 33 years experience.
From healthtap.com
From healthtap.com
See details
82 THE MELTED SPATULA: RECIPES IDEAS | RECIPES, FOOD, FOOD ...
Mar 28, 2012 - Recipes from my food blog, www.themeltedspatula.com & www.facebook.com/TheMeltedSpatula. See more ideas about recipes, food, food blog.
From pinterest.com
From pinterest.com
See details
17+ MELTED PLASTIC IN OVEN CAN I STILL EAT FOOD - FOODS ...
Dec 04, 2021 · That is melted plastic. First by no means contact the new floor of the plastic. Is Melted Plastic in Oven Harmful. ABSOLUTELY DO NOT EAT. I’d separate the a part of the cake the place the. You is perhaps questioning If I melted plastic within the oven can I nonetheless eat the meals And that may be a nice query.
From food.sarahsoriano.com
From food.sarahsoriano.com
See details
STRIPED SPATULA RECIPES
Easy Keto Beef Lasagna Low Carb Recipe (5 Net Carb) … 7 hours ago In a double boiler, combine gouda cheese cut in pieces and full-fat cream cheese. Let it melt until homogeneous while stirring with spatula. Once the cheese is melted, add in two eggs, salt, and pepper. Make sure the ingredients are well mixed.
From share-recipes.net
From share-recipes.net
See details
WHAT TO DO IF I ACCIDENTALLY MELTED PLASTIC IN THE OVEN ...
Aug 09, 2021 · Food lover guides and recipes. ... spatula, or chopstick to remove the plastic (metal utensils will harm the finish). ... we have also discussed the ways to clean melted plastic from the oven along with discussing whether you should consume food with melted plastic in it and what effects can melted plastic have on your health if ingested or ...
From thewholeportion.com
From thewholeportion.com
See details
GOOD QUESTION: HOW DO I GET MELTED PLASTIC OFF THE OVEN ...
Jun 24, 2009 · We’ve totally had this problem. Julie asks: I’ve had a bad week when it comes to plasticware in the kitchen. First I forgot that a bunch of stuff—including some plastic food savers from Ikea—had been stored in the oven, and turned the oven on just long enough to melt one of them. Now there’s a little bit of residue on the bottom plate of the oven, which is removable.
From thekitchn.com
From thekitchn.com
See details
WHAT'S A SAFE SPATULA TO USE FOR FRYING ANYTHING IN A PAN ...
Using a greased spatula, scoop as much batter as possible into a greased pan, and use a greased offset spatula to smooth the top. Let sit for a minimum of 8 hours to cure, then cut into cubes and coat in an equal mixture (w/w) of cornstarch and powdered sugar.
From reddit.com
From reddit.com
See details
MELTED NYLON/PLASTIC ON MY LE CREUSET SKILLET - COOKWARE ...
Jan 06, 2011 · Melted nylon/plastic on my Le Creuset skillet. Ahh, help...I was cooking with my skillet and it for sure was too hot since the plastic/nylon turner I was using seemed to leave some melted residue on it, and I have no idea how to get it off. I've already tried freezing it and chipping away at it with a wooden handle and boiling a water+baking ...
From chowhound.com
From chowhound.com
See details
MELTED PLASTIC IN OVEN - ALL INFORMATION ABOUT HEALTHY ...
How to Remove Melted Plastic from Your Oven new blog.fantasticservices.com. There are two main methods for cleaning plastic from inside the oven. To get melted plastic off your hob - use either WD-40 or boiling water and a putty knife. Freezing your oven racks can make removing the plastic off of them, a walk in the park.
From therecipes.info
From therecipes.info
See details
RUBBER SPATULAS - COOKSINFO FOOD ENCYCLOPAEDIA
May 13, 2005 · Not all rubber and plastic ones are overly heat proof. Unless you know for sure it’s heat resistant, don’t use a rubber spatula for stirring food while it’s cooking. Newer ones may be heat-safe from 175 to 290 C (350 to 550 F), which is much better than the ones still hanging around unused in drawers from the 1970s and 1980s.
From cooksinfo.com
From cooksinfo.com
See details
WHICH IS BETTER RUBBER OR SILICONE SPATULA?
Oct 18, 2021 · Silicone rubber withstands high and low temperatures far better than organic rubbers. Silicone rubber can be used indefinitely at 150°C with almost no change in its properties. It withstands use even at 200°C for 10,000 hours or more, and some products can withstand heat of 350°C for short periods.
From topcookingstories.com
From topcookingstories.com
See details
AMAZON.COM: TENTA TENTA KITCHEN NONSTICK COOKWARE THIN ...
Long Angled Slotted Spatula--A cooking utensil with a wide, flat blade that is not sharp, easy for lifting food out of pans Measurements:The spatula blade measures 3.94" in width at the longest point and 5.3" in handle.. Wide thin: (0.02~0.08 inch thin) but durable nylon blade does the turner job perfectly! Applications: This reliable and ergonomically shaped spatula is perfect for folding ...
From amazon.com
From amazon.com
See details
RECIPE: CLASSIC SLOW COOKER QUESO - EXPRESSNEWS.COM
Dec 15, 2021 · Cover and cook on the low setting for 2-3 hours or until the cheese is completely melted. While the queso is cooking, occasionally scrape the sides of the slow cooker with a spatula to prevent the ...
From expressnews.com
From expressnews.com
See details


