PLASTIC JARS WITH LIDS RECIPES


CANNING BUTTER | JUST A PINCH RECIPES
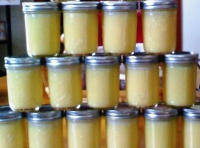
Whenever you find a sale on REAL butter, go ahead and stock up. You can freeze butter or you can home-can it. Canned butter lasts for years if the seals are secure and it's kept in a cool place. Always pressure can butter instead of water-bathing it. Butter is dairy and non-acidic so the water bath method will not stop botulism. Canning butter is so easy and the best type of jars to use are half-pint, wide-mouth jars. The wide mouth makes it easier to get the butter out of the jars and opening a half pint at a time is convenient for most families.
Provided by Donna Graffagnino @StillWild
Categories Spreads
Prep Time 10 minutes
Cook Time 1 hours 20 minutes
Yield 10
Number Of Ingredients 12
Steps:
- Oven – set to 250* F – This is for heating the jars. You don’t have to heat your jars in the oven, but if you use water, you will need to dry out the jars before adding the melted butter. That’s kind of a pain, so put your jars on a baking sheet and put them in the oven set to 250*F for about 20 minutes before adding the butter.
- Go ahead and put 3-4 inches of water in your pressure canner and bring up the heat.
- Boiling butter: Put water in the pan to heat lid and rings, go ahead and bring the heat up under that as well. Put the butter in a heavy pot and melt it, bring it to a boil then reduce the heat to a simmer. Let the butter simmer for 10 minutes or so. You’re evaporating some of the moisture from the butter and getting it good and hot. Be sure to stir it and don’t allow any of the milk solids ( the little while particles) to burn and don’t let it boil over!
- Once everything is good and hot, carefully take the jars out of the oven. Place the jars right side up on a clean dish cloth and place the canning funnel in the jars one at a time and fill the jars with hot butter, leaving a 1/2" head space.
- Using a clean cloth dipped in vinegar and then squeezed out, clean off the jar rims. Place lids and rings on each jar, tighten the rings just firmly but not hard.
- Put the jars in the pressure canner that has 3-4 inches of hot water in it. I put in a couple of strategically placed clean dish cloths in case the little jars topple over. They can rattle against the sides and each other and break.
- Half-pints of butter in the canner: Put the lid on the canner and fasten it down. Allow steam to flow out of the vent for about 10 minutes. Place the weight (at 10 pounds) or gauge (11 pounds) on the vent and when it reaches the correct pressure (when the weight begins to rattle) start timing.
- Allow the pressure canner to chug along for 60 minutes for these half pints. After 60 minutes, take the canner of the heat and allow it to release its pressure naturally. You might hear the lids sealing while the jars are still in the canner, that’s okay.
- Once all the pressure is gone and you can safely open the canner, open it up and take the jars out of the canner. Place them on a clean towel to cool.
- Because this is pressure canned, and the butter is subjected to high temperatures, you may see the milk solids clump together and fall to the bottom of the jar. That’s OK! Jut give your jars a shake as they cool to combine the solids and the liquids. As the butter solidifies, the solids will be dispersed throughout the liquids and it will look like you expect butter to look.
- Check for seals after it cools. Store canned butter in a dark cool, dark place, (a cardboard box works great). If you want the butter to be firm, then refrigerate a jar before you open it. Whatever you don't use, just store in the fridge until you need it again.
TOMATO SAUCE FOR CANNING RECIPE | SEAN TIMBERLAKE | FOO…
Provided by Sean Timberlake
Total Time 16 hours 0 minutes
Prep Time 3 hours 0 minutes
Cook Time 1 hours 0 minutes
Yield Seven quarts
Number Of Ingredients 4
Steps:
- Prepare the jars and lids: Wash all jars and lids thoroughly with soap and water and rinse well. Fill your canner with enough water to cover the jars by at least 1 inch and bring to a simmer. Using a pair of canning tongs, lower the jars in gently, tilting them to fill with the hot water. In a small saucepan, keep some water warm but not boiling; place the lids in the water. Have an additional kettle of water on to boil. Peel and core the tomatoes: Bring a large pot of water to the boil. Have a large bowl of ice water at the ready. Gently lower the tomatoes into the boiling water and blanch them for 60 seconds. Remove with a strainer and transfer them to the ice water. Once cool, slit the skins; they should peel off easily. Remove the cores with a small paring knife. You will need to do this in batches. Discard skins and cores. Prepare the sauce: Coarsely chop the tomatoes and add them to a large stockpot. Place stockpot over medium-high heat, crushing and stirring the tomatoes to keep from burning. Continue until all the tomatoes are added and crushed. Bring the tomatoes to a boil, then reduce heat and keep at a low boil. Reduce to the desired thickness, by a third for a thin sauce, or by half for a thick sauce. Fill and close the jars: Using canning tongs, remove the jars from the canner, carefully pouring the water back into the canner. Set next to the sauce. Turn the heat under the canner to high. Add two tablespoons of bottled lemon juice and one teaspoon of salt to each jar; add a teaspoon of sugar to offset the added acidity if desired. Use a ladle to pour the sauce into the jars through a canning funnel, leaving 1/2-inch headspace at the top. Run a clean chopstick around the inside of the jar to dislodge any trapped air. Wipe the rims of the jars with a damp paper towel. Place the lids on, and screw on the rings until just finger-tight. Seal the jars: Using canning tongs, gently transfer the jars to the canner, taking care to keep them vertical. When all the jars are in the canner, there should be at least 1 inch water covering them; if you need more, add water from the kettle until the jars are sufficiently covered. Bring the water to a full rolling boil, and process for 40 minutes. Remove and cool: Using canning tongs, gently remove the jars from the canner and transfer them to a kitchen towel or cooling rack, again keeping them vertical. Do not set hot jars directly on to cool counter surfaces. Leave to cool, undisturbed, for at least 12 hours. If any of the jars do not seal when cool, reprocess using the method above, or refrigerate and use immediately. Label and store: Add a label to the lid or side of your jar, noting the date it was canned. Remove the rings and store jars in a cool, dark place for up to one year. Refrigerate after opening.
More about "plastic jars with lids recipes"
CANNING BUTTER | JUST A PINCH RECIPES
Whenever you find a sale on REAL butter, go ahead and stock up. You can freeze butter or you can home-can it. Canned butter lasts for years if the seals are secure and it's kept in a cool place.
Always pressure can butter instead of water-bathing it. Butter is dairy and non-acidic so the water bath method will not stop botulism. Canning butter is so easy and the best type of jars to use are half-pint, wide-mouth jars. The wide mouth makes it easier to get the butter out of the jars and opening a half pint at a time is convenient for most families.
From justapinch.com
Reviews 5
Category Spreads
Cuisine American
From justapinch.com
Reviews 5
Category Spreads
Cuisine American
- Check for seals after it cools. Store canned butter in a dark cool, dark place, (a cardboard box works great). If you want the butter to be firm, then refrigerate a jar before you open it. Whatever you don't use, just store in the fridge until you need it again.
See details
PREPARING JARS FOR CANNING AND BOILING WATER PROCESSING
Feb 06, 2020 · Slide a small nonmetallic spatula or plastic knife around in the hot mixture to remove any air bubbles. Using a damp clean cloth or paper towel, clean the jar rims and threads. Center the lids on the jars…
From thespruceeats.com
From thespruceeats.com
See details
HOW TO STERILIZE GLASS BOTTLES AND JARS – BOTTLESTORE.COM BLOG
Place the glass jars and lids (We recommend metal caps with plastisol liners for the job. While some plastic caps made with PP plastic can withstand the boiling water, the lining material often isn’t a good fit for this type of temperature) in a large pot, fill the pot with water, enough to submerge the jars …
From blog.bottlestore.com
From blog.bottlestore.com
See details
HOW TO OPEN A JAR: 6 TRICKS FOR PRYING OPEN EVEN THE MOST ...
Oct 02, 2021 · Items that can be used for greater grip include a dry dish towel, plastic wrap or a piece of silicone (often found in kitchens as a heat-resistant mat or shelf liner). Place the grip-assisting …
From tasteofhome.com
From tasteofhome.com
See details
HOW TO MAKE YOUR FRUIT LAST TWICE AS LONG - LOVELY LUCKY …
Jan 14, 2020 · Just add all the berries, fruits & veggies to appropriate sized mason jars. Totally depends on the quantity and size of your produce to determine which size – 16 oz or 32 oz – jars to use. I LOVE using plastic lids …
From lovelyluckylife.com
From lovelyluckylife.com
See details
KILNER® - ICONIC GLASS JARS, BOTTLES & EQUIPMENT | KILNER®
The original Kilner® Jar is as much-loved and successful now as it was 175 years ago and households all over the world trust it to successfully preserve and pickle their fruit and vegetables.
From kilnerjar.co.uk
From kilnerjar.co.uk
See details
MAKE A MASON JAR AQUARIUM - HELLO WONDERFUL
Jun 03, 2019 · Mason jars. 2. Blue food coloring. 3. Filtered water (tap water tends to give a cloudier look, but is totally fine to use) 4. Aquarium plastic figurines or toy fish. 5. Aquarium rocks and plastic …
From hellowonderful.co
From hellowonderful.co
See details
CANNING SUPPLIES—JARS, APPLIANCES & KITS | FRESH PRESE…
Learn about different mason jars, lids and bands, appliances, and home growing kits to take your canning to the next level. Let's get canning!
From freshpreserving.com
From freshpreserving.com
See details
DANGERS OF HEATING FOOD IN PLASTIC - MICROWAVE HEALTH ...
Oct 08, 2008 · The Good Housekeeping Research Institute tested 31 containers, lids, bags, wraps, and liners. What we found was reassuring — but to really protect your family, there's more you …
From goodhousekeeping.com
From goodhousekeeping.com
See details
OVERNIGHT, NO-COOK REFRIGERATOR OATMEAL - THE YUMMY LIFE
Mar 23, 2012 · 1/2-pint mason jars with airtight lids, plastic lids for jars, chia seeds, rolled oats. Specific amounts of ingredients are listed with the individual recipes for each of the 6 varieties of flavored refrigerator oatmeal …
From theyummylife.com
From theyummylife.com
See details
BASIC RECIPES FOR MAKING HOMEMADE SPICE BLENDS
Mar 17, 2021 · Clean glass jars with tight-fitting lids. The lids are important to keep the seasonings fresh, and glass is important since plastic containers will absorb the smell of the ingredients. …
From thespruceeats.com
From thespruceeats.com
See details
BEETROOT CHUTNEY RECIPE - ALLOTMENT GARDEN RECIPES
2) While the chutney is cooking prepare your jars by running through a short hot wash in your dishwasher, or wash thoroughly by hand, then put into a hot oven to sterilise for 10-15 mins. Once the chutney is ready, let it settle for 10 mins, then carefully spoon into jars …
From allotment-garden.org
From allotment-garden.org
See details
PREPARING JARS FOR CANNING AND BOILING WATER PROCESSING
Feb 06, 2020 · Slide a small nonmetallic spatula or plastic knife around in the hot mixture to remove any air bubbles. Using a damp clean cloth or paper towel, clean the jar rims and threads. Center the lids on the jars…
From thespruceeats.com
From thespruceeats.com
See details
HOW TO STERILIZE GLASS BOTTLES AND JARS – BOTTLESTORE.COM BLOG
Place the glass jars and lids (We recommend metal caps with plastisol liners for the job. While some plastic caps made with PP plastic can withstand the boiling water, the lining material often isn’t a good fit for this type of temperature) in a large pot, fill the pot with water, enough to submerge the jars …
From blog.bottlestore.com
From blog.bottlestore.com
See details
HOW TO OPEN A JAR: 6 TRICKS FOR PRYING OPEN EVEN THE MOST ...
Oct 02, 2021 · Items that can be used for greater grip include a dry dish towel, plastic wrap or a piece of silicone (often found in kitchens as a heat-resistant mat or shelf liner). Place the grip-assisting …
From tasteofhome.com
From tasteofhome.com
See details
HOW TO MAKE YOUR FRUIT LAST TWICE AS LONG - LOVELY LUCKY …
Jan 14, 2020 · Just add all the berries, fruits & veggies to appropriate sized mason jars. Totally depends on the quantity and size of your produce to determine which size – 16 oz or 32 oz – jars to use. I LOVE using plastic lids …
From lovelyluckylife.com
From lovelyluckylife.com
See details
KILNER® - ICONIC GLASS JARS, BOTTLES & EQUIPMENT | KILNER®
The original Kilner® Jar is as much-loved and successful now as it was 175 years ago and households all over the world trust it to successfully preserve and pickle their fruit and vegetables.
From kilnerjar.co.uk
From kilnerjar.co.uk
See details


