HOW TO MAKE SOURDOUGH BREAD - NYT COOKING

Perhaps you’ve seen impressively holey sourdough loaves on social media, and wondered if you too could make them. You can! Claire Saffitz can show you how.
Provided by Claire Saffitz
Steps:
- • Mature starter, which you should keep refrigerated until you’re ready to use it (you can get a bit from a friend or buy it online from Etsy or King Arthur Flour) • 700 grams high-quality white bread flour, plus more for feeding starter and dusting work surfaces • 300 grams high-quality whole-wheat flour, whole-grain rye flour, or spelt flour, or a combination • 20 grams kosher salt or fine sea salt • Rice flour, for dusting
- 1. Feed your starter (refreshing). In the morning, three days before you plan to serve your bread (Friday morning, for example, for loaves on Sunday), pull your starter from the refrigerator and decant 20 grams of it into a clean, clear container. Return any remaining starter to the refrigerator for future use. Stir in 100 grams of room-temperature tap water until the starter is evenly dispersed, then stir in 100 grams of white flour until you have a smooth paste. Why? The yeast and bacteria in your starter become sluggish in the cool environment of your refrigerator. They must be energized through successive feedings, a process called refreshing, to be active enough to raise the dough. 2. Cover the container, and let sit at room temperature until it has at least doubled in volume and its surface teems with sudsy bubbles, 10 to 12 hours, depending on your kitchen’s temperature. 3. Feed your starter a second time. Once the starter has doubled in size (the evening of the first day), discard all but 20 grams of starter. To the 20 grams of starter, add 100 grams of water, then mix and incorporate another 100 grams of white flour. Cover and set aside at room temperature to be used in your dough the next day.
- The bulk of your work occurs on this day, so you’ll want to set aside some time to tend to your dough. Depending on environmental conditions, your dough may take anywhere from five to nine hours to finish its rises. It’s not active time, but you’ll want to stay close to keep an eye on it.1. Mix together flour and water and let sit (autolyse). Early on the second day, weigh 700 grams of white bread flour and 300 grams of whole-wheat or whole-grain rye or spelt flour (or a blend) in a large mixing bowl. Mix to combine. Weigh out 750 grams of lukewarm tap water (about 90 degrees) and add to the flours. Mix gently with a clean hand or a flexible bench scraper until all the flours are hydrated and no dry spots remain. Cover with a damp dish towel, and let sit at least 30 minutes while you wait until your starter is ready (see Step 2). Why? If starter is the life force of bread, then the stretchy strands known as gluten are its backbone. When two proteins in flour come into contact with water, gluten forms a network inside the dough, trapping the gas produced by the yeast. To build lots of gluten from the get-go, bakers employ a technique known as autolyse, in which flour and water are mixed and left to rest, usually before adding the starter. During autolyse, gluten bonds form that create the basic structure of the dough. As little as 30 minutes of autolyse can be effective, but generally speaking a couple of hours is optimal. It will give your gluten a head start and decrease the amount of mixing down the line.2. Make sure the starter is ready to use (perform a float test). When the sudsy bubbles on the surface of a starter form a dome and it appears on the verge of collapse, drop about a teaspoon of starter into a small bowl of room temperature water. If it floats, the starter is full of gas and ready to use (ripe). If it sinks, let it sit, checking every 30 minutes, until you see even more activity and then try the test again.3. Combine the autolyse and starter. Add 200 grams of ripe starter to the bowl with the flour-water mixture. Pinching with your thumb, forefinger and middle finger on one hand and rotating the bowl with the other, mix until the starter is completely incorporated. 4. Assess texture and add salt. At this point, the dough should be wet but also extremely extensible (having the ability to stretch without snapping back). Sprinkle 20 grams salt and 20 grams of water across the dough, and pinch, as before, to incorporate. Cover with a damp towel and let sit for 10 minutes. Why? Adding salt tightens the gluten network, so the dough will go from very extensible to more elastic (having the tendency to snap back after being stretched) and stringy.5. Mix the dough. Uncover the dough. Slide a wet hand down along the inside of the bowl and underneath the dough. Grasp a handful and stretch it upward until you feel resistance, then fold it back onto the dough mass. Repeat this motion continuously for 10 minutes, rotating the bowl about 90 degrees each time. As you work the dough, it will progress from very slack and sticky to smoother and more elastic.6. Check if the dough has built enough gluten (perform the windowpane test). After 10 minutes of mixing, pinch off a golf ball-size piece of dough and gently stretch it with your fingertips, working it both longer and wider until you have a thin, even membrane through which light can pass. If the dough tears before this point, continue to mix and check again every 10 minutes. (If you’re mixing for more than 20 minutes and the dough is not yet at this point, feel free to move on. Your bread will still turn out.) Use a flexible bench scraper to scrape dough out onto a clean surface. Rinse the bowl to remove any dried flour, then return the dough to the damp bowl. Why? This will help determine if the dough has developed sufficient gluten to give it strength, which enables it to hold its shape. 7. Prepare for the dough’s first rise (bulk fermentation). Mark where the dough hits the side of the bowl with a piece of tape. Note the time, and the temperature of the dough. It should be 76 degrees to 80 degrees. Cover the dough with a damp towel and let sit for 60 minutes. Why? Bulk fermentation is the period after the starter has been added during which the dough undergoes its first rise. The yeast and bacteria produce gas and flavor, so a longer fermentation will result in a more flavorful bread. If your dough is above or below the optimal 76- to 80-degree range, that’s fine, just note that it will accelerate or slow the bulk fermentation accordingly. If fermentation seems to be moving slowly, you can move your dough to a warmer place, like the inside of the oven with the oven light on.8. Fold the dough. Using a wet hand and the same mixing motion as Step 5, but with a gentler touch to avoid knocking out any gas, perform four folds, making a full rotation of the bowl. Cover the bowl, wait 1 hour, then perform the same series of four folds. Cover and repeat every 60 minutes, until the dough feels pillowy and filled with air, which can take at least 3 hours and as many as 7. Each time you fold the dough, it should feel lighter and sit higher in the bowl. Determining when bulk fermentation is complete can be difficult. The dough should more or less double in size — use the mark on the bowl as a reference — but that’s not a guarantee. You should see lots of bubbles on the surface and sides of the dough. “It’s like cream versus whipped cream,” said Avery Ruzicka, the baker and an owner of Manresa Bread in California. “You should be able to see that there’s volume to it.” Or as Ethan Pikas, of Cellar Door Provisions in Chicago, said, “It should feel very smooth and aerated. It will feel very alive.”9. Shape dough for the first time (pre-shaping). Clear and lightly flour a work surface. Gently turn out the dough, letting its weight coax it out of the bowl and loosening the sides with the bench scraper. Divide the dough in half with the bench scraper. Using floured hands and working with one piece of dough at a time, gently pull all the edges of the dough toward the center to create a round, tidy packet. (The non-floured surface will readily stick to itself.) Use a bench scraper to turn the loose ball of dough over so it rests seam-side down. Cover with a clean towel and repeat with the second half of dough. Let both pieces of dough rest, covered, on the work surface for 20 minutes. Why? Pre-shaping the dough guarantees uniform loaf size and helps to organize the gluten strands roughly into the final shape of the baked loaves. The following rest period relaxes the gluten and makes final shaping easier, leading to bread with a better overall rise. 10. Prepare the shaping baskets. As dough rests, line two baskets or mixing bowls with clean kitchen towels. Stir together a 50/50 mixture of white bread flour and rice flour. (Rice flour will prevent sticking.) Dust the interiors of the baskets generously with the 50/50 flour mixture. Set aside.11. Shape the dough a last time (final shaping). Uncover one piece of dough and lightly dust the top with the 50/50 flour mixture. In one decisive motion, use the bench scraper to lift and turn the dough over floured-side down. Slide your fingertips beneath the dough and stretch it gently into a square shape. Fold the left side of the dough inward toward the center, then fold the right side inward and overtop of the left fold. Starting at the end closest to you, roll the dough away from you into a bulky spiral. Let the dough sit for a minute or two on its seam to help it seal, then use a bench scraper to lift up the dough and place it seam-side up in one of the prepared baskets. Lightly dust the exposed part of the dough with more of the 50/50 flour mixture, and cover with a kitchen towel. Repeat with the second piece of dough.12. Let the shaped dough rise inside the baskets (proofing). Rest loaves at room temperature, checking on them periodically, until the surface of the dough has settled and the entire loaves have slightly increased in volume, 1 to 1 1/2 hours. 13. Check if dough is proofed (the poke test). Press a floured finger about 1/2 inch into the dough. If the dough springs back immediately, it needs more time — check again every 20 minutes. But, if it springs back slowly and a slight impression remains, the dough is proofed. 14. Chill the dough. Once the dough passes the poke test, cover the baskets with plastic wrap and transfer to the refrigerator. Chill overnight and up to two days before baking. The longer the dough spends in the refrigerator, the tangier the final bread will taste.
- 1. Prepare the oven. About an hour before baking, arrange a rack in the lower third of your oven and place a large, uncovered Dutch oven inside. Heat the oven to 500 degrees. 2. Prepare the dough. Remove one loaf from the refrigerator and uncover. Lightly dust the exposed dough with the 50/50 flour mixture, massaging it into the surface. Place a piece of parchment paper over the basket, making sure the parchment is longer and wider than the basket by several inches. Invert the loaf onto the parchment paper. Remove the basket, then slowly peel away the towel. Dust the rounded side of the dough with more of the 50/50 flour mixture, rubbing it into the surface to coat evenly. 3. Make a slash in the dough. Use a lame or a serrated knife to make a long, slightly off-center slash about 1/4-inch deep, angling the blade toward the midline of the loaf. Why? Slashing the bread will help the bread expand predictably in the oven. 4. Bake the dough. Very carefully place the heated Dutch oven on the stovetop. Taking care not to touch the sides, use the parchment paper to lower the loaf into the Dutch oven. Cover and return it to the oven. Bake for 20 minutes. Then, carefully remove the lid and reduce the oven temperature to 450 degrees. Continue to bake the loaf uncovered until the surface is deeply browned all over, another 30 to 40 minutes. Remove the Dutch oven from the oven, and use tongs to help you pull out the loaf. Transfer the Dutch oven back to the oven, and set the oven temperature back to 500 degrees. Repeat the process with the second loaf of bread. Why? The bread is baked covered in the beginning to trap steam, which helps the loaf expand and rise as much as possible.5. Cut and serve! Allow the loaves to cool completely, for a few hours, before cutting into them. Whole loaves can be stored uncovered at room temperature for 1 day. Once cut, bread should be stored in paper bags at room temperature and will keep for 5 days or longer. After the second day, it benefits from light toasting.
- Keep your starter in a container with the lid on, labeled clearly. Once a week, discard all but 25 grams of starter (discarding most of the starter helps avoid building up a massive amount with each successive feeding). Using a digital scale for accuracy, stir 100 grams of room temperature tap water into the starter until the starter is evenly dispersed. Then stir in 100 grams of high-quality white bread flour until you have a smooth paste. Cover and place in the back of the refrigerator. Set a calendar reminder to feed your starter at the same time every week. Why? The yeast and bacteria in starter feed on sugars in the flour, and you’ll need to replenish this food source on a regular basis. Cooling it down will significantly slow the level of activity, or how quickly the micro-organism consume its food source. Bakeries generally keep their starter at room temperature and feed it at least once a day because they are mixing and baking dough constantly, but for most home bakers, refrigerating your starter and feeding it once a week is sufficient. Think of it as a low-maintenance pet!
NEW YORK DELI-STYLE RYE BREAD RECIPE - NYT COOKING
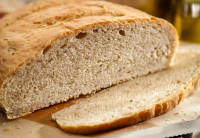
American "deli rye" is descended from traditional breads in Middle and Eastern Europe, where rye and wheat grow together and "bread spice" (a combination of caraway, coriander, anise and fennel seeds) is common. This kind of rye bread spread across the United States in the 20th century along with Jewish delicatessens, where it served as the perfect foil for rich fillings like pastrami and chopped liver -- not to mention tuna melts. The sour tang and chewy texture of the original breads have largely been lost over time, because rye bread today is made mostly from wheat flour and just a scant amount of rye. This recipe restores some of the original charm, but is still quick and easy for home baking.
Provided by Julia Moskin
Total Time 4 hours 30 minutes
Yield 1 large loaf
Number Of Ingredients 8
Steps:
- In the bowl of a standing mixer, whisk together the flours, caraway seeds (if using), salt and yeast. Put 1 1/4 cups lukewarm water into a small bowl, then stir in the honey and oil.
- Using a dough hook attachment at low speed, gradually pour in the liquid mixture. Mix just until a cohesive dough starts to form and no streaks of dry flour remain, about 2 minutes. Scrape down sides of the bowl halfway through. Cover bowl tightly with plastic wrap and let dough rest for 20 minutes.
- Turn mixer to medium-low and knead until smooth and elastic, easily clearing the sides of the bowl, about 8 minutes. The dough should be moist but not sticky; if needed, add more flour 1 tablespoon at a time.
- Lightly oil a medium-size mixing bowl. Transfer the dough to a lightly floured surface and knead 30 seconds, shaping dough into a smooth round ball. Place seam side down in the oiled bowl. Cover with plastic wrap and let rise until doubled in size, 1 1/2 to 2 hours.
- Stack 2 rimmed baking sheets and line the top sheet with aluminum foil. Punch the dough down to deflate. Turn out onto a lightly floured surface. Press and stretch into a rough 6-inch square.
- Lift and fold top 2 corners of dough into the center of the square and press gently to seal. Lift and fold down the upper third of the dough toward the center and press gently to seal. Lift and fold down the top half of the dough to form a loaf, and pinch the seam closed. Turn the loaf seam side down, gently slide hands underneath, and transfer to the prepared pan. You should have an oval loaf about 8 inches by 4 inches; use hands to shape as needed. Cover with oiled plastic wrap and let rise until loaf increases in size by about half, 30 minutes to 1 hour.
- Meanwhile, place a rack in the lower third of oven and heat to 450 degrees. When the dough has risen, make 3 deep slashes across the top, using a sharp paring knife or razor blade. Place in oven, reduce heat to 375 degrees and bake until deep golden brown, 35 to 40 minutes, rotating pan once during baking.
- Meanwhile, dissolve cornstarch in 1 cup cold water. Simmer in saucepan or microwave until clear and syrupy. Transfer hot, baked bread immediately to a wire rack and brush top and sides with cornstarch mixture until glazed and shiny. Let cool completely before slicing.
WHAT TO COOK - THE NEW YORK TIMES
Sam Sifton is an assistant managing editor of The New York Times, responsible for culture and lifestyle coverage, and the founding editor of …
From nytimes.com
From nytimes.com
See details
SOURDOUGH PIZZA DOUGH RECIPE - NYT COOKING
Preparation. In a large mixing bowl, combine the flour and salt. In a small mixing bowl, stir together 300 grams (about 1 1/4 cups) lukewarm tap water, the instant dry yeast and the olive oil, then stir the sourdough starter …
From cooking.nytimes.com
From cooking.nytimes.com
See details
TARTINE BAKERY
STEP 1 Make the starter: Combine 1,000 grams white-bread flour with 1,000 grams whole-wheat flour. Put 100 grams of warm water (about 80 degrees) in a …
From tartinebakery.com
From tartinebakery.com
See details
CHOWHOUND
Thank you for making Chowhound a vibrant and passionate community of food trailblazers for 25 years. We wish you all the best on your future culinary …
From chowhound.com
From chowhound.com
See details


