NO MESS DOUGH DISC RECIPES


More about "no mess dough disc recipes"
HOMEMADE CHEESE RAVIOLI MADE WITH FRESH EGG PASTA DOUGH ...
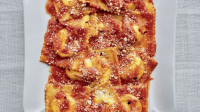
Missy Robbins makes ricotta-and-mozzarella-filled ravioli with egg pasta dough from scratch, served in a simple, everyday tomato sauce.
Provided by Missy Robbins
Number Of Ingredients 27
Steps:
- For the fresh egg pasta dough, place the flour on a wooden work surface and create a barricade with a center sanctuary for your yolks that is 5 to 6 inches in diameter but not more
- If you create too much space, your barricade won't be strong enough to hold the yolks as you begin to incorporate the flour
- To avoid any additional risk to your barricade, mix, but do not beat, your yolks before adding them to the well
- Listicle: King Arthur 00 Pizza Flour Kick off by adding half of the yolks to the well and use a fork to incorporate the inner layer of flour, stirring in a continuous motion around the circumference to combine
- Continue adding the rest of the yolks, incorporating the flour as you go
- If you bust through your barricade, not to worry
- Use your bench scraper to catch the egg mixture and fold it back into the flour, doing this at every edge until you have a mixture that is thick enough to contain itself
- Set your tools aside, roll up your sleeves, and get to work kneading
- The dough will be sticky at first, so as you work it, continue to remove the dough that clings to your hands and return it to the mass
- Listicle: Rachael Ray Bench Scrape The dough will begin to firm up as the gluten is activated by kneading, but if it feels a touch too dry and is not integrating (this can happen when the environment is drier, such as during the winter or when you're working in an arid climate), add about 1 tablespoon room-temperature water to loosen it
- The kneading motion is simple, but it does take some time to get the rhythm right
- You essentially want to fold the dough in on itself, pressing down and away from your body with the heel of your dominant hand, relying on the weight of your body to do so
- (You can hold the edge of the dough closest to you with your other hand to keep it in place as you stretch it away from you
- ) Rotate it 180 degrees, fold, and press again
- Repeat this rotating, folding, and pressing motion until the dough is smooth and relatively firm to the touch, 8 to 10 minutes
- Use your bench scraper to clean off any pieces of dough that clump and stick as you're kneading
- Lightly dust the board with flour if needed; be careful not to add too much, as it will dry out the dough
- When properly kneaded, the dough should resemble the texture of Play-Doh and should spring back just slightly when poked
- Cover the dough with plastic wrap and set it aside for a least 30 minutes
- This allows the dough to become more pliable
- If you are not forming pasta until the evening or the next day, place the dough in the refrigerator and remove it 20 minutes before you plan to roll it out so it returns to room temperature
- Makes 1 batch
- Use the dough within 24 hours
- For the simple red sauce, place a large heavy saucepan or Dutch oven over low heat, add the oil and garlic and cook gently until aromatic and without color, 30 seconds to 1 minute
- Add the chili flakes
- Add the tomatoes and their juice and cook over low heat until the flavors are well blended, 25 to 30 minutes
- You are not looking to reduce the mixture, just to bring the flavors together
- Season with salt
- Set aside off the heat until ready to use, or let cool, transfer to an airtight container and refrigerate for up to 5 days or freeze for up to 1 month for another use
- Makes 9 cups
- For the ravioli filling, place a tamis or fine-mesh strainer over a bowl
- Pass the ricotta through the tamis
- Add the mozzarella, Parmigiano, and pecorino to the bowl and fold to mix
- Season with pepper and salt
- It should taste well-seasoned
- Refrigerate until ready to use
- To finish, roll out the egg dough, then make 50 to 60 square pieces with the filling using the following methods
- The rolling and sheeting instructions that follow assume that you’re using a manual sheeter
- If you're working with the KitchenAid attachment or another motorized sheeter, more power to you
- It will undoubtedly make your life easier, and the instructions that follow will be more detailed than necessary, though they will still apply
- I do recommend, however, starting with a manual sheeter, as it will help you learn to make decisions based on feel rather than prescription
- For instance, cranking by hand assists you in determining, by the tension in the handle, whether your dough sheet needs to go through the same setting again (and again) or if it's ready to go down (or up) one
- Listicle: KitchenAid KSMPRA Pasta Roller & Cutter Attachment Set Listicle: Imperia Model 150 Pasta Maker Machine To start, cut your dough into quarters so you're working with smaller, more manageable pieces
- Begin with one piece and cover the remaining pieces with the plastic wrap
- Dust your board and rolling pin with a bit of 00 flour
- Roll the dough out to an oval ¼ to ½ inch thick and about 8 inches long
- You want it to be thin enough to fit through the widest setting on the sheeter, but not so wide that it doesn’t have room to expand widthwise as it's fed through
- Feed the dough through once, cranking with your dominant hand while you very gently lead the dough through with your nondominant hand
- Then fold the dough into thirds by bringing one end to the middle and then the other end over the top as if folding a business letter
- Lightly press on top to seal and then feed one narrow end of the dough through the sheeter again
- What you're doing at this point is essentially re-kneading the dough and making sure there is no extra air in it
- Repeat the fold and feed at least three times, until the dough is smooth and uniform
- Decrease the setting on your sheeter (to "5" on the Imperia Model 150 or "2" on the KitchenAid) and feed the dough through again
- At this point, the sheet will be long enough to be a bit unwieldy to work with
- You can return it to your floured board, cut it in half and work with only one length at a time, covering the length(s) not in use with a kitchen towel or plastic wrap
- The shape you intend to make will determine how thin you sheet the dough from this point
- Don't be afraid to pause and adjust or to cut your sheet in half if it becomes a bit unwieldy to work with
- (Just cover the half you've set aside with a kitchen towel or plastic wrap
- ) The dance between cranking the machine and feeding the dough through on one end while catching it on the other is not second nature—indeed, it's a job better suited to three hands than two
- It will be awkward at first, and you will certainly turn out more than a couple of unseemly sheets
- You can always fold the sheet in half and feed it through again to even it out
- Continue this process until you've achieved the desired thickness for the shape you intend to make (with Imperia, "2" setting, passed through 3 times; with KitchenAid, "6" setting, passed through 3 times)
- As you work, your sheet may become tacky and require a light dusting of 00 flour; be careful not to add too much or you'll end up with a sheet that's too dry
- Lightly dust with 00 flour and transfer to a parchment-lined sheet tray, layering parchment between each sheet to ensure they do not stick together
- Cover with plastic wrap or a kitchen towel and repeat the process until you have sheeted your full batch of dough
- Lightly dust a wooden work surface with 00 flour
- Line a sheet pan with parchment paper and lightly dust with semolina
- Lay your sheet(s) of pasta on the work surface
- Use a knife to cut 18-inch-long sheets, removing the scraps from the unclean edges (save them for soup)
- Cover the sheets with plastic wrap or a kitchen towel
- Place one pasta sheet on your work surface
- Spoon the filling into a pastry bag
- Cut a 1-inch hole in the tip of your pastry bag and pipe small circles of filling about 1 ½ inches wide and ½ inch high evenly across your sheet, spacing them about 2 inches apart
- Evaluate your dough
- If it feels moderately tacky, you can eliminate this next step
- If the pasta feels a bit dry, hold a spray bottle filled with water 8 to 10 inches above the work surface and spray the pasta
- This will enable the second sheet to stick
- Lay a second sheet of pasta gently over the first, making sure the edges line up and there aren’t any wrinkles
- Using your two index fingers, gently press around each dollop of filling to express any air pockets
- For extra insurance, flip a #30 (1 ?-inch) plain round cutter to the dull side and gently press over each dollop to express any excess air
- For square ravioli, use a fluted pastry cutter or fluted dough divider to cut the ravioli into 2 ½-inch squares
- You can also use a 2 ½-inch fluted square cutter to the same effect
- After you have pressed down, gently move the cutter clockwise while still pressing to ensure a full cut
- Gently remove the scraps surrounding the ravioli by lifting the sheets from one end
- Discard the excess dough or reserve for use in soup
- Place the finished pasta on the prepared sheet pan in a single layer
- Give the pan an extra dusting of semolina to prevent sticking
- Repeat with the remaining sheets
- Place in the refrigerator uncovered (if they are covered, they will sweat and become too wet) to dry for 45 minutes to 1 hour
- If not using right away, remove from the refrigerator, loosely cover the sheet pan with plastic wrap, and return to the refrigerator for up to 8 hours
- When you're ready to cook the ravioli, bring a large pot of water to a boil over high heat
- Generously salt the water
- Place a large saute pan over low heat
- Add the red sauce
- If needed, add a splash of pasta cooking water to loosen the sauce
- Add the ravioli to the water and turn down the heat to bring the water to a gentle simmer instead of a rolling boil
- It is important to cook these gently at a simmer instead of a boil
- The filling is delicate and the ravioli can break if cooked over high heat
- Cook for 2 to 3 minutes, until tender at the thickest closure point
- Using a spider or pasta basket, remove the ravioli from the pot and transfer to the saute pan
- Turn up the heat to medium
- Swirl the ravioli in the sauce for 30 seconds to 1 minute to marry, using a spoon to gently turn them over and coat all sides
- If the sauce begins to tighten, add a splash of pasta cooking water to loosen and continue swirling to marry
- Transfer to a serving platter or divide among plates
- Garnish with Parmigiano and pecorino
- Finish with chili flakes
NO MESS DOUGH DISC - BLOGS & FORUMS - QVC
Feb 13, 2016 · (You need it for thickener anyway.) Roll out on No Mess Dough Board. Cut dumplings in 2" squares, 1/8 to 1/4 inch thick. Drop dumplings into boiling broth. After adding all the dumplings, reduce heat to low. Simmer for about 15-20 minutes, stirring occasionally. Take chicken from bones and drop back with dumplings. (recipe card is dated 1997!)
From community.qvc.com
From community.qvc.com
See details
NO MESS DOUGH DISC WITH COVER AT HSN.COM. | DOUGH, COOKING ...
Sep 22, 2012 - No Mess Dough Disc with Cover at HSN.com.
From pinterest.com
From pinterest.com
See details
RECIPE DISK 4
Beat well until bubbles appear. Add 5-1/4 cups flour, slowly. Stir until soft dough forms. Knead on well-floured No Mess Dough Disc about 5 minutes. Place in greased bowl, let rise in a warm place until double in bulk. Punch down dough, divide into 3 equal parts. Roll out each section of dough on No Mess Dough Disc, all the way to the edge of disc.
From spike-jamie.com
From spike-jamie.com
See details
NO MESS DOUGH DISK - RECIPELINK.COM
Meat Cakes (using ground beef and Italian sausage, baked in muffin tins) Pistachio and Poppy Seed Slices (slice-and-bake cookies) Blueberry French Toast Casserole with Blueberry Sauce. Incavolata (Italian soup of beans and kale) Spice-Rubbed Grilled Salmon with Cucumber Salad. Cabbage Casserole - good stuff.
From recipelink.com
From recipelink.com
See details
VIOLA FAMILY: NO MESS DOUGH DISC REPLACEMENT COVER
Mar 19, 2020 · No mess dough disc replacement cover. Roll out to 1 8 thickness and cut dumplings in 2 squares. Mix until dough leaves sides of bowl. It really helps in preventing the dough stick to your rolling pin. Get it as soon as thu oct 15. No mess dough disc website.
From viola2-family.blogspot.com
From viola2-family.blogspot.com
See details
AMAZON.COM: NO MESS DOUGH DISC
1-48 of 252 results for "no mess dough disc" Amazon's Choice for no mess dough disc. Bethany Housewares 20 Inch Pastry Board and Cloth Set. 4.8 out of 5 stars 420. $34.75 $ 34. 75. Get it as soon as Thu, Dec 30. FREE Shipping by Amazon. More Buying Choices $27.19 (15 new offers)
From amazon.com
From amazon.com
See details
NO MESS DOUGH DISC KIT W/ROLLING PIN COVERS - QVC.COM
Cover disc, lightly flour, & begin rolling out perfect doughs without any sticky mess. Also comes with helpful baking tips & a starter card collection of recipes including :No-Fail Pie Crust, No-Fail Noodles, No Fail Crescent Rolls, & No-Fail Pizza Crust. Plus you get (2) 14inch Rolling Pin Covers to keep dough from sticking to your rolling pin. MADE IN USA QDirect 2/96 (Pin covers by FoxRun)
From bing.com
From bing.com
See details
NO MESS DOUGH DISC - PAGE 2 - BLOGS & FORUMS
Dec 21, 2016 · Re: No mess dough disc. 12-21-2016 11:14 AM. @dusty1 During one of the many moves we have had to make the last few years who knows what happened to mine, I too used mine all the time, I wish they could bring it back!
From community.qvc.com
From community.qvc.com
See details
BEST HOMEMADE PLAYDOUGH: 3 NO-FAIL RECIPES FOR PERFECT DIY ...
How to Make It (found here): 1 cup flour. 1 cup water. 2 teaspoons cream of tartar. 1/3 cup salt. 1 tablespoon vegetable oil. Food coloring (optional) In a medium-size pot, stir all ingredients (except the food coloring) together on the stove. Heat over low-medium and keep stirring until the mixture is smooth and begins to thicken.
From kindercare.com
From kindercare.com
See details
NO-MESS PIZZA BREAD IN A BAG RECIPE | JAMIKA PESSOA | FOOD ...
For the dough: Spray a loaf pan with cooking spray. Add the sugar, yeast, 1 cup of the flour and 1 cup warm water to a gallon-size resealable plastic bag. Press down to remove excess air from the bag.
From foodnetwork.com
From foodnetwork.com
See details
HOW TO EASILY ROLL OUT DOUGH WITH NO MESS | MYRECIPES
Mar 07, 2014 · Rolling out pie dough, cookie dough, pizza dough, etc. can sometimes be messy and a little bit of work. You have to flour the surface and continue to flour your hands or rolling pin to keep the dough from sticking. To roll out dough easily, place the dough between two sheets of waxed paper.
From myrecipes.com
From myrecipes.com
See details
NO MESS DOUGH DISC KIT W/ROLLING PIN COVERS - QVC.COM
Cover disc, lightly flour, & begin rolling out perfect doughs without any sticky mess. Also comes with helpful baking tips & a starter card collection of recipes including :No-Fail Pie Crust, No-Fail Noodles, No Fail Crescent Rolls, & No-Fail Pizza Crust. Plus you get (2) 14inch Rolling Pin Covers to keep dough from sticking to your rolling pin.
From qvc.com
From qvc.com
See details
BEST EVER CINNAMON ROLLS WITH CAKE MIX
Beat well until bubbles appear. Add 5-1/4 cups flour, slowly. Stir until soft dough forms. Knead on well-floured No Mess Dough Disc about 5 minutes. Place in greased bowl, let rise in a warm place until double in bulk. Punch down dough, divide into 3 equal parts. Roll out each section of dough on No Mess Dough Disc, all the way to the edge of disc.
From aphids.com
From aphids.com
See details
FAVORITE FOODS FROM THE OZARK WOODS - SYBLE WHITLOCK ...
This full color, all page laminated instructional cookbook, featuring the No-Mess Dough Disc, an all purpose non-stick pastry board, makes one of the hardest cooking techniques, the preparation of doughs easy, from rolling out all types of doughs to kneading. Not only does this cookbook make preparing doughs easy but it is filled with over 150 delicious crust, pie, rolled cookie, bread ...
From books.google.com
From books.google.com
See details
NO MESS DOUGH DISC TRADEMARK - REGISTRATION NUMBER 1682068 ...
May 13, 1991 · Justia Trademarks Categories Housewares and glass NO MESS DOUGH DISC - Trademark Details. NO MESS DOUGH DISC - Trademark Details. Status: 710 - Cancelled - Section 8. Serial Number. 74165619. Registration Number. 1682068. Word Mark. NO MESS DOUGH DISC. Status. 710 - Cancelled - Section 8. Status Date. 2016-01-22. Filing Date. 1991-05-13.
From trademarks.justia.com
From trademarks.justia.com
See details
NO MESS DOUGH DISC WITH COVER PASTRY CLOTH BY WOOD FAMILY ...
Find many great new & used options and get the best deals for No Mess Dough Disc With Cover Pastry Cloth by Wood Family Enterprise 16" at the best online prices at eBay! Free shipping for many products!
From ebay.com
From ebay.com
See details
WEIGHT WATCHERS VEGETARIAN 2 INGREDIENT DOUGH RECIPE THE ...
Aug 23, 2021 · Check out this Weight Watchers Vegetarian 2 Ingredient Dough recipe without yogurt. This delicious plant-based dough is easy to make with 2 simple ingredients and includes no animal products. Make this into bagels, pizza crust, breadsticks and more. Typically, classic WW two ingredient dough is made with Greek yogurt and self-rising flour.
From theholymess.com
From theholymess.com
See details
MEG’S MOM’S SAND TART COOKIES – MY GRANDMAS' RECIPES
Dec 05, 2008 · Add up to 4 cups first, then see if it needs a little more. Don’t allow it to become crumbly. Divide the dough into 3 or 4 pieces and form each into a tidy disc. Tightly wrap each disc with plastic film and refrigerate for at least several hours, ideally overnight. This dough can be stored in refrigerator for up to a week, or even frozen.
From mygrandmasrecipes.wordpress.com
From mygrandmasrecipes.wordpress.com
See details
GOYA DISCOS PARA EMPANADAS 14 OZ, 10 COUNT - WALMART.COM
Goya Discos Para Empanadas come in a 14 oz,10-count package. Use them to create professional-looking desserts and other dishes right from your kitchen. To use, simply place fruit, vegetables, meat or cheese on the Goya discos empanadas, fold the dough over and bake. Paper comes between each one to prevent sticking.
From walmart.com
From walmart.com
See details
GAME DAY RECIPE: CHEESY SAUSAGE BOMBS - SOUFFLE BOMBAY
Jan 16, 2017 · Instructions. Saute sausage in a non stick frying pan until 85% or so cooked through. Drain grease and add in Mozzarella. Stir until incorporated. Allow mixture to cool 10 minutes or so. Roll out your pizza dough until the disc of dough is the size of a large pizza pie.
From soufflebombay.com
From soufflebombay.com
See details
CHICKEN CORN CHOWDER BISCUIT BOWLS RECIPE | JAMIKA PESSOA ...
Directions. Preheat the oven to 375 degrees F. Melt the butter in a saucepan over medium heat. Add the bell pepper and onion and cook until softened, about 3 minutes. Stir in the flour and cook 1 ...
From foodnetwork.com
From foodnetwork.com
See details


