MERMAID CAKE POPS RECIPES


MERMAID ANIMAL CAKE POPSICLES RECIPE - FOOD.COM
Make dessert extra fin-tastic with these light and fluffy funfetti cake pops, they are as delicious as they are adorable!
Total Time 1 hours
Prep Time 45 minutes
Cook Time 15 minutes
Yield 20 Cake Pops
Number Of Ingredients 15
Steps:
- Confetti Cake Pop Tools:.
- Nonstick baking spray.
- Popsicle shaped silicone mold.
- 20 popsicle sticks.
- Mermaid Decoration Tools:.
- Paramount crystals or vegetable oil* (optional to thin and smooth the melts).
- Black decorating icing fitted with coupler and size 1 small round piping tip.
- Gold star sprinkles.
- Pink heart sprinkles.
- Chocolate sprinkles, long.
- Multicolored pearl sprinkles (I used blue, white and gold).
- Toothpicks.
- Wax paper.
- Cake Pops:.
- Preheat your oven to 350 degrees F. Generously coat your cake popsicle molds with nonstick baking spray, and place them on a baking sheet lined with parchment paper. Add the cake mix, eggs, and whole milk to a medium sized mixing bowl and whisk for 2 minutes. Transfer the batter to either a large zip top bag or a piping bag (I like to use a wide mouth glass or jar to hold the bag while filling it with batter). Cut a corner off the bag, and pipe the batter into each popsicle cavity filling half full. Insert a popsicle stick into each, and bake for 12-15 minutes or until a toothpick inserted into the center comes out clean. Allow the cake popsicles to cool for at least 15 minutes before gently removing from the molds and transferring to a cooling rack to cool completely.
- Buttercream Frosting:.
- You can prepare the frosting for the mermaid’s scales while waiting for the cake pops to cool. Place the softened butter in a mixing bowl, and beat, on medium speed, using a hand mixer or stand mixer for 3 minutes until the butter is light and fluffy. Add the vanilla and mix again until incorporated. Add the powdered sugar and mix again while slowly adding the milk. You will want to start on low then work your way up to about medium speed after adding the powdered sugar or else you will have a cloud of it all over your kitchen! Mix until smooth. Divide the frosting evenly among 3 small bowls. Add a little pink, sky blue, and lavender coloring to each bowl, and mix until combined. You only need a little to achieve a soft shade, and the colors will develop and deepen a bit more as you allow them to sit prior to piping.
- Mermaid Decorations:.
- Add half a bag of the bright pink and blue candy melts to 2 separate wide mouth glass jars, and then fill the rest of each jar almost completely with white candy melts. Add 1 bag of white candy melts to a third jar. Heat each jar, in the microwave, for 1 minute at 50% power, and then stir. Continue to heat in 30-second intervals, at 50% power, stirring between each set until the candy melts are smooth and fully melted in each jar. Adding white to each color creates a pastel look. If any of your melts are still lumpy looking after melting them you can add about 2 tablespoons of paramount crystals or 1-2 teaspoons of vegetable oil to each jar. Stir it in until completely combined. If any of the melts harden while working just reheat them in 30-second intervals until smooth again.
- Bunny Mermaids:.
- Dip all of your bunny cake pops into the melted blue candy melts. Allow the excess to drip off of the top of each before placing onto a piece of wax paper to set. If you notice any air bubbles in the coating you can pop them immediately with a toothpick. While waiting for the first coating to harden, break off about a fourth of the fondant to form the ears and paws. Roll little balls of fondant in between your thumb and pointer finger to make the paws. The ears are made by creating teardrop shapes and pinching the tops to form a point. Use a little more of the candy melts like “glue” to attach the ears and paws to the cake pops (you may have to hold the ears on for a few seconds until they set). Once all of the fondant pieces have set to the cake pops dip each pop again into the blue melts (allowing for the excess to drip off). Place them back onto the wax paper to harden completely. If you are having trouble getting the ears to stay straight you can use a marshmallow underneath the ears to prop them up while they harden. Use a little of the melted pink candy melts to make the fins, and also to add a little pink to the inside of each ear. Just dip a toothpick into the melts and use it to “draw” the design (like a flattened heart shape) onto wax paper and allow to set. Break off another smaller piece of the white fondant and mix a little of the pink icing coloring into it until combined. Form tiny balls of the pink fondant and place them onto a piece of wax paper. Flatten each ball out with your fingers to form the cheeks for each animal popsicle. Once your bunnies have set you can add the buttercream mermaid scales (no fancy piping skills required). I like to use a toothpick to draw a guideline onto each pop for the top of the mermaid’s tail. Transfer each color of buttercream frosting into either a piping bag or large zip top bag and cut about 1/2 an inch off of the corner. It’s easiest if you start with the cake pops upside down (the stick pointing up). Pipe large round dots, in alternating colors, across the top of each pop. Then use the back off a spoon to drag the frosting up towards the top of the animal. Continue piping and dragging the frosting as you go, alternating the colors, and slightly overlapping each row until you reach the guideline (you should have about 3 rows of scales on each cake pop). Push each fin into the buttercream scales to hold them in place. Turn the cake pops right side up, and use pearl sprinkles to form a line across the top. Use decorating icing to add the eyes and nose onto each, and a little more of the blue candy melts to attach the seashell or heart bras and hair accessories.
- Cat Mermaids:.
- Dip all of your cat cake pops into the melted pink candy melts as you did for the bunnies. Place onto wax paper to set. Break off 1/4 piece white fondant and form the paws just like the bunnies, and the ears by pressing little balls of the fondant into a triangle between your thumbs and pointer fingers. Press down on each gently to flatten. Attach the fondant pieces to each cake pop with pink melts, and once set, dip again into the pink candy melts. Make lavender mermaid fins by heating a little of the lavender melts along with a handful of white melts in a small heatproof bowl in 30-second intervals. Once the final coating on the cake pops has hardened you can decorate them just as you did for the bunnies.
- Panda Mermaids:.
- Dip all of the remaining cake pops into the melted white candy melts just like you did for the other 2 animals. Form paws using a little of the white fondant and attach with the white candy melts. Once the fondant pieces have set you can dip the cake pops again. The panda’s ears and eyes are made using black candy melts. Melt 1/4 bag black candy melts as you did for the other colors, and then draw 2 semi circles for the ears, and 2 ovals for the eyes for each, using a toothpick, onto wax paper. Once the coating on the pops and the black candy melts have set you can use a little more of the white candy melts to attach the ears and eyes to each cake pop, and to draw the lashes onto the eyes. Decorate as you did for the other animals, admire your mer-mazing cake popsicles, and enjoy!
Nutrition Facts : Calories 463.8, FatContent 23.9, SaturatedFatContent 13.4, CholesterolContent 70.1, SodiumContent 197.1, CarbohydrateContent 58.9, FiberContent 0.3, SugarContent 53.3, ProteinContent 4.8
MERMAID CAKE RECIPE | BBC GOOD FOOD
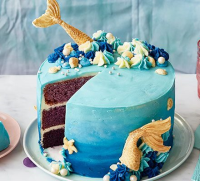
Create a cake with the wow factor with our colourful ombre mermaid. It's a baking challenge but makes a magical party cake for kids and grown-ups alike
Provided by Liberty Mendez
Categories Afternoon tea, Dessert, Treat
Total Time 2 hours
Prep Time 1 hours 30 minutes
Cook Time 30 minutes
Yield 14
Number Of Ingredients 14
Steps:
- If you're making the mermaid tails, melt the white chocolate in a heatproof bowl in 20-second bursts in the microwave, stirring after each turn. Pour into the tail moulds and small shells, and put on a small tray flat in the freezer for 15-20 mins until set. You can repeat this for four tails if you only have one mould.
- Once set, remove from the mould, mix the lustre with ¼ tsp of water and paint it onto the mermaid tails (see tip, below). Put back on a plate or tray in the freezer until needed.
- Heat the oven to 180C/160C fan/gas 4. Butter and line the base of three 18cm sandwich cake tins with baking parchment. Using a stand mixer or electric hand whisk, beat together the butter, sugar, eggs, vanilla, baking powder and flour until you have a fluffy mix.
- Divide the mixture evenly between three bowls and mix a few drops of colouring into each bowl until fully combined, making each bowl a different shade of purple, getting lighter. Pour each coloured sponge mix into separate tins and smooth over the tops. Bake for 25-30 mins until a skewer inserted into the middle comes out clean. After 10 mins, remove the cakes from their tins and transfer to a cooling rack, top-side facing down, and leave to cool. Don’t worry if the outside doesn’t look purple, the inside will!
- While the cake is cooling, make the icing. Beat together the icing sugar and butter until pale and fluffy, mixing in 1 tbsp warm water to loosen the mixture if necessary. Set half of the icing aside in a bowl. Divide the other half of the icing between three bowls and colour each a different shade of blue, a dark, medium and light. Stack the sponges, spreading most of the white icing over each one using a palette knife, then use the palette knife to roughly coat the outside of the cakes with the remaining white icing to create a crumb coat. Chill for 30 mins.
- Put each of the blue icing shades in separate piping bags and cut a large 2cm hole at the bottom. Starting with the dark shade at the bottom of the cake, pipe an even ring onto the whole cake, two-three times around. Continue working your way up the cake with the icing getting lighter as you reach the top of the cake. Using a small palette knife, work your way around the join in between each row, gently pushing to join each line together. Save some icing in the piping bags to decorate the top. Smooth over the cake with a large palette knife or cake scraper to create a smooth ombre icing, keeping the excess to decorate the top.
- You can either mix all the leftover icing together and put in a clean piping bag with a star nozzle to get a multicoloured effect, or pipe individual shades on the top. Add a few dots around the top of the cake in the varying blue colours to look like waves (using some of the white to look like the top of a crashing wave), and dot around the pearls, sprinkles, shells and mermaid tails, pushing them into the icing on the side of the cake, and on top to finish.
Nutrition Facts : Calories 816 calories, FatContent 45 grams fat, SaturatedFatContent 27 grams saturated fat, CarbohydrateContent 96 grams carbohydrates, SugarContent 79 grams sugar, FiberContent 1 grams fiber, ProteinContent 6 grams protein, SodiumContent 1.26 milligram of sodium
More about "mermaid cake pops recipes"
HOW TO MAKE A MERMAID CAKE - DELISH
From delish.com
Total Time 1 hours 30 minutes
Category birthday, Summer, dessert
- Preheat oven to 350°. Line two 8” round cake pans with parchment paper and grease with cooking spray. Prepare cake mix according to package instructions. Divide cake batter between prepared pans and bake according to package instructions. Let cakes cool in pans for 10 minutes, then invert onto wire racks to cool completely. Make frosting: In a large bowl using a hand mixer, beat butter and half of the powdered sugar until smooth. Add the remaining powdered sugar, vanilla and 4 tablespoons heavy cream and beat until fluffy. If the mixture is too stiff, add more heavy cream. Place a dab of frosting on cake plate (to keep cake in place) and place parchment strips on each side of the cake plate. Place down first cake and top with frosting, then top with second cake and frost with a thin crumb coat of frosting. Divide remaining frosting into three small bowls and stir one shade of gel food coloring into each bowl of frosting. Place each color of frosting into its own piping bag fitted with a large round piping tip. Starting at the top of one side of the cake, pipe a small circle of purple frosting. Directly underneath the purple frosting circle, pipe a small circle of blue frosting, following by a circle of teal frosting underneath. Continue in a vertical line in the same order of colors until you run out of space on the cake. Using an offset spatula, smear each circle of frosting horizontally across the side of the cake about 1 inch. Note: Use a different spatula for each color of frosting to avoid mixing the shades. Repeats steps 9 and 10, slightly overlapping the circles of frosting with the smeared frosting to create a mermaid-scale effect until you run out of space on the side of the cake. Repeat the same circle and smear technique with the frosting on top of the cake, but in concentric circles this time.
HOW TO MAKE MERMAID CAKE POPS - FOOD.COM
From food.com
AMAZING LIL MERMAID CAKE POPS - CAKE DECORIST
From cakedecorist.com
23 MERMAID CAKE POPS IDEAS | MERMAID CAKES, MERMAID CAKE ...
From pinterest.com
MERMAID TAIL CAKE POPS PROJECT | CAKE MASTERS MAGAZINE
From cakemastersmagazine.com
20+ AMAZING MERMAID BIRTHDAY CAKE IDEAS - PINEAPPLE PAPER CO.
From pineapplepaperco.com
23 MERMAID CAKE POPS IDEAS | MERMAID CAKES, MERMAID CAKE ...
From pinterest.com
20+ AMAZING MERMAID BIRTHDAY CAKE IDEAS - PINEAPPLE PAPER CO.
From pineapplepaperco.com
EASY MERMAID CAKE FOR A MERMAID BIRTHDAY PARTY - MERRIMENT ...
From merrimentdesign.com
CAKE POP RECIPES | ALLRECIPES
From allrecipes.com
30 BEST CHRISTMAS CAKE POPS - EASY CHRISTMAS CAKE POP RECIPES
From countryliving.com
MERMAID CAKE POPS | ETSY
From etsy.com
175 BEST BABYCAKES CAKE POPS RECIPES - PLUGGED INTO COOKING
From pluggedintocooking.com
CAKE POPS | BAKERELLA
From bakerella.com


