FULL SIZE SHEET PAN DIMENSIONS RECIPES


YULE LOG CAKE RECIPE - BETTYCROCKER.COM
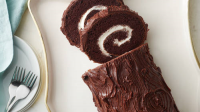
A delicious cake made to look like a wooden yule log, this is an old-school holiday dessert that never fails to get some “ooohs” and “ahhhs”—not to mention “mmms!” Also known as Bûche de Noël, our Yule Log Cake is the perfect centerpiece for any holiday table. Made with Betty Crocker™ cake mix and whipped frosting, this yule log cake recipe is more than a delicious dessert, it’s a fun activity and may even become your family’s new favorite holiday tradition.
Provided by Betty Crocker Kitchens
Total Time 2 hours 5 minutes
Prep Time 35 minutes
Yield 12
Number Of Ingredients 10
Steps:
- Heat oven to 375°F (350°F for dark or nonstick pan). Line bottom only of 15x10x1-inch pan with foil or waxed paper; spray with baking spray with flour. Place paper baking cup in each of 8 regular-size muffin cups.
- In large bowl, beat eggs with electric mixer on high speed about 5 minutes or until thick and lemon colored. Add cake mix, water and oil; beat on low speed 30 seconds, then on medium speed 1 minute, scraping bowl occasionally. Pour 3 1/2 cups batter into pan. Divide remaining batter among muffin cups.
- Bake 14 to 16 minutes or until cake springs back when lightly touched in center and cupcakes test done when toothpick inserted in center comes out clean. If necessary, run knife around edges of pan to loosen cake. Turn cake upside down onto clean kitchen towel sprinkled with 1 tablespoon powdered sugar; carefully remove foil. While hot, carefully roll up cake and towel from narrow end. Cool completely on cooling rack, about 1 hour. Cool cupcakes 10 minutes. Remove from pan; cool completely, about 30 minutes. Save cupcakes for another use.
- Meanwhile, in medium microwavable bowl, microwave whipping cream uncovered on High 1 minute to 1 minute 30 seconds or until it just starts to boil. Stir in chocolate chips and corn syrup; let stand 3 minutes. Beat gently with wire whisk until smooth. Beat in vanilla. Refrigerate about 1 hour, stirring every 15 minutes, until spreading consistency.
- Unroll cake carefully, and remove towel. Spread filling evenly over cake; roll up cake. Place cooling rack on sheet of waxed paper. Place cake roll on cooling rack; frost cake. Using fork, drag tines through frosting to look like log. Let stand 15 minutes. Transfer cake to serving platter. Store loosely covered in refrigerator. Let stand at room temperature 30 minutes before serving.
Nutrition Facts : Calories 450 , CarbohydrateContent 58 g, CholesterolContent 120 mg, FatContent 4 , FiberContent 1 g, ProteinContent 5 g, SaturatedFatContent 9 g, ServingSize 1 Serving, SodiumContent 370 mg, SugarContent 41 g, TransFatContent 2 g
CROISSANTS RECIPE - NYT COOKING

This recipe is a detailed roadmap to making bakery-quality light, flaky croissants in your own kitchen. With a pastry as technical as croissants, some aspects of the process — gauging the butter temperature, learning how much pressure to apply to the dough while rolling — become easier with experience. If you stick to this script, buttery homemade croissants are squarely within your reach. (Make sure your first attempt at croissants is a successful one, with these tips, and Claire Saffitz’s step-by-step video on YouTube.)
Provided by Claire Saffitz
Total Time P1D
Yield 8 croissants
Number Of Ingredients 11
Steps:
- Twenty-four hours before serving, start the détrempe: In the bowl of a stand mixer fitted with the dough hook, combine the flour, sugar, salt and yeast, and stir to combine. Create a well in the center, and pour in the water and milk. Mix on low speed until a tight, smooth dough comes together around the hook, about 5 minutes. Remove the hook and cover the bowl with a damp towel. Set aside for 10 minutes.
- Reattach the dough hook and turn the mixer on medium-low speed. Add the butter pieces all at once and continue to mix, scraping down the bowl and hook once or twice, until the dough has formed a very smooth, stretchy ball that is not the least bit sticky, 8 to 10 minutes.
- Form the dough into a ball and place seam-side down on a lightly floured work surface. Using a sharp knife, cut two deep perpendicular slashes in the dough, forming a “+.” (This will help the dough expand into a square shape as it rises, making it easier to roll out later.) Place the dough slashed-side up inside the same mixing bowl, cover with plastic wrap and let rise at room temperature until about 1 1/2 times its original size, 45 minutes to 1 hour. Transfer the bowl to the refrigerator and chill for at least 4 hours and up to 12.
- As the dough chills, make the butter block: Place the sticks of butter side-by-side in the center of a large sheet of parchment paper, then loosely fold all four sides of the parchment over the butter to form a packet. Turn the packet over and use a rolling pin to lightly beat the cold butter into a flat scant 1/2-inch-thick layer, fusing the sticks and making it pliable. (Don’t worry about the shape at this point.) The parchment may tear. Turn over the packet and unwrap, replacing the parchment with a new sheet if needed. Fold the parchment paper over the butter again, this time making neat, clean folds at right angles (like you’re wrapping a present), forming an 8-inch square. Turn the packet over again and roll the pin across the packet, further flattening the butter into a thin layer that fills the entire packet while forcing out any air pockets. The goal is a level and straight-edged square of butter. Transfer the butter block to the refrigerator.
- Eighteen hours before serving, remove the dough from the refrigerator, uncover and transfer to a clean work surface. (It will have doubled in size.) Deflate the dough with the heel of your hand. Using the four points that formed where you slashed the dough, stretch the dough outward and flatten into a rough square measuring no more than 8 inches on one side.
- Place 2 pieces of plastic wrap on the work surface perpendicular to each other, and place the dough on top. Wrap the dough rectangle, maintaining the squared-off edges, then roll your pin over top as you did for the butter, forcing the dough to fill in the plastic and form an 8-inch square with straight sides and right angles. Freeze for 20 minutes.
- Remove the butter from the refrigerator and the dough from the freezer. Set aside the butter. Unwrap the dough (save the plastic, as you’ll use it again) and place on a lightly floured surface. Roll the dough, dusting with flour if necessary, until 16 inches long, maintaining a width of 8 inches (barely wider than the butter block). With a pastry brush, brush off any flour from the surface of the dough and make sure none sticks to the surface.
- You’re going to enclose the butter block in the dough and roll them out together. To ensure they do so evenly, they should have the same firmness, with the dough being slightly colder than the butter. The butter should be chilled but able to bend without breaking. If it feels stiff or brittle, let sit at room temperature for a few minutes. Unwrap the butter just so the top is exposed, then use the parchment paper to carefully invert the block in the center of the dough rectangle, ensuring all sides are parallel. Press the butter gently into the dough and peel off the parchment paper. You should have a block of butter with overhanging dough on two opposite sides and a thin border of dough along the other two.
- Grasp the overhanging dough on one side and bring it over the butter toward the center, then repeat with the other side of the dough, enclosing the butter. You don’t need the dough to overlap, but you want the two sides to meet, so stretch it if necessary, and pinch the dough together along all seams so no butter peeks out anywhere. Lift the whole block and dust a bit of flour underneath, then rotate the dough 90 degrees, so the center seam is oriented vertically.
- Orient the rolling pin perpendicular to the seam and lightly beat the dough all along the surface to lengthen and flatten. Roll out the dough lengthwise along the seam into a 24-inch-long, 1/4-inch-thick narrow slab, lightly dusting underneath and over top with more flour as needed to prevent sticking. Rather than applying pressure downward, try to push the dough toward and away from you with the pin, which will help maintain even layers of dough and butter. Remember to periodically lift the dough and make sure it’s not sticking to the surface, and try your best to maintain straight, parallel sides. (It’s OK if the shorter sides round a bit — you’re going to trim them.)
- Use a wheel cutter or long, sharp knife to trim the shorter ends, removing excess dough where the butter doesn’t fully extend and squaring off the corners for a very straight-edged, even rectangle of dough. Maintaining the rectangular shape, especially at this stage, will lead to the most consistent and even lamination. If at any point in the process you see air bubbles in the dough while rolling, pierce them with a cake tester or the tip of a paring knife to deflate and proceed.
- Dust any flour off the dough’s surface. Grasp the short side of the rectangle farther from you and fold it toward the midline of the dough slab, aligning the sides. Press gently so the dough adheres to itself. Repeat with the other side of the dough, leaving an 1/8-inch gap where the ends meet in the middle. Now, fold the entire slab in half crosswise along the gap in the center. You should now have a rectangular packet of dough, called a “book,” that’s four layers thick. This is a “double turn,” and it has now quadrupled the number of layers of butter inside the dough.
- Wrap the book tightly in the reserved plastic. If it is thicker than about 1 1/2 inches, or if it’s lost some of its rectangularity, roll over the plastic-wrapped dough to flatten it and reshape it. Freeze the book for 15 minutes, then refrigerate for 1 hour.
- Let the dough sit at room temperature for about 5 minutes. Unwrap and place on a lightly floured surface. Beat the dough and roll out as before (Step 10) into another long, narrow 3/8-inch-thick slab. It should be nice and relaxed, and extend easily. Dust off any excess flour.
- Fold the dough in thirds like a letter, bringing the top third of the slab down and over the center third, then the bottom third up and over. This is a “simple turn,” tripling the layers. Press gently so the layers adhere. Wrap tightly in plastic again and freeze for 15 minutes, then refrigerate for 1 hour.
- Let the dough sit at room temperature for about 5 minutes, then unwrap and place on a lightly floured surface. Beat the dough and roll out as before, but into a 14-by-17-inch slab (15-by-16-inch for pain au chocolat or ham and cheese croissants). The dough will start to spring back, but try to get it as close to those dimensions as possible. Brush off any excess flour, wrap tightly in plastic, and slide onto a baking sheet or cutting board. Freeze for 20 minutes, then chill overnight (8 to 12 hours). If making pain au chocolat or ham and cheese croissants, see recipes.
- Four and a half hours before serving, arrange racks in the upper and lower thirds of the oven. Bring a skillet of water to a simmer over medium-high heat. Transfer the skillet to the floor of the oven and close the door. (The steam released inside the oven will create an ideal proofing environment.)
- As the steam releases in the oven, line two rimmed baking sheets with parchment paper and set aside. Let the dough sit at room temperature for about 5 minutes. Unwrap (save the plastic for proofing), place on a very lightly floured surface, and, if necessary, roll out to 17-by-14 inches. Very thoroughly dust off any excess flour with a pastry brush. Use a wheel cutter or long knife and ruler to cut the shorter sides, trimming any irregular edges where not all the layers of dough fully extend and creating a rectangle that’s exactly 16 inches long, then cut into four 4-by-14-inch rectangles.
- Separate the rectangles, then use the ruler and wheel cutter to slice a straight line from opposite corners of one rectangle to form two long, equal triangles. Repeat with the remaining rectangles to make 8 triangles. Trim the short side of each triangle at a slight angle, making them into triangles with longer sides of equal length.
- Working one triangle at a time, grasp the two corners of the shorter end, the base of the crescent, and tug gently outward to extend the points and widen the base to about 3 inches. Then, gently tug outward from about halfway down the triangle all the way to the point, to both lengthen the triangle and thin the dough as it narrows. Starting at the base (the short end), snugly roll up the dough, keeping the point centered and applying light pressure. Try not to roll tightly or stretch the dough around itself. Place the crescent on one of the parchment-lined baking sheets, resting it on the point of the triangle. If the dough gets too soft while you’re working, cover the triangles and freeze for a few minutes before resuming rolling. Space them evenly on the baking sheets, four per sheet. Very loosely cover the baking sheets with plastic wrap, so the croissants have some room to expand.
- Three and a half hours before serving, open the oven and stick your hand inside: It should be humid but not hot, as the water in the skillet will have cooled. You want the croissants to proof at 70 to 75 degrees. (Any hotter and the butter will start to melt, leading to a denser croissant.) Place the baking sheets inside the oven and let the croissants proof until they’re about doubled in size, extremely puffy, and jiggle delicately when the baking sheet is gently shaken, 2 to 2 1/2 hours. Resist the urge to touch or poke the croissants as they proof: They’re very delicate. Try not to rush this process, either, as an underproofed croissant will not be as light and ethereal.
- Remove the baking sheets from the oven and carefully uncover them, then transfer to the refrigerator and chill for 20 minutes while you heat the oven. Remove the skillet from the oven and heat to 375 degrees.
- In a small bowl, stir the yolk and heavy cream until streak-free. Using a pastry brush, gently brush the smooth surfaces of each crescent with the yolk and cream mixture, doing your best to avoid the cut sides with exposed layers of dough.
- Transfer the sheets to the oven and bake for 20 minutes. Rotate the baking sheets and switch racks, and continue to bake until the croissants are deeply browned, another 10 to 15 minutes. Remove from the oven and let cool completely on the baking sheets.
More about "full size sheet pan dimensions recipes"
YULE LOG CAKE RECIPE - BETTYCROCKER.COM
A delicious cake made to look like a wooden yule log, this is an old-school holiday dessert that never fails to get some “ooohs” and “ahhhs”—not to mention “mmms!” Also known as Bûche de Noël, our Yule Log Cake is the perfect centerpiece for any holiday table. Made with Betty Crocker™ cake mix and whipped frosting, this yule log cake recipe is more than a delicious dessert, it’s a fun activity and may even become your family’s new favorite holiday tradition.
From bettycrocker.com
Reviews 4
Total Time 2 hours 5 minutes
Calories 450 per serving
From bettycrocker.com
Reviews 4
Total Time 2 hours 5 minutes
Calories 450 per serving
- Unroll cake carefully, and remove towel. Spread filling evenly over cake; roll up cake. Place cooling rack on sheet of waxed paper. Place cake roll on cooling rack; frost cake. Using fork, drag tines through frosting to look like log. Let stand 15 minutes. Transfer cake to serving platter. Store loosely covered in refrigerator. Let stand at room temperature 30 minutes before serving.
See details
CROISSANTS RECIPE - NYT COOKING
This recipe is a detailed roadmap to making bakery-quality light, flaky croissants in your own kitchen. With a pastry as technical as croissants, some aspects of the process — gauging the butter temperature, learning how much pressure to apply to the dough while rolling — become easier with experience. If you stick to this script, buttery homemade croissants are squarely within your reach. (Make sure your first attempt at croissants is a successful one, with these tips, and Claire Saffitz’s step-by-step video on YouTube.)
From cooking.nytimes.com
Reviews 4
Total Time P1D
Cuisine french
From cooking.nytimes.com
Reviews 4
Total Time P1D
Cuisine french
- Transfer the sheets to the oven and bake for 20 minutes. Rotate the baking sheets and switch racks, and continue to bake until the croissants are deeply browned, another 10 to 15 minutes. Remove from the oven and let cool completely on the baking sheets.
See details
SHEET PAN PANCAKES (HOMEMADE & MIX DIRECTIONS) - DINNER ...
Oct 20, 2021 · Sheet Pan Pancakes with mixed berries and homemade pancake batter let you make pancakes for a crowd without standing over the oven! Using the base of this classic Homemade Pancake recipe for these sheet pan pancakes makes this recipe a …
From dinnerthendessert.com
From dinnerthendessert.com
See details
SHEET PAN STEAK AND VEGGIES - DAMN DELICIOUS
Dec 16, 2016 · What size sheet pan do you use? Chungah — January 21, 2017 @ 5:55 PM Reply I prefer to use an XL sheet pan, about 20.25 x 14.25 x 1 inches.
From damndelicious.net
From damndelicious.net
See details
4 CHEESE DIPS ON 1 SHEET PAN, EASY GAME DAY FOOD | HIP2SAVE
Dec 16, 2020 · You’ll need a very large sheet pan for this recipe to make sure it all fits! I am using a 16×22 inch size sheet pan in my recipe. Consider adding a small cheese spread knife to each of the four dips so it’s easier to serve.
From hip2save.com
From hip2save.com
See details
AMAZON.COM: THE OFFICIAL NINJA FOODI DIGITAL AIR FRY OVEN ...
This sheet pan cookbook features: Official guidance―Serve up perfection with straightforward instructions that teach you how to take advantage of your Ninja® Foodi™ Digital Air Fry Oven’s unique capabilities. Quick and easy recipes―Learn how to whip up 75 delicious dishes, ranging from party platters to sheet pan …
From amazon.com
From amazon.com
See details
TEXAS SHEET CAKE V | ALLRECIPES
The pan size in the text is 10X15 but the pan size in the header is different; use the 10X15 size. Multiply pan dimensions to give you sq. in. (150 for this recipe; my pan was 192). Divide your pan area by 150, and multiply the result by 35 servings.
From allrecipes.com
From allrecipes.com
See details
AMAZON.COM: NORDIC WARE BAKER'S BIG BAKING SHEET, 1-PACK ...
The large size is especially great for all the sheet pan dinner recipes that have become popular. The larger size ensures that the food won't be overcrowded. One note is that putting these in the dishwasher will alter the color/finish of the pan, although it won't affect it's use.
From amazon.com
From amazon.com
See details
HOLY SHEET | GREAT JONES
Our half-sized sheet pan, Holy Sheet, is a kitchen superhero: bold and colorful in appearance, but the custom nonstick ceramic coating allows for a quick, easy, and drama-free cleanup. Why It's Special. Oven-safe and dishwasher-friendly. Comes in three joyful, …
From greatjonesgoods.com
From greatjonesgoods.com
See details
TEXAS SHEET CAKE RECIPE FOR 9 X 13 INCH PAN » HUMMINGBIRD HIGH
May 11, 2021 · Like this recipe! This recipe uses a 9 x 13 inch sheet pan with 1 inch tall sides to make the Texas sheet cake. Those are also the dimensions for a “quarter sheet pan.” Traditional, larger batch Texas sheet cake recipes will instruct you to make the recipes in a 13 x 18 inch sheet pan with 1 inch tall sides (which are also the dimensions …
From hummingbirdhigh.com
From hummingbirdhigh.com
See details
OVEN ROASTED CHICKEN AND VEGETABLES (ONE PAN) | ONE POT ...
Aug 14, 2019 · The best, healthy, quick and easy oven roasted chicken and vegetables recipe, homemade with simple ingredients in sheet pan/ one pan in 30 minutes. Loaded with Italian flavors! This meal packs flavor while minimizing work. All you have to do is chop, season, and bake, and you have a flavorful, full …
From onepotrecipes.com
From onepotrecipes.com
See details
FOOD PAN SIZE GUIDE | MISSION RESTAURANT SUPPLY BLOG
Dec 28, 2011 · On MissionRS.com, we have many different-sized food pans, ranging from full size to 1/9 size. These pans also come in a variety of depths, with typical depths between 2 1/2 to 6 inches, though sizes from ¾ inch to 8 inches aren't unheard of. Furthermore, the standard full-size food pan …
From missionrs.com
From missionrs.com
See details
THE 8 BEST BAKING SHEETS IN 2022
Jan 06, 2022 · Full Sheet . This size measures 26 x 18 inches and is mostly used in commercial kitchens to bake in large quantities. A full-size baking sheet is typically too large for most home ovens. Half Sheet . Measuring 18 x 13 inches, this size is the most common selection for a standard home oven. It is exactly half the size of a full sheet pan…
From thespruceeats.com
From thespruceeats.com
See details
BEST SHEET PANS OF 2020 TESTED AND REVIEWED | EPICURIOUS
Aug 17, 2020 · As for size, full-sheet pans are generally too large for noncommercial kitchens. ... the Vollrath Wear-Ever Half-Size Sheet Pan, ... with daily kitchen tips, fun cooking videos, and, oh yeah, over ...
From epicurious.com
From epicurious.com
See details
THE SIMPLY RECIPES GUIDE TO LOAF PANS
Jul 02, 2019 · In America, what recipes call a “standard loaf pan” is 8-1/2 x 4-1/2 x 2-1/2 inches. If a store sells only one size of loaf pan, this is probably it. If you own one loaf pan, it should probably be this size.
From simplyrecipes.com
From simplyrecipes.com
See details
HOW TO SCALE A RECIPE TO THE NUMBER OF SERVINGS YOU NEED
Jan 30, 2021 · With foods like these, the dimensions of the pan becomes an important factor, since doubling changes the volume of the food, and thus potentially its thickness. So the rule of thumb here is to try to keep the thickness of the food as close to that of the original …
From thespruceeats.com
From thespruceeats.com
See details
BAKING SUPPLIES - ONLINE BAKING SUPPLY STORE | WILTON
Shop Wilton's online baking supply store for your all your baking needs! Browse supplies for baking cakes, cupcakes, cookies, brownies, tarts and more! Featuring baking tools, ingredients, bakeware and other great baking supplies.
From wilton.com
From wilton.com
See details
CAKE PAN SIZES & CONVERSIONS - SALLY'S BAKING ADDICTION
Jan 20, 2020 · 11×7 inch pan holds 10 cups of batter, the same as a 10×2 inch round pan, 9×2-inch square pan, 9×2.5 inch springform pan, 10×3 inch Bundt pan, and a 10×15 inch jelly roll pan. 9×13 inch pan holds 14-16 cups of batter, essentially the same as 2 9×2-inch …
From sallysbakingaddiction.com
From sallysbakingaddiction.com
COOKING PERFORMANCE GROUP FEC-100 SINGLE DECK FULL SIZE ...
Perfect for virtually all cooking and baking applications, this Cooking Performance Group FEC-100 single deck full size electric convection oven is an invaluable asset to any commercial kitchen. It features a temperature range of 150 to 500 degrees Fahrenheit and is …
From webstaurantstore.com
From webstaurantstore.com
See details
WHOLE30 FAST & EASY RECIPES : 150 SIMPLY DELICIOUS ...
Dec 05, 2017 · About the Book . Easy-to-prepare, healthful, and delicious recipes for the Whole30 and beyond . Book Synopsis . A New York Times bestseller featuring 150 all new, Whole30-compliant recipes--all fast and easy to prepare. Millions of people have …
From target.com
From target.com
See details
NATURALS® BAKER'S HALF SHEET 2 PACK - NORDIC WARE
Dec 20, 2021 · Followed the recipe in the cook book that came with it. Wish the cook book had more recipes.Thanks for the recipes that are on your web site! Love the Baker’s Half Sheet pans .Ended up getting 8 pans with rack and everyone in the family …
From nordicware.com
From nordicware.com
See details
BLUEBERRY BANANA BREAD RECIPE | ALLRECIPES
Baked exactly as the recipe lists aside from dredging the berries in flour and using a full sized loaf and OMG delicious. For the large loaf in a glass pan, I put it on a cookie sheet and baked at 350 for 35 min. Then I covered it with a piece of foil and baked another 30 …
From allrecipes.com
From allrecipes.com
See details
WILLIAMS SONOMA TRADITIONALTOUCH™ JELLY ROLL PAN ...
Apr 13, 2021 · Rated 3 out of 5 by sunshine57 from Not size specified Although pan is heavy duty, it is NOT the size noted in the description. It is supposed to be 15"x10"x1" and the outer dimensions don't even measure those measurements. The pan insert notes it is 14.2"x9.3"x1". It does bake well but if needing a specific size …
From williams-sonoma.com
From williams-sonoma.com
See details
BLUEBERRY BANANA BREAD RECIPE | ALLRECIPES
Baked exactly as the recipe lists aside from dredging the berries in flour and using a full sized loaf and OMG delicious. For the large loaf in a glass pan, I put it on a cookie sheet and baked at 350 for …
From allrecipes.com
From allrecipes.com
See details
WILLIAMS SONOMA TRADITIONALTOUCH™ JELLY ROLL PA…
Apr 13, 2021 · Rated 3 out of 5 by sunshine57 from Not size specified Although pan is heavy duty, it is NOT the size noted in the description. It is supposed to be 15"x10"x1" and the outer dimensions don't even measure those measurements. The pan insert notes it is 14.2"x9.3"x1". It does bake well but if needing a specific size …
From williams-sonoma.com
From williams-sonoma.com
See details
INSTALLING A MORTARED SHOWER PAN | BETTER HOMES & GARDENS
May 30, 2018 · Fill the pan with water to about an inch from the top of the membrane. Let the water come to rest, mark its level on the side of the pan, and let the water sit for 24 hours. Then check the level. If it's still at the mark, the pan …
From bhg.com
From bhg.com
See details
WHOLE WHEAT BREAD RECIPE, EASY WHEAT BREAD | JENNY CAN …
Apr 02, 2020 · Ingredients: 2 cups (240-260 g) whole wheat flour (Aerate Flour Before Measuring - See How) 1/2 cup (60-65 g) bread flour or all-purpose flour; 2 teaspoons (1 packet / 7g) instant …
From jennycancook.com
From jennycancook.com
See details
BAKING PAN CONVERSION CHART - COMFORTABLY DOMESTIC
May 10, 2013 · The baking pan conversion chart outlines volume equivalents for various cake pans, loaf pans, tube pans, as well as cupcake tins, and pie plates.This handy-dandy chart makes it easy to convert recipes to bake with the pans that you have! I’m following a slight tangent in relation to food science, just long enough to share a very useful baking pan conversion chart …
From comfortablydomestic.com
From comfortablydomestic.com
See details
ALL-CLAD GOURMET ACCESSORIES STAINLESS-STEEL LASAGNA PAN ...
Jun 17, 2019 · The sides and rectangular shape of this gleaming 18/10 stainless-steel pan from All-Clad are perfectly suited to cooking lasagnas and casseroles. What makes the pan truly unique is its handy fitted-plastic lid, which allows you to safely transport your baked dish to a barbecue or potluck – or refrigerate leftovers right in the pan …
From williams-sonoma.com
From williams-sonoma.com
See details


