CLING SHEET RECIPES


CHEAT’S MANCHESTER TART RECIPE - BBC GOOD FOOD
Save time by using ready-made pastry and custard powder for this easy Manchester tart – it still has all the lovely flavours of this classic northern dessert
Provided by Richard Ashton
Categories Afternoon tea, Dessert, Treat
Total Time 55 minutes
Prep Time 20 minutes
Cook Time 35 minutes
Yield Serves 6-8
Number Of Ingredients 9
Steps:
- Heat oven to 200C/180C fan/gas 6. Butter a 22cm round loose-bottomed tart tin, then use the sheet of pastry to line the tin. Prick the base with a fork, then lay a sheet of baking parchment on top and fill with baking beans. Bake for 20 mins. Remove the beans and baking parchment and cook for a further 5 mins. Remove from the oven and leave to cool.
- To make the custard, put the milk, custard powder, sugar and vanilla extract in a pan on a medium heat and keep stirring until smooth and thick, around 5-10 mins. Leave to cool and cover with cling film to stop a skin forming.
- Once the base and custard have cooled, spread the jam over the pastry and sprinkle with half the coconut. Pour in the custard, then sprinkle with the remaining coconut and chill. Decorate with raspberries and a final sprinkle of coconut, and serve.
Nutrition Facts : Calories 362 calories, FatContent 21 grams fat, SaturatedFatContent 11 grams saturated fat, CarbohydrateContent 36 grams carbohydrates, SugarContent 15 grams sugar, FiberContent 3 grams fiber, ProteinContent 6 grams protein, SodiumContent 0.4 milligram of sodium
SOURDOUGH RECIPE - RECIPES AND COOKING TIPS - BBC GOOD FOOD
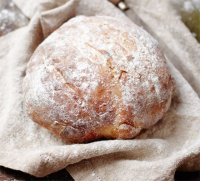
Baking a loaf of this dense, chewy bread requires making a fermented 'starter' from flour, but it's worth the effort
Provided by Cassie Best
Categories Lunch, Side dish
Total Time 1 hours
Yield Makes 1 loaf
Number Of Ingredients 5
Steps:
- First make your starter. In a large jar (a 1litre kilner jar is good) or plastic container, mix 100g of the flour with 125ml slightly warm water. Whisk the batter until smooth and lump free, whisking will help incorporate some airborne yeast particles to get your starter going. Leave the jar or container lid ajar for an hour or so in a warm place (around 25C is ideal), then seal and set aside for 24 hrs.
- For the next 6 days you will need to ‘feed’ the starter each day. To do this, tip away half the original starter and add an extra 100g of flour and 125ml slightly warm water, whisking well each time, try to do this at roughly the same time everyday. After 3-4 days you should start to see bubbles appearing on the surface, and it will smell yeasty and a little acidic. This is a good indication that the starter is working. The time it takes for fermentation to begin can vary between 1 to 5 days depending on temperature and environment, persevere for up to 6 days, if you still don’t see any signs of life, or the starter smells unpleasant, throw it away and start again. On the 8th day the starter should be quite bubbly and smell much sweeter. It is now ready to bake with.
- Now you can make your first loaf. Tip the flour, 225ml warm water, salt, honey and sourdough starter into a large bowl, or a table top mixer fitted with a dough hook. Stir with a wooden spoon, or on a slow setting in a machine, until combined, adding a little extra flour if it’s too sticky or a little extra warm water if it’s too dry. Tip onto a work surface and knead for about 10 mins until soft and elastic, if using a mixer, turn the speed up a little and mix for 5 mins. The dough is ready when it bounces back when gently pressed with a finger.
- Place the dough in a large, well oiled bowl and cover with an oiled sheet of cling film. Leave in a warm place to rise for 3 hrs. You may not see much movement after this time, but don’t be disheartened, sourdough takes much longer to rise than a conventional yeasted bread.
- Line a medium-sized bowl with a clean tea towel and flour it well, if you have a proving basket you can use this. Tip the dough back onto your work surface and knead briefly to knock out any air bubbles. Shape the dough into a smooth ball and dust it with flour. Place the dough, seam side up, in the bowl or proving basket, cover with a sheet of oiled cling film and leave for 6-8 hrs, until roughly doubled in size.
- Place a large baking tray in the oven, set to 230C/210C fan/gas 8, to heat up. Fill a small roasting tin with a little water and place this in the bottom of the oven to create some steam. Remove the large tray from the oven, sprinkle with flour then carefully tip the risen dough onto the tray.You can slash the top a few times with a sharp knife if you like. Bake for 35-40 mins until golden brown and hollow sounding when tapped. Leave to cool on a wire rack for 20 mins before serving.
Nutrition Facts : Calories 245 calories, FatContent 1.1 grams fat, SaturatedFatContent 0.2 grams saturated fat, CarbohydrateContent 47.9 grams carbohydrates, SugarContent 1.4 grams sugar, FiberContent 1.6 grams fiber, ProteinContent 8 grams protein, SodiumContent 0.4 milligram of sodium
More about "cling sheet recipes"
BEEF WELLINGTON RECIPE | GORDON RAMSAY RECIPES
From gordonramsay.com
Total Time 3 hours 10 minutes
Category Beef
SIMPLE HOMEMADE BREAD RECIPE | JAMIE OLIVER BREAD RECIPES
From jamieoliver.com
Total Time 55 minutes
Cuisine https://schema.org/LowLactoseDiet, https://schema.org/VeganDiet, https://schema.org/VegetarianDiet
Calories 127 calories per serving
- Stage 1: making a well Pile the flour on to a clean surface and make a large well in the centre. Pour half your water into the well, then add your yeast, sugar and salt and stir with a fork.
- Stage 2: getting it together Slowly, but confidently, bring in the flour from the inside of the well. (You don't want to break the walls of the well, or the water will go everywhere.) Continue to bring the flour in to the centre until you get a stodgy, porridgey consistency – then add the remaining water. Continue to mix until it's stodgy again, then you can be more aggressive, bringing in all the flour, making the mix less sticky. Flour your hands and pat and push the dough together with all the remaining flour. (Certain flours need a little more or less water, so feel free to adjust.)
- Stage 3: kneading! This is where you get stuck in. With a bit of elbow grease, simply push, fold, slap and roll the dough around, over and over, for 4 or 5 minutes until you have a silky and elastic dough.
- Stage 4: first prove Flour the top of your dough. Put it in a bowl, cover with cling film, and allow it to prove for about half an hour until doubled in size – ideally in a warm, moist, draught-free place. This will improve the flavour and texture of your dough and it's always exciting to know that the old yeast has kicked into action.
- Stage 5: second prove, flavouring and shaping Once the dough has doubled in size, knock the air out for 30 seconds by bashing it and squashing it. You can now shape it or flavour it as required – folded, filled, tray-baked, whatever – and leave it to prove for a second time for 30 minutes to an hour until it has doubled in size once more. This is the most important part, as the second prove will give it the air that finally ends up being cooked into your bread, giving you the really light, soft texture that we all love in fresh bread. So remember – don't fiddle with it, just let it do its thing.
- Stage 6: cooking your bread Preheat the oven to 180°C/350°F/gas 4. Very gently place your bread dough on to a flour-dusted baking tray and into the preheated oven. Don't slam the door or you'll lose the air that you need. Bake for 25-30 minutes or until cooked and golden brown. You can tell if it's cooked by tapping its bottom – if it sounds hollow it's done, if it doesn't then pop it back in for a little longer. Once cooked, place on a rack and allow it to cool for at least 30 minutes – fandabidozi. Feel free to freeze any leftover bread.
CLING FILM: GLAD® PRESS’N SEAL® HOME COLLECTION
From glad.com
CHEESE STARS | NIGELLA'S RECIPES | NIGELLA LAWSON
From nigella.com
CHEESE AND ONION PIE - RECIPES - HAIRY BIKERS
From hairybikers.com
HOMEMADE HAMBURGER BUNS RECIPE | ALLRECIPES
From allrecipes.com
25+ DINNER RECIPES FOR LOWER CHOLESTEROL THAT SUPPORT ...
From eatingwell.com
CLEARING THE AIR ON CANCER RISKS OF SMOKED OR GRILLED ...
From moffitt.org
CLING FILM: GLAD® PRESS’N SEAL® HOME COLLECTION
From glad.com
HOW TO MAKE ITALIAN HOMEMADE PASTA - RECIPES FROM ITALY
From recipesfromitaly.com
HOW TO REMOVE STATIC FROM CLOTHES - GOOD HOUSEKEEPING
From goodhousekeeping.com
CHEESE AND ONION PIE - RECIPES - HAIRY BIKERS
From hairybikers.com
25+ DINNER RECIPES FOR LOWER CHOLESTEROL THAT SUPPORT ...
From eatingwell.com
CLEARING THE AIR ON CANCER RISKS OF SMOKED OR GRILLED ...
From moffitt.org


