BASIC MARTINI RECIPE RECIPES


EASY RISOTTO RECIPE | JAMIE OLIVER RECIPES
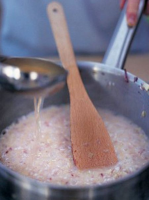
Making a beautiful risotto is so easy! All it takes is a little love and care and this base recipe
Total Time 45 minutes
Yield 6
Number Of Ingredients 9
Steps:
- Heat the stock. Peel and finely chop the onion and garlic, trim and finely chop the celery. Finely grate the Parmesan.
- In a separate pan, heat the oil and 1 small knob of butter over a low heat, add the onions, garlic and celery, and fry gently for about 15 minutes, or until softened but not coloured.
- Add the rice and turn up the heat – the rice will now begin to lightly fry, so keep stirring it. After 1 minute it will look slightly translucent. Add the vermouth or wine and keep stirring — it will smell fantastic. Any harsh alcohol flavours will evaporate and leave the rice with a tasty essence.
- Once the vermouth or wine has cooked into the rice, add your first ladle of hot stock and a good pinch of sea salt. Turn the heat down to a simmer so the rice doesn’t cook too quickly on the outside.
- Keep adding ladlefuls of stock, stirring and almost massaging the creamy starch out of the rice, allowing each ladleful to be absorbed before adding the next. This will take around 15 minutes. Taste the rice — is it cooked? Carry on adding stock until the rice is soft but with a slight bite. Don’t forget to check the seasoning carefully. If you run out of stock before the rice is cooked, add some boiling water.
- Remove the pan from the heat, add 1 knob of butter and the Parmesan, then stir well.
- Place a lid on the pan and allow to sit for 2 minutes – this is the most important part of making the perfect risotto, as this is when it becomes outrageously creamy and oozy like it should be. Eat it as soon as possible, while the risotto retains its beautiful texture.
Nutrition Facts : Calories 446 calories, FatContent 14 g fat, SaturatedFatContent 6.3 g saturated fat, ProteinContent 15.1 g protein, CarbohydrateContent 55.8 g carbohydrate, SugarContent 2.6 g sugar, SodiumContent 1 g salt, FiberContent 1.6 g fibre
HOW TO MAKE FRESH PASTA | HOMEMADE PASTA - JAMIE OLIVER

Simple ingredients and little bit of love is all you need to make your own perfect pasta dough.
Total Time 1 hours
Yield 6
Number Of Ingredients 2
Steps:
- Place the flour on a board or in a bowl. Make a well in the centre and crack the eggs into it. Beat the eggs with a fork until smooth.
- Using the tips of your fingers, mix the eggs with the flour, incorporating a little at a time, until everything is combined.
- Knead the pieces of dough together – with a bit of work and some love and attention they’ll all bind together to give you one big, smooth lump of dough!
- Once you’ve made your dough you need to knead and work it with your hands to develop the gluten in the flour, otherwise your pasta will be flabby and soft when you cook it, instead of springy and al dente. There’s no secret to kneading. You just have to bash the dough about a bit with your hands, squashing it into the table, reshaping it, pulling it, stretching it, squashing it again. It’s quite hard work, and after a few minutes it’s easy to see why the average Italian grandmother has arms like Frank Bruno! You’ll know when to stop – it’s when your pasta starts to feel smooth and silky instead of rough and floury.
- Wrap the dough in clingfilm and put it in the fridge to rest for at least 30 minutes – make sure the clingfilm covers it well or it will dry out and go crusty round the edges (this will give you crusty lumps through your pasta when you roll it out, and nobody likes crusty lumps!).
- How to roll your pasta: first of all, if you haven't got a pasta machine it's not the end of the world! All the mammas I met while travelling round Italy rolled pasta with their trusty rolling pins and they wouldn't even consider having a pasta machine in the house! When it comes to rolling, the main problem you'll have is getting the pasta thin enough to work with. It's quite difficult to get a big lump of dough rolled out in one piece, and you need a very long rolling pin to do the job properly. The way around this is to roll lots of small pieces of pasta rather than a few big ones. You'll be rolling your pasta into a more circular shape than the long rectangular shapes you'll get from a machine, but use your head and you'll be all right!
- If using a machine to roll your pasta, make sure it's clamped firmly to a clean work surface before you start (use the longest available work surface you have). If your surface is cluttered with bits of paper, the kettle, the bread bin, the kids' homework and stuff like that, shift all this out of the way for the time being. It won't take a minute, and starting with a clear space to work in will make things much easier, I promise.
- Dust your work surface with some Tipo 00 flour, take a lump of pasta dough the size of a large orange and press it out flat with your fingertips. Set the pasta machine at its widest setting - and roll the lump of pasta dough through it. Lightly dust the pasta with flour if it sticks at all.
- Click the machine down a setting and roll the pasta dough through again. Fold the pasta in half, click the pasta machine back up to the widest setting and roll the dough through again. Repeat this process five or six times. It might seem like you're getting nowhere, but in fact you're working the dough, and once you've folded it and fed it through the rollers a few times, you'll feel the difference. It'll be smooth as silk and this means you're making wicked pasta!
- Now it's time to roll the dough out properly, working it through all the settings on the machine, from the widest down to around the narrowest. Lightly dust both sides of the pasta with a little flour every time you run it through.
- When you've got down to the narrowest setting, to give yourself a tidy sheet of pasta, fold the pasta in half lengthways, then in half again, then in half again once more until you've got a square-ish piece of dough. Turn it 90 degrees and feed it through the machine at the widest setting. As you roll it down through the settings for the last time, you should end up with a lovely rectangular silky sheet of dough with straight sides - just like a real pro! If your dough is a little cracked at the edges, fold it in half just once, click the machine back two settings and feed it through again. That should sort things out.
- Whether you're rolling by hand or by machine you'll need to know when to stop. If you're making pasta like tagliatelle, lasagne or stracchi you'll need to roll the pasta down to between the thickness of a beer mat and a playing card; if you're making a stuffed pasta like ravioli or tortellini, you'll need to roll it down slightly thinner or to the point where you can clearly see your hand or lines of newsprint through it.
- Once you've rolled your pasta the way you want it, you need to shape or cut it straight away. Pasta dries much quicker than you think, so whatever recipe you're doing, don't leave it more than a minute or two before cutting or shaping it. You can lay over a damp clean tea towel which will stop it from drying.
Nutrition Facts : Calories 415 calories, FatContent 7 g fat, SaturatedFatContent 1.7 g saturated fat, ProteinContent 21.1 g protein, CarbohydrateContent 67.6 g carbohydrate, SugarContent 1.5 g sugar, SodiumContent 0.2 g salt, FiberContent 2.6 g fibre
More about "basic martini recipe recipes"
HOW TO MAKE FRESH PASTA | HOMEMADE PASTA - JAMIE OLIVER
Simple ingredients and little bit of love is all you need to make your own perfect pasta dough.
From jamieoliver.com
Total Time 1 hours
Cuisine https://schema.org/VegetarianDiet, https://schema.org/LowLactoseDiet
Calories 415 calories per serving
From jamieoliver.com
Total Time 1 hours
Cuisine https://schema.org/VegetarianDiet, https://schema.org/LowLactoseDiet
Calories 415 calories per serving
- Place the flour on a board or in a bowl. Make a well in the centre and crack the eggs into it. Beat the eggs with a fork until smooth.
- Using the tips of your fingers, mix the eggs with the flour, incorporating a little at a time, until everything is combined.
- Knead the pieces of dough together – with a bit of work and some love and attention they’ll all bind together to give you one big, smooth lump of dough!
- Once you’ve made your dough you need to knead and work it with your hands to develop the gluten in the flour, otherwise your pasta will be flabby and soft when you cook it, instead of springy and al dente. There’s no secret to kneading. You just have to bash the dough about a bit with your hands, squashing it into the table, reshaping it, pulling it, stretching it, squashing it again. It’s quite hard work, and after a few minutes it’s easy to see why the average Italian grandmother has arms like Frank Bruno! You’ll know when to stop – it’s when your pasta starts to feel smooth and silky instead of rough and floury.
- Wrap the dough in clingfilm and put it in the fridge to rest for at least 30 minutes – make sure the clingfilm covers it well or it will dry out and go crusty round the edges (this will give you crusty lumps through your pasta when you roll it out, and nobody likes crusty lumps!).
- How to roll your pasta: first of all, if you haven't got a pasta machine it's not the end of the world! All the mammas I met while travelling round Italy rolled pasta with their trusty rolling pins and they wouldn't even consider having a pasta machine in the house! When it comes to rolling, the main problem you'll have is getting the pasta thin enough to work with. It's quite difficult to get a big lump of dough rolled out in one piece, and you need a very long rolling pin to do the job properly. The way around this is to roll lots of small pieces of pasta rather than a few big ones. You'll be rolling your pasta into a more circular shape than the long rectangular shapes you'll get from a machine, but use your head and you'll be all right!
- If using a machine to roll your pasta, make sure it's clamped firmly to a clean work surface before you start (use the longest available work surface you have). If your surface is cluttered with bits of paper, the kettle, the bread bin, the kids' homework and stuff like that, shift all this out of the way for the time being. It won't take a minute, and starting with a clear space to work in will make things much easier, I promise.
- Dust your work surface with some Tipo 00 flour, take a lump of pasta dough the size of a large orange and press it out flat with your fingertips. Set the pasta machine at its widest setting - and roll the lump of pasta dough through it. Lightly dust the pasta with flour if it sticks at all.
- Click the machine down a setting and roll the pasta dough through again. Fold the pasta in half, click the pasta machine back up to the widest setting and roll the dough through again. Repeat this process five or six times. It might seem like you're getting nowhere, but in fact you're working the dough, and once you've folded it and fed it through the rollers a few times, you'll feel the difference. It'll be smooth as silk and this means you're making wicked pasta!
- Now it's time to roll the dough out properly, working it through all the settings on the machine, from the widest down to around the narrowest. Lightly dust both sides of the pasta with a little flour every time you run it through.
- When you've got down to the narrowest setting, to give yourself a tidy sheet of pasta, fold the pasta in half lengthways, then in half again, then in half again once more until you've got a square-ish piece of dough. Turn it 90 degrees and feed it through the machine at the widest setting. As you roll it down through the settings for the last time, you should end up with a lovely rectangular silky sheet of dough with straight sides - just like a real pro! If your dough is a little cracked at the edges, fold it in half just once, click the machine back two settings and feed it through again. That should sort things out.
- Whether you're rolling by hand or by machine you'll need to know when to stop. If you're making pasta like tagliatelle, lasagne or stracchi you'll need to roll the pasta down to between the thickness of a beer mat and a playing card; if you're making a stuffed pasta like ravioli or tortellini, you'll need to roll it down slightly thinner or to the point where you can clearly see your hand or lines of newsprint through it.
- Once you've rolled your pasta the way you want it, you need to shape or cut it straight away. Pasta dries much quicker than you think, so whatever recipe you're doing, don't leave it more than a minute or two before cutting or shaping it. You can lay over a damp clean tea towel which will stop it from drying.
See details
EASY RISOTTO RECIPE | JAMIE OLIVER RECIPES
Making a beautiful risotto is so easy! All it takes is a little love and care and this base recipe
From jamieoliver.com
Total Time 45 minutes
Cuisine https://schema.org/GlutenFreeDiet, https://schema.org/VegetarianDiet
Calories 446 calories per serving
From jamieoliver.com
Total Time 45 minutes
Cuisine https://schema.org/GlutenFreeDiet, https://schema.org/VegetarianDiet
Calories 446 calories per serving
- Heat the stock. Peel and finely chop the onion and garlic, trim and finely chop the celery. Finely grate the Parmesan.
- In a separate pan, heat the oil and 1 small knob of butter over a low heat, add the onions, garlic and celery, and fry gently for about 15 minutes, or until softened but not coloured.
- Add the rice and turn up the heat – the rice will now begin to lightly fry, so keep stirring it. After 1 minute it will look slightly translucent. Add the vermouth or wine and keep stirring — it will smell fantastic. Any harsh alcohol flavours will evaporate and leave the rice with a tasty essence.
- Once the vermouth or wine has cooked into the rice, add your first ladle of hot stock and a good pinch of sea salt. Turn the heat down to a simmer so the rice doesn’t cook too quickly on the outside.
- Keep adding ladlefuls of stock, stirring and almost massaging the creamy starch out of the rice, allowing each ladleful to be absorbed before adding the next. This will take around 15 minutes. Taste the rice — is it cooked? Carry on adding stock until the rice is soft but with a slight bite. Don’t forget to check the seasoning carefully. If you run out of stock before the rice is cooked, add some boiling water.
- Remove the pan from the heat, add 1 knob of butter and the Parmesan, then stir well.
- Place a lid on the pan and allow to sit for 2 minutes – this is the most important part of making the perfect risotto, as this is when it becomes outrageously creamy and oozy like it should be. Eat it as soon as possible, while the risotto retains its beautiful texture.
See details
HOW TO MAKE FRESH PASTA | HOMEMADE PASTA - JAMIE OLIVER
Simple ingredients and little bit of love is all you need to make your own perfect pasta dough.
From jamieoliver.com
Total Time 1 hours
Cuisine https://schema.org/VegetarianDiet, https://schema.org/LowLactoseDiet
Calories 415 calories per serving
From jamieoliver.com
Total Time 1 hours
Cuisine https://schema.org/VegetarianDiet, https://schema.org/LowLactoseDiet
Calories 415 calories per serving
- Place the flour on a board or in a bowl. Make a well in the centre and crack the eggs into it. Beat the eggs with a fork until smooth.
- Using the tips of your fingers, mix the eggs with the flour, incorporating a little at a time, until everything is combined.
- Knead the pieces of dough together – with a bit of work and some love and attention they’ll all bind together to give you one big, smooth lump of dough!
- Once you’ve made your dough you need to knead and work it with your hands to develop the gluten in the flour, otherwise your pasta will be flabby and soft when you cook it, instead of springy and al dente. There’s no secret to kneading. You just have to bash the dough about a bit with your hands, squashing it into the table, reshaping it, pulling it, stretching it, squashing it again. It’s quite hard work, and after a few minutes it’s easy to see why the average Italian grandmother has arms like Frank Bruno! You’ll know when to stop – it’s when your pasta starts to feel smooth and silky instead of rough and floury.
- Wrap the dough in clingfilm and put it in the fridge to rest for at least 30 minutes – make sure the clingfilm covers it well or it will dry out and go crusty round the edges (this will give you crusty lumps through your pasta when you roll it out, and nobody likes crusty lumps!).
- How to roll your pasta: first of all, if you haven't got a pasta machine it's not the end of the world! All the mammas I met while travelling round Italy rolled pasta with their trusty rolling pins and they wouldn't even consider having a pasta machine in the house! When it comes to rolling, the main problem you'll have is getting the pasta thin enough to work with. It's quite difficult to get a big lump of dough rolled out in one piece, and you need a very long rolling pin to do the job properly. The way around this is to roll lots of small pieces of pasta rather than a few big ones. You'll be rolling your pasta into a more circular shape than the long rectangular shapes you'll get from a machine, but use your head and you'll be all right!
- If using a machine to roll your pasta, make sure it's clamped firmly to a clean work surface before you start (use the longest available work surface you have). If your surface is cluttered with bits of paper, the kettle, the bread bin, the kids' homework and stuff like that, shift all this out of the way for the time being. It won't take a minute, and starting with a clear space to work in will make things much easier, I promise.
- Dust your work surface with some Tipo 00 flour, take a lump of pasta dough the size of a large orange and press it out flat with your fingertips. Set the pasta machine at its widest setting - and roll the lump of pasta dough through it. Lightly dust the pasta with flour if it sticks at all.
- Click the machine down a setting and roll the pasta dough through again. Fold the pasta in half, click the pasta machine back up to the widest setting and roll the dough through again. Repeat this process five or six times. It might seem like you're getting nowhere, but in fact you're working the dough, and once you've folded it and fed it through the rollers a few times, you'll feel the difference. It'll be smooth as silk and this means you're making wicked pasta!
- Now it's time to roll the dough out properly, working it through all the settings on the machine, from the widest down to around the narrowest. Lightly dust both sides of the pasta with a little flour every time you run it through.
- When you've got down to the narrowest setting, to give yourself a tidy sheet of pasta, fold the pasta in half lengthways, then in half again, then in half again once more until you've got a square-ish piece of dough. Turn it 90 degrees and feed it through the machine at the widest setting. As you roll it down through the settings for the last time, you should end up with a lovely rectangular silky sheet of dough with straight sides - just like a real pro! If your dough is a little cracked at the edges, fold it in half just once, click the machine back two settings and feed it through again. That should sort things out.
- Whether you're rolling by hand or by machine you'll need to know when to stop. If you're making pasta like tagliatelle, lasagne or stracchi you'll need to roll the pasta down to between the thickness of a beer mat and a playing card; if you're making a stuffed pasta like ravioli or tortellini, you'll need to roll it down slightly thinner or to the point where you can clearly see your hand or lines of newsprint through it.
- Once you've rolled your pasta the way you want it, you need to shape or cut it straight away. Pasta dries much quicker than you think, so whatever recipe you're doing, don't leave it more than a minute or two before cutting or shaping it. You can lay over a damp clean tea towel which will stop it from drying.
See details
BASIC BISCUITS RECIPE | ALLRECIPES
This is a good basic biscuit recipe, and my husband loves it. I use canola oil, and it turns out well enough for me. Sometimes I use 1/2 whole wheat flour as well. If I want them a bit fluffier, I add more milk and less oil. Good basic recipe.
From allrecipes.com
From allrecipes.com
See details
BASIC FONDUE RECIPE | ALLRECIPES
This recipe is awesome, better than the Melting Pot in my opinion. I cut the recipe in half and used 1 garlic clove, 1/2 cup of milk and a 1/2 cup of Amberbock. As other users had suggested I coated …
From allrecipes.com
From allrecipes.com
See details


